How to properly equip the sauna inside? The simplest steam bath inside consists of a dressing room and a washing room. As a rule, there is no separate pair department. More "advanced saunas" consist of three sections: dressing room, steam room, washing department.
But, in addition to the bath compartments, there are also windows, doors, shelves inside. Progress did not pass them by, but much remained unchanged. It is advisable to start equipping a bath with doors, windows, bath shelves.
Doors and windows should be significantly smaller than the dimensions that are customary to install in residential premises. So, warm air will be well retained inside the bath and steam room.
The secret of installing sauna doors is that they open from the sauna - outward. A threshold is required, up to 15 centimeters high. Inside the bath, the threshold, coinciding with the floor, forms a gap - this is the arrangement - additional ventilation in the bath.

There are many variations of door types, one of them is made of boards. The door frames for the internal doors of the bath do not have to be massive. The main thing here is not the power of the doors, but their ability to keep warm.
Outside, the doors are insulated, for example, moisture-resistant plywood is used.
There is another variation of the door, which is finished with two wooden frames. The sizes of these frames will vary.
The outer frame should fit exactly under the doorframe so that the doors fit snugly enough to the edges. The edges are made slightly beveled.
The outer and inner frames are trimmed with plating and filled with heat-insulating material. The inner frame is then screwed onto the outer frame.
There are vapor and moisture resistant doors. They are made from one frame and fiberglass sheet. The gaps that remain between the sheets are filled with material that will provide heat retention.
Constipation on such doors is also placed at the top. To avoid burns, the upper constipation is usually made of wood. At the bottom, you can simply put a hook made of metal. But in the steam room, no metal latches, latches can be made.

The door handles are made of wood. There are no requirements for installing such handles, so you can safely make them from what you can get your hands on. And you can save a little on this. Walk through the woods, look for the necessary material and go for it.
But do not forget, for safety reasons, to treat the finished handles with a material that will protect the door handle from strong heat.
Insulated doors are quite heavy, so they are mounted on three canopies. It is advisable to purchase door hinges made of brass - they do not rust.
Bath windows
Previously, there was only one window inside the bath, now there are many more windows in the baths. But, as before, the optimal dimensions are unchanged today. They should be 40 to 60 cm high and 60 to 70 cm wide.
The general rule for installing windows: the total glazing area should not exceed 5% of the bath floor area. The lower the window is inside the sauna room, the better the heat and sauna heat will be retained.

All efforts in arranging the bathing world are directed towards keeping the bath warm and hot for a long time. Therefore, it is desirable to have double glazed windows.
Window frames are made sealed, without any metal latches, latches, etc. All the iron in the steam bath will sooner or later rust.
Windows can also be placed on the doors in the steam room. The size is selected independently. Try to arrange them so that you can easily look out of it from a lying, standing or sitting position.
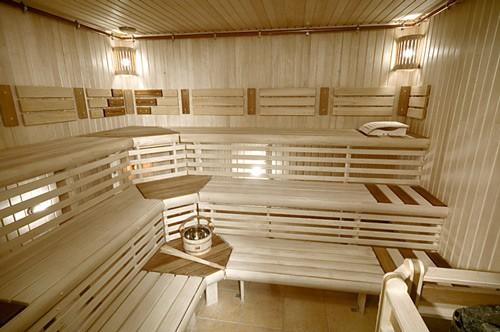
Sauna shelves are made in three stages, if there is enough space. Usually this is a kind of a series of wide steps. And at the top it is customary to bathe while lying down. Therefore, the top shelf is made wider.
The material for the shelves is linden, aspen, and poplar. These tree species do not have resin and dry quickly. They do not heat up so much that they can burn the body. In addition, these hardwoods are less prone to rotting.
It is advisable to make the edges of the shelves rounded, so you can protect yourself from minor injuries.

The distance from the top to the ceiling is usually made a little over a hundred centimeters. The distance between the center and top shelves should be less than fifty centimeters. So it is more convenient to steam with a broom, you will not touch anything superfluous with it.
The higher the shelves to the ceiling of the bath, the more heat there, therefore, this is the place for desperate steam room lovers.
When there is not enough space inside the bath, the shelves are made removable, rising. This is a plus for good cleaning, bath washing, drying, ventilation.
But, I remember a case when we did not keep track of the state of the fasteners, and the rotten boards, simply under the weight of our bodies with a friend, safely came off. Here we had bruises! 🙂
The arrangement of the bath is a very interesting activity. After all, a lot will depend on how you put everything together and set it up: thermal insulation in the bath, fire safety, and so on.
Whether such a bath will be a joy depends only on you, your knowledge and efforts.
With free space on land plot, you can build a strong and very functional bath. Moreover, the last factor is due to the competent design of the premises, their decoration and furnishings. Regardless of the size of the building, premises such as a steam room and a hallway with a wardrobe should be equipped inside.

But such an economy option can hardly be called comfortable enough, therefore, among the rooms recommended for design, decoration and equipment with all the necessary rooms, the following can be distinguished:
- shower, washing or washing. Here, basic hygiene procedures will be performed in the form of a shower. The room can be equipped with a small font and a bucket-waterfall for pouring;

- separate bathroom. It is unnecessary to talk about the purpose of this room. It is especially important to allocate a room for a toilet in two-story bath houses with a kitchen and a sleeping place;

- relaxation area with dining room. This room is intended for relaxation after the procedure of vaping, drinking tea. The zone can be supplemented with a fireplace, a seating area and other furniture and decorations;
- kitchen area. Relevant for large baths, which are often used by large companies. The kitchen area can be small and consist of an electric stove, a kettle and microwave oven... Sometimes the kitchen is supplemented with a phytobar, equipping a rack with high chairs and a cabinet for storing packages with elite varieties of teas and medicinal herbs;

- pantry. A small room with shelves and cabinets should be allocated for storing bath sheets, towels, hats, shoes, etc. Here it is worth storing household chemicals for cleaning, so as not to litter the shower room with it;
- sleeping area. For example, the second floor can be allocated for a separate bedroom. It will be pleasant for arriving guests to settle here if there is not enough space in the house;
- boiler room for boiler equipment;

- billiard room;
- solarium;
- pool;

- laundry. It is recommended to design next to the shower room for ease of installation of water supply and sewerage wiring. The laundry room can be equipped with a washing machine, drying cabinet or conventional floor / wall dryer, ironing board for bath linen;
- veranda or terrace;

- a small vestibule (important for baths, which are used all year round).

Depending on the available budget, it is possible to equip only some of the proposed premises, for example, a bathroom, a shower and a recreation area. If the plans include the construction of a truly luxurious health-improving complex, and it is not difficult to pay a "tidy sum" for comfort, you should think about including all the aforementioned premises in the estimate.

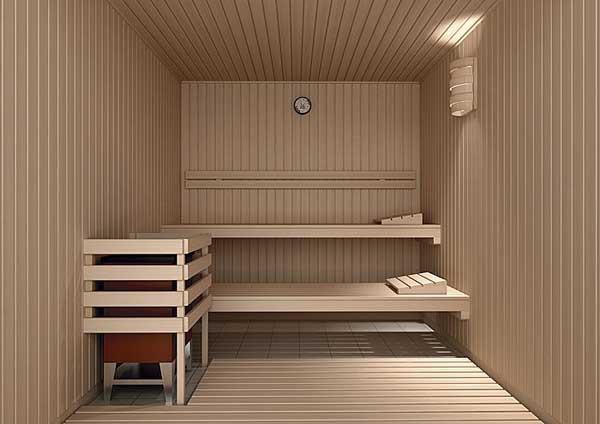
Steam room arrangement. 1 - foil. 2-insulation. 3-membrane. 4-plinth ceiling made of wood. 5-plinth floor wooden. 6-vent valve. 7-ceiling made of wooden lining. 8-light. 9-floor made of wood. 10 shelves. 11 thermometer and hygrometer. 12-back shelf. 13-chimney. 14-water tank. 15-heater. 16-oven bath. 17-protective shield. 18-non-combustible base under the oven. 19-door to the steam room. 20-bath accessories. 21-light therapy or diode illumination.
It is customary to equip the steam room on the first floor of the building. The entrance to the steam room can be from the shower room or dressing room. The door to the steam room is installed from tempered glass or wood, strictly without metal decorations, inserts and fittings (with the exception of hinges), because the metal can heat up and burn the visitor. For one steaming person, it is customary to allot 1-2 meters of square floor space. The stove will take about a meter more. Accordingly, the comfortable dimensions of the steam room are 3-5 sq.m. Too large a steam room with high ceilings is not worth doing - it will take a lot of time and fuel to warm up the room, and the air will dry out from a hot stove.


Video - The optimal size of the bath and steam room
The height of the ceilings is arranged from 2.2 to 2.6 m, depending on the height of the owners of the bath and the height of the shelves, which in turn can be 1-3 tiered. The shelves themselves are made so that it is comfortable to sit on them, lie down, and a bather with a broom could stand nearby and perform bath procedures. Upper shelf make the widest, and the recommended height of each tier is 35 cm. It is better to sew up the space under the shelves in order to reduce fuel consumption for heating the unused area of the room.

It is advisable to make the shelves from hardwood, the use of cedar / larch is permissible. Wood can be combined, but it must be of good quality - dry, free of knots, resin pockets, traces of rot and mold, carefully sanded. For convenience, it is worth buying or making do-it-yourself headrests made of aspen or linden, as well as a tub and a bucket with a long handle. It is imperative to hang a bath thermometer with a hygrometer in the steam room to regulate the degree of heating and air humidity.
 In the photo - a pointer thermohygrometer and an hourglass

The lighting in the bath is rarely made bright. Basically, ceiling and wall lamps are covered with wooden shades / lampshades, so that a soft twilight reigns in the steam room. Additionally, a diode tape can be used for color therapy, as well as an optical fiber to create the effect of a starry sky.


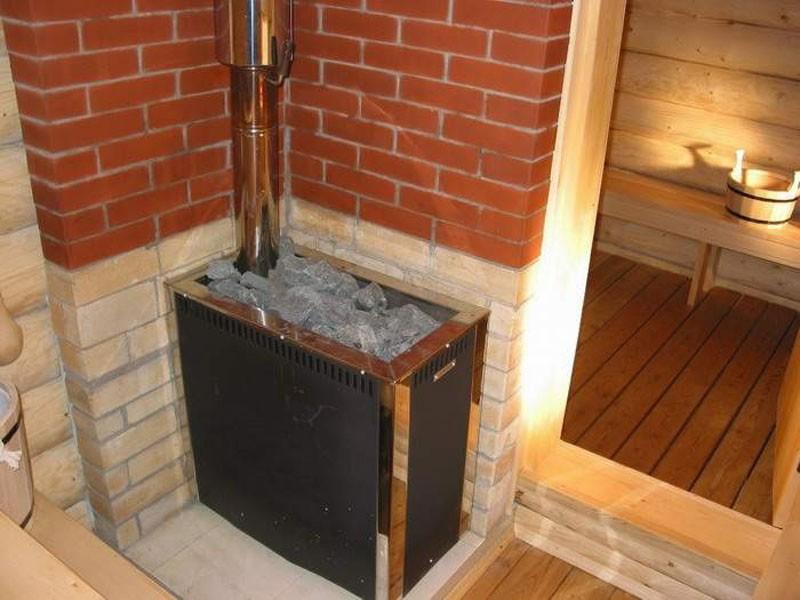
The stove is usually located closer to the door. Moreover, the heater can be made of bricks or made of steel (wood-burning, electric).
 Sauna stove at the entrance to the steam room
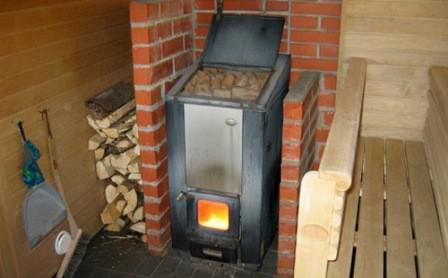
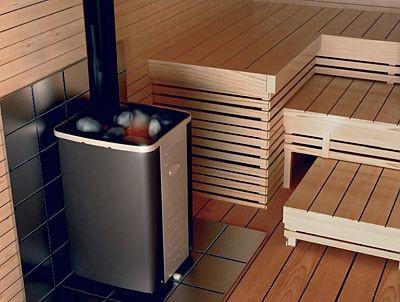 Sauna heater installed on ceramic tiles
It is extremely important when installing the stove to properly insulate the wall, floor, as well as overlap in the place of its contact with the outgoing chimney. The stove is placed at a distance of at least 10-15 cm from the wall, if the firebox door goes into the steam room, if the sauna stove is located simultaneously in two adjacent rooms and the fire door is brought out to the dressing room, a recess is cut in the interior partition that exceeds the dimensions of the furnace by 10 -15 cm on each side of heating surfaces. Insulation is carried out by means of asbestos cardboard, bricks, ceramic tiles, stainless steel sheets.

Separately, it is worth considering the options for decorating the walls, ceiling and floor. In addition to the standard lining and wood flooring, there are some interesting ideas.
Table. Steam room wall decoration
| Material | Benefits | Features of the | Mounting method |
|---|---|---|---|
| Salt crystals or halotherapy blocks in your own steam bath / sauna | Have a pronounced therapeutic effect on the body as a whole, respiratory system and the skin in particular. | Salt crystals are installed in dry steam saunas. The maximum evaporation of trace elements occurs at 60 degrees, but already at 75 degrees the blocks turn into a salt solution. Do not allow salt bricks to come into contact with water, because the salt dissolves in it. | Salt crystals are used to make spectacular rectangular wall inserts; it is also possible to decorate one or more walls from floor to ceiling. Facing with salt blocks is combined with diode or other illumination; two-component quick-setting glue is used to fix the masonry (curing time from 10 minutes). |
| Wild stone or decorative brick | The uniqueness of the interior, the unusual combination of stone with wooden surfaces. Improved fire safety. When using medicinal rocks, for example, soapstone or jadeite, additionally - a healing effect. | The stone can be used to revet both a part of the wall behind the stove and the entire wall behind the heating device. Sometimes stones are attached instead of plinths to the floor and ceiling. It is worth remembering that the stones in the sauna get very hot, so they should not even be allowed to accidentally come into contact with the skin of the visitors of the sauna. | If a wooden wall is faced with a stone, you will need to fix construction waterproofing paper on it (overlaps on all sides 4-8 cm). On top of the waterproofing layer with galvanized staples or nails, a paint net should be fixed (the spacing of the fasteners vertically up to 15 cm, horizontally - up to 40 cm, at the corners the mesh is laid in two layers). The mesh is plastered, and after drying 1-1.5 plaster layer, facing stones are laid out on a cement-sand mortar. It is recommended that the stones be laid out on the floor first and numbered for convenience. It is better not to use stones that are too heavy for facing. |
| Ceramic tiles, porcelain stoneware, polished natural stone tiles | Fire safety, aesthetics, steam room interior decoration, durability. | All of these tiles are laid on the wall behind the stove (all or only part of the wall). Tiles with a thickness of more than 10 mm are installed using metal fasteners and pouring cement-sand mortar / glue / mastic into the joints. | The tiles are fastened to the plastered wall surface. For fixing the tiles, highly specialized adhesives are used, for marble - on a latex or polyurethane base (anhydrous). Laying is carried out from the bottom up, the seams are laid with crosses or wedges to maintain the same thickness. |
| Cork moisture resistant coating | Suitable for both additional wall insulation and finishing. | Plates are used with a thickness of 20-40 mm. | Installation of panels on the wall is carried out using a specialized adhesive for cork coverings. It is permissible to use a cork skirting board to equip a steam room. |
Table. Materials for arranging flooring in a steam room
| Material | Benefits | Features of the |
|---|---|---|
| Beautiful, durable, noble looks. | Cold enough, it is desirable to install underfloor heating systems under the porcelain stoneware coating. Must be non-slip. Seams are treated with moisture resistant grout to prevent the spread of mold and mildew. | |
| Shock absorbing, warm to the touch, and goes well with wood surfaces. Not slippery. | Suitable for use in a steam room, because the floor temperature rarely exceeds 30-40 degrees. | |
| Wooden boards and wood rugs | Such coatings can be laid on concrete or porcelain stoneware. | Treatment with moisture-proof impregnations and periodic air drying is required. |
Note! It is unacceptable to use any plastic, rubber coatings, linoleum, PVC tiles and panels for arranging a steam room. Decoration Materials and furniture when heated should not emit a chemical smell, resin.
The ceiling in the Russian bath has long been made of timber, lining, boards. It is wooden surfaces that tolerate high temperatures well, fill the bath pleasant aroma and do not contribute to the accumulation of condensation - wood tends to "breathe".
There is no point in painting the ceiling, covering it with plywood, chipboard, or plastering - high humidity and temperature will quickly ruin such a finish. IN Turkish baths mosaics are often used to decorate the ceiling, but it is worth remembering that the humidity and temperature in hammams are much lower than in Finnish and Russian steam rooms. It is possible to use a cork coating Termokork with a thickness of 100 mm, specially designed for the ceilings of baths (cost 3900-4000 rubles per 1 sq. M).

It is advisable to equip the steam room with one window. A particularly eccentric option is a panoramic full-wall blind window. Such a window allows you to admire nature from your own steam room, while the mirror coating on the outside will not allow the curious to look inside. But remember that the larger the window, the more heat loss.
The most common option is a single opening window 60x60 cm or 40x60 cm. The window is not placed on the wall behind the stove or sun loungers. The height from the floor to the bottom sash cannot be less than 170 cm - this is the height that implies effective ventilation of the room (natural air circulation). The frame can be made of wood or high-quality plastic that can withstand temperatures up to 120 degrees.


Sometimes glass blocks are inserted instead of a window. They allow you to save on lighting the steam room during the day.
Arrangement of a shower or washroom
The shower room can be organized as a separate room or adjacent to the steam room, for example, separated only by a glass damper or a glass block partition. A cabin can be installed here or a shower tray with a drain for water drainage can be organized. If a large number of visitors are planned, then it is recommended to install two or three showers.
Directly in the shower, in addition to the shower itself, there should be a bench, a mirror, as well as hooks and non-traumatic shelves for toiletries.
Often, the washroom is completed with a douche bucket and a bathtub made of acrylic or cast iron. Also, fonts are installed in the washing room, especially if there is not enough space for arranging a full-fledged pool.
The temperature in the shower room should be higher than in the dressing room, but significantly lower than in the steam room.
Hot water supply is organized by connecting to a central water supply, installing a boiler or installing a heat exchanger and a remote water tank (from 80 to 120 liters).
The diversion of water is organized into a central sewerage system, a septic tank or a drainage well. A drain is installed in the shower room (the floor is poured or laid with a slope towards the drain funnel), from which waste fluid is drained through a pipe with a diameter of 110 mm. One person needs about 50 liters of water to take a shower, respectively, using this figure, you can calculate the volume of a septic tank or a storage cesspool for a bath. By the way, treatment and storage installations should not be located near the walls of the bath or underground - bad smell will enter the room. It is recommended to mount a local installation 5-10 m from the walls of the bath.
Coating options for wall, floor and ceiling cladding are shown in the following table.
Table. Arrangement of a shower in a bath
| Material | Features of the | Finishing example, photo |
|---|---|---|
| Wood | Showers adjacent to the steam room are often trimmed with wood so as not to violate the general style of the premises. Wood does not tolerate constant moisture - fungus develops, rot appears. It is worth considering the possibility of installing a shower tray or cabin in order to minimize the effect of moisture on the material of the walls and floor, as well as regularly dry the boards, and carry out treatment with antiseptics. | |
| Wood Ceramic tile, porcelain stoneware, mosaic | These materials are most appropriate in the shower, but it is important to choose products with a non-slip surface, and trowel the seams with compounds that prevent the formation of mildew. It is recommended to install wooden or rubber mats on the tile floor. | |
| PVC panels | This material can be used for walls and ceilings only in showers, not adjacent to the steam room. Plastic does not tolerate exposure to high temperatures, but high humidity is not afraid of it. The panels are easy enough to install, wash, but the strength of the material leaves much to be desired. | |
| Natural stone | This solution is not to everyone's liking due to the extraordinary interior and the coldness of the coating. However, the stone tolerates high humidity and is quite suitable for cladding the walls of the shower room. |
Video - An example of finishing shower ceramic tiles
Don't forget about ventilation in the shower room. A hood with an electric fan should be located under the ceiling. For natural ventilation, it is worth placing a small opening window closer to the ceiling, this is especially true for wooden baths and showers with timber trim, clapboard.
Advice! So that less heat escapes from the shower, it is recommended to equip a threshold at the entrance to the room, as well as install a door of a small height (from the standard 2.37 m, 2.07 m, 2 m and 1.87 m, the smallest is chosen, and this value should be reduced further 10 cm). The justified width of the doorway is 75-80 cm.
Bathroom
The bathroom can be a separate room or be combined with a shower. In the first case, in addition to a toilet or dry closet, it is recommended to install a washbasin with a mirror, a cabinet, a shelf, a paper holder in the room. The decoration of a separate bathroom can be absolutely any, from classic cladding with tiles and plastic panels to cork, linoleum, a combination of various materials.


Toilet ventilation is very important. According to the rules, up to 50 cubic meters of fresh air should be supplied to a toilet room with 1 toilet bowl every hour.
Often a heating radiator is installed in the toilet so that it is comfortable in the cold season. It is also worth placing a boiler here so as not to spoil the interior of the washing room.
In the case when it is planned to install a toilet bowl in the shower room, it is worth equipping two forced draft hoods. One will not allow moisture to accumulate under the ceiling, the second will ventilate the space above the toilet.

The decoration of the shower room with a toilet is made in the same style; for convenience, the toilet is installed in the far corner of the washing room and is fenced off with a partition, curtain, screen. It is unacceptable to use materials like linoleum in the shower room. Standard options for finishing with tiles, clapboard, mosaic, stone, plastic, etc. are used.
The drainage of water from the toilet can only be carried out into a local treatment plant or a central sewerage system. If floors of a leaky type are arranged in the bath, a sewerage network must be provided separately for the toilet (or an independent mobile dry closet is installed, for example, of a composting or liquid type).

Of course, every private developer designs a bathhouse, relying on their own capabilities and preferences, but it is worth familiarizing yourself with federal regulations prescribing the rules for arranging baths in general and latrines in particular:
- SanPiN 983-72, 2.1.2.2645-10 and 42-128-4690-88;
- SNiP 30-02-97;
- SNiP 31-05-2003;
- and for organizing a shower and toilet for a disabled person, you should pay attention to the second edition of the comprehensive design manual the environment for persons with disabilities (from 1997, prepared by the Moscow Committee for Architecture and Construction).
Files to download:
Plumbing dimensions
Dressing room and wardrobe
The dressing room is the last room that must be on the first floor. This room can be large and spacious or very tiny. In any case, there must be an entrance to the shower room from the dressing room. Dressing rooms are most often made of wood to emphasize the style of the bath. It is advisable to arrange wooden furniture.
The recommended air temperature in the dressing room is 26-28 degrees. Ventilation can be natural, for which opening windows are installed, which in turn are a source of additional light during the daytime. Artificial lighting should be made quite saturated (chandelier and wall sconces), but not harsh.
The dressing room can be combined with a dressing room if the entire bathhouse is small. In this case, you should be guided by the following recommendations:
the height of the ceiling should be greater than the height of the person, taking into account the raised hands. Optimally - 2.4-2.6 m;
- the number of seats, hooks and shelves for clothes should correspond to the expected number of visitors to the bath;
- the floor in the dressing room and dressing room should be warm and non-slip so that it is comfortable to walk barefoot. For example, you can install a "warm floor" or lay a carpet;
- it is worth providing one or more electrical outlets;
- it is recommended to equip the dressing room with a mirror.
By the way, the dressing room can be combined with the kitchen area by installing a corner kitchen set with household appliances... If you plan not only brewing tea in the kitchen, but also full-fledged cooking, you need to install a separate hood, as well as plan the laying of water and sewer pipes to connect the sink.
Advice! Do not install kitchen cabinets under the stairs to prevent dust from falling from the steps onto the dishes.
Video - Dressing room design
Second floor
In the photo - a cozy bedroom in the attic of the bath
Everyone decides on their own how to equip the second floor. Whether there will be a bedroom upstairs, a billiard room, a solarium or a simple storage room depends on the size of the bath and the budget of its owner. However, we strongly recommend installing a safe staircase with wide steps between the floors, and supplementing the residential floor with a small balcony.
Equip the bath so that you feel cozy and comfortable in it.
Video - Sauna with billiards project
Video - Building a bath with a font


The steam room in the bath is the main room. It is in it that the stove, sun beds and other interior details are located, which are necessary for the correct organization of the process of receiving procedures.
That is why the question of how to equip a bathhouse inside should be considered separately, paying attention to even the smallest details.
Steam room interior decoration
First of all, it should be noted that when arranging all items, you need to focus not on design qualities and beauty, but on functionality and convenience.... Fire safety considerations should also be followed to prevent fire.

Bake
- This device is the main one in this room. It is it that creates and maintains the required temperature, which means that special attention is paid to its installation.
- First of all, it must be said that the seat for the furnace must be made at the stage of making the foundation. This is due to the fact that the device requires a solid and reliable base.
- The standard arrangement of the steam room of the bath assumes that the stove will be located in the corner farthest from the entrance door. This is necessary in order to reduce heat loss when visiting the room.

- At the same time, professional masters advise to immediately install protective screens. Their function is to protect wooden surfaces from infrared radiation.
- Such a screen is made of brick or natural stone. However, professional bath attendants advise using factory-made products with a reflective surface, which will redirect radiation to the center of the room, increasing the level of heating.

- If the design of the stove is for water, then it should be installed in such a way that there is convenient access to the container.
- Considering all these features, the internal arrangement of the steam room begins with the oven.
Advice!
Quite often, factory products are sold along with protective screens and detailed instructions for a quality installation.
These instructions must be followed carefully as they were designed specifically for these models.

Warming
- This type of work can also be attributed to the arrangement. This is due to the fact that it is thanks to him that you can reduce energy consumption for heating and increase the thermal capacity of the room.
- For decoration, wooden materials are used, which are usually fixed on the crate. This makes it possible to install almost any insulation.

- In order for the room to retain heat well, the installation instructions recommend using a material that has a layer with a reflective surface. Thanks to it, infrared radiation is redirected into the room, which makes it possible to increase the heating level.
- It is worth noting that special adhesive tape with the same reflective surface should be used to organize the joints. As a result, the insulation must create a complete seal.

Interior items
- When creating a steam room with your own hands, you need to correctly think over the location of all interior items. This is especially important if the room is small.
- Considering that the stove is installed at a certain distance from with multi-level shelves, it should be placed on the opposite wall.

- Some craftsmen prefer to make two or three levels of shelves in the steam room. This will save space and at the same time make it possible to get a complete and functional interior.
- When creating sun loungers and shelves, it is necessary to focus on the personal preferences of users and their dimensions. However, it is worth remembering that there are standard solutions that have proven their effectiveness in a year of use and they can always be adapted to specific technical conditions.
- Many bath attendants strongly advise installing a special thermometer in the room. Its price is not very high, but it is thanks to it that you can control the heating level.

- This device should be mounted next to the front door. This place can be considered the coldest and all indications should be taken with this feature in mind.

Output
In the video presented in this article, you will find additional information on this topic. Also, based on the test, which is set out above, it can be understood that the arrangement of a steam room in a bath requires strict adherence to all instructions in order to get an interior with maximum functionality, which is very important for this room.
The correct arrangement of the bath will make the rest comfortable and extend the service life of the building. High-quality finishing and careful selection of the interior will protect wooden materials from dampness and insects, decay and mold, and a person from burns and allergies.

The choice of material for finishing
Decorators advise using linden. This is an affordable raw material that does not heat up at a temperature of 80-120 degrees above zero, therefore it does not burn the skin. Wood absorbs moisture well and does not damp.
The pleasant honey scent of linden and healing properties will create a cozy atmosphere in the room and will have a healing effect for humans. A delicate light shade of wood will harmoniously fit into the interior.
Never use pine. When heated, it emits resins, which makes it impossible to stay in the steam room. Do not use wood-based panels or linoleum for interior decoration of the steam room and washing room. Materials release toxic substances that are harmful to health.
Fiberboard and particleboard are also toxic when heated. In addition, they are fire hazardous and swell strongly when they absorb moisture. Such materials are not suitable for finishing a washing or steam room, but they are suitable for arranging a rest room, a terrace or a summer kitchen with a bath.

Euro lining is the best material for lining a bath. The thin, smooth panel improves air circulation and flattens the walls. Environmentally friendly wood does not emit harmful substances and improves human well-being.
Choose the linden paneling of the Softline profile. Smooth and soft lines of the slats will make the room neat and refined. And the simple principle of fastening the tongue and groove will speed up the installation. You can easily install the lining yourself.
Insulation and cladding of walls and ceilings in the bath
After you bought the materials, let the clapboard sit in the bath for 1-2 days. Then get to work.
Preparatory stage
Fill any bumps and dents in the walls and ceiling. By the way, the lining has excellent quality aligning the walls.
Creating the lathing
If you lay the lining without a frame, then the walls may turn out to be uneven and will last less. The lathing is made of bars of the same size, which are placed at a distance of 50-60 cm from each other.
We spread the insulation
Between the bars, continue the film or foil with an overlap of 5-10 cm thick. It will protect the insulation from moisture. Then, on top, lay mineral or basalt wool, which will perfectly insulate the room.
To prevent the heat from escaping, do not leave gaps or gaps between the cotton slabs. Put a thin layer of cross-linked polyethylene on top of the insulation and secure with strong tape.

Installation of lining
The lining is laid horizontally or vertically, depending on taste preferences. The vertical method will allow the air to warm up to 100-120 degrees above zero. It will visually stretch the walls and increase the height of the ceilings. The horizontal method is faster and easier to install. It will provide good ventilation and increase the life of the materials.
In both cases, the installation starts from the corner. To fix the lining, clamps, nails and self-tapping screws are used. Remember that they should only be stainless steel. Otherwise, brown spots will appear on the walls.
Wall and ceiling treatment
In order for the lining to last a long time, the surface is covered with varnish and paint, fire retardants and antiseptics. The products will protect wood from scratches and insects, dampness and decay, mold and mildew, open fire.

Steam room floor decoration
In the steam room, it is better to raise the floor by 15-20 cm, this will improve the thermal insulation in the room. For flooring, an edged board or tile is used.
- The boards are laid on wooden logs as tightly as possible to each other. It is better to round the edges of the boards so that there are small gaps. This will make cleaning easier and speed up the drainage of water. The boards are fastened with self-tapping screws.
- Tile is not afraid of dampness and does not rot like wood. For laying the tiles, first make a screed and level the surface. The tiles are placed on special glue and the seams are treated with a special moisture-resistant mixture. It will prevent moisture from getting under the cladding and forming mold. Remember that for tile it is necessary to make a wooden shield so as not to slip.

Installation of windows and doors in the bath
It is also better to choose linden as a raw material for windows and doors, all according to the same characteristics. Wood withstands high temperatures, does not burn and does not damp.
The size of the windows should be selected depending on the purpose of the room. It is better not to install a window in the steam room at all. If there is such a need, then choose a small window to minimize heat loss. Choose windows with heat-resistant glass!
Install a large window in the dressing room and rest room. It will give a lot of light, visually increase the space and simplify ventilation. To keep the room warm for longer, place the window closer to the floor and use double frames.
For a bath, it is necessary to install at least two doors - an entrance door and a door to the steam room. In addition, the layout may require a door to the recreation room, shower room and other areas.
There are three types of doors that are suitable for a bath or sauna:
- Deaf (completely wooden) - a great option for the main entrance;
- Glass - made of heat-resistant glass, suitable for rest rooms and steam rooms;
- Combined - wooden doors with a glass insert suitable for a shower or rest room.
The choice of the type of door and window depends on the tastes of the customer. The company "Bath Furniture" presents a catalog with a wide selection of windows, doors and fittings of various configurations and sizes.

Sauna shelves and furniture
The final stage will be the installation of shelves, benches and other pieces of furniture and interior design. The shelf is the main element for arranging comfortable placement in the steam room. As a rule, the shelves are arranged in steps of 2-3 tiers. There may be more rows. But keep in mind that the distance between the lower level and the floor must be at least 80 cm.
Also for the arrangement you will need benches and benches. Be careful when checking the quality of such products. Items should not creak or wobble. Choose a smooth surface free of knots, burrs and roughness.

Cooperage products will make your stay in the sauna comfortable and enhance the healing effect. Items are designed to store and use water. The Bath Furniture company offers:
- mugs and ladles
- buckets, tubs and gangs
- pouring devices
- cover.
To equip a dressing room or rest room, choose tables and benches, sun loungers and armchairs, furniture sets. Don't forget about accessories. You will need hangers, a mirror, cabinets or drawers.
Comfortable furniture and accessories will transform the premises. They will allow you to relax as much as possible and enjoy outdoor recreation, have a great time in a friendly company.
The construction of a bathhouse on the site is the dream of many suburban real estate owners. It is especially pleasant if there is an opportunity to make the arrangement of the bath with your own hands. Many construction companies offer turnkey bath construction services and options for building a house with a sauna. But in this case, there is no guarantee that such a building will meet your aesthetic and all other needs. Having engaged in the arrangement of a wooden bath on your own, you can realize your idea of what a real Russian bath should be like.
Building a bath is not as easy as it might seem. In order for it to fully correspond to its purpose, to be cozy and outwardly attractive, before starting construction, you should carefully calculate everything, familiarize yourself with the options offered on the Internet or read special literature. The construction of a house and a bath has its own immutable laws, failure to comply with which can lead to disastrous results. Therefore, you need to seriously consider the solution to this issue, starting with the choice of a place for a bath on the site.
Relaxation room in the bathhouse - comfort for yourself and your friends
In principle, all saunas are arranged in the same way: dressing room, changing room, washing room, steam room. But everyone is satisfied with the arrangement of the bathhouse inside to his taste. The modern bath is used not only for utilitarian purposes. Often, the bathhouse is equipped with a relaxation room where you can get together with friends, have a party, or just relax and take a nap after taking bath procedures. To equip the rest room in the bath, you can use the dressing room.
The dressing room is made so that cold air does not penetrate into the main rooms of the bath. Bath inventory, firewood or coal are kept here. But if it is well insulated and the interior decoration is approached correctly, then you can make a very cozy rest room. The furnishings and design are selected depending on the size of the room. When choosing furniture and interior items, it is better to focus on materials that are resistant to adverse conditions. Wooden and wicker furniture is excellent for this purpose. When arranging a Russian bath, a room decorated in rustic style... However, the choice of interior design for arranging a bath in the country is a purely personal matter. Everyone presents comfort in their own way.
A good steam room is the most important thing in a bath
 As for the main premises, the internal arrangement of the bath must be carried out taking into account certain rules. The size of the working areas of the bath is determined by the overall dimensions of the building, but optimal ratio steam rooms, washrooms and changing rooms are considered 1-1.5-2.
The most important room of the bath is the steam room. Its size is calculated taking into account the number of people who will simultaneously take bath procedures. You should not make the steam room too large, as it will take too much energy and raw materials to heat it, and the result may be ineffective. The room must be maintained at a constant heat and the heat spread evenly. All surfaces of the room are well insulated, and inside they are sheathed with clapboard. Ceiling height should not be more than 230 cm.
To equip a steam room in a bath, wood with certain properties is used. Low thermal conductivity, moisture resistance, resistance to decay and strength are the main requirements for wood used to equip a bath from the inside. Such qualities are possessed by aspen, linden, larch, and Canadian cedar.
A stove is installed in the steam room. It can be wood or electric. The arrangement of the stove in the bath depends on the energy source used, the size of the room and the required power for efficient operation.
 - an important stage in the installation of the furnace. The chimney is needed for the removal of combustion products and the flow of air necessary for fuel combustion. A properly equipped chimney system provides good draft, which does not allow smoke to linger in the room, heat to the outside and helps to maintain a constant temperature in the room. A good ventilation system is also needed.
The main element of the arrangement of the steam bath is the shelves. They are mounted along the walls of the room in 2-3 tiers (almost like when arranging a sauna). It is advisable to make the top shelf wide enough to lie on it. The dimensions and height of the shelves are determined by ergonomic rules. They should be comfortable to sit or lie on, use a broom and not interfere with neighbors.
A modern washroom in a bath is not a basin of hot water
 For the arrangement of the washing bath, similar materials are used. The walls are sheathed with clapboard. The floor is made of moisture-resistant and least rotting varieties of wood. Aspen and larch are well suited for arranging the bath floor.
The floor in the bath must be warm. When laying it, a rough flooring is arranged, heat-insulating and waterproofing materials are installed. So that water does not linger on the surface of the floor, it is built at an angle (about 10?). Water flows into a recess along one of the walls, and then goes into the sewer or septic tank.
If it is not possible to connect to the hot water supply system, a water heater is installed in the room. For convenience, you can place a bench, shelves for accessories and cosmetics in the washroom.
A warm locker room in the bath is not a whim, but a necessity
The locker room in the bath should be spacious and warm enough. If possible, then it is worth equipping the toilet. This will not be superfluous, especially if it is supposed to spend a lot of time in the bath. The changing room interior can include comfortable benches, lockers for clothes, shelves for small items, towel racks, a mirror. These little things will make the preparation for bath procedures convenient and comfortable.
Video - Interior decoration of the bath