03.09.2016 17528
When installing a solid door, you need to think about reliable locks. Metal door leaves are usually sold already complete with a lock (or even two), but a door made of natural wood is not always equipped with a locking mechanism.
In order to accurately put the lock without spoiling the wooden surface of the door leaf with inept actions, it is best to contact a specialized organization. The price (for the work of a specialist) will depend on the design features of the door, the type of locking mechanism and the total amount of work. At the same time, a professional installer will not only help with advice when completing the locking system, larvae, armored plates), but will also provide a guarantee for his work. If you are confident that you can do it yourself, start by preparing materials and tools.
We choose: mortise or invoice
Surface locks are easier to install, as they are attached to the surface of the door leaf with screws. Padlock on wooden door does not violate the integrity of the leaf and, thanks to the fastening from the inside, can be installed on doors with a minimum thickness. Overhead modifications of locking systems are easily interchangeable, although the holes for fastening for different models may not coincide. The disadvantages of the overhead design include
- massive, long key;
- the need for masking with overlays, otherwise the lock will violate the aesthetics of the doors;
- minimum resistance to criminal mechanical loads (overhead). To increase their reliability, such a lock is usually installed on a door that opens outward and additionally strengthens the fastening of the striker plate.
Important: when choosing a patch lock, pay attention to the metal from which it is made. The steel case is the most durable, but aluminum and brass locks are too susceptible to shock.
In a wooden door they are completely invisible, but their installation requires certain locksmith's and carpentry skills and meticulousness. For manipulation, attackers only have a keyhole, so mortise locks for doors are considered more reliable. Heavy series locks (multi-girder, with vertical rods) is almost impossible to eliminate by extrusion. And even a more modest size of a lock with a single horizontal bolt plate will require the use of a metal-cutting blade or other special tools.
Locking mechanism types
Both overhead and mortise locks on a wooden door can have different security mechanisms.
- In the cylinder secrecy mechanism, coded pin, plate or disc elements are used. Primitive "English" type cylinder locks are easily opened with a master key, and high-security cylinders with Cor-Kit key cards are so invulnerable that they are even used to protect the premises of the US mint.
- The action of the lever locks is based on the interaction of the teeth of the key with the coded figured plates (levers) of the lock. The lever lock with a double-sided key has increased secrecy. Reinforced crossbars will allow you not to be afraid of sawing, a protective curtain with rotating discs will prevent unauthorized access to the levers.
- Installation is rational with increased cross-country ability. The magnetic device is intended only for doors that open outward, and electromechanical modifications do not have such restrictions. Electromagnetic locks may require an electrical connection, but an option with an autonomous power supply is also possible. A massive door will require a magnetic lock with increased pull-out force.
Important: experts advise protecting the front door with a set of two locks with different types of secret mechanism.
Currently, to protect the front door, combined locks are offered that combine two types of locks in a single body (lever and cylinder or lever and pump). They can be either dependent type (i.e. locks must be closed one after the other in a certain order), and independent (work individually).
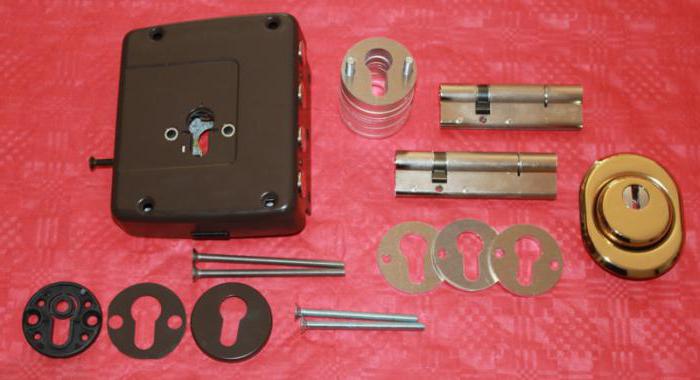
A set of tools required for work
Having chosen a lock that suits you in terms of parameters, you should select the necessary tools. does not require any special tools, it is quite possible to do with an electric drill with a set of drills and a "crown" for wood, a screwdriver, a chisel, a hacksaw for metal and a hammer. The combined square and tape measure will make the markup easier. Professional craftsmen for cutting grooves for the lock bar and grooves for the case have specialized milling cutters that allow you to do the work not only quickly, but also accurately. But it makes no sense for amateurs to buy such expensive equipment to install a mortise lock with a handle for entrance doors once.Installing a patch lock
The installation of an overhead lock on a wooden door begins with marking its convenient location and marking the size of the groove for the securing plate at the end of the door. The groove is cut to a depth that allows the plate to be mounted flush with the door leaf, without protrusions. Then a through hole is drilled to accommodate the cylinder mechanism. If a special template is included in the accessories of the product you purchased, the marking for the holes is greatly simplified.
Expert advice: the diameter of the working "crown" is chosen a couple of millimeters larger than the lock cylinder.
After inserting the cylinder and the retaining ring into the hole and pressing the body tightly against the door leaf, fix it with screws. In this case, long and short fasteners are screwed perpendicular to the canvas. Outside the door, an overlay is installed on the cylinder mechanism (also using self-tapping screws).
Some models are supplied with special mounting plates. In this case, a mounting plate is attached to the inner surface of the door leaf, and the lock body is attached to it.
Expert advice: saw off the excess length of the lock connecting rod, leaving a margin of 12 mm and firmly pressing the mounting plate to the door surface.
The final stage of work is the installation of a strike plate. It is convenient to mark its position by thickly lubricating the lock tongue with a soft lead simple pencil or chalk. We select the groove for the locking plate with a chisel, tapping on it with a hammer. Having prepared the place, we attach the mounting plate housing and the fixing plate with screws. Padlock installed!
Installing a mortise lock
Mortise door locks require a special slot at the end of the door leaf, so installing them will take more time and effort from you. To perform this laborious work, slots are drilled along the contour of the intended hole with a thin drill, to a depth equal to the length of the body of the inserted mechanism.
Expert Advice: To make the hole exactly as deep as planned, you can mark the drill with a piece of insulating tape
The remains of the tree are removed with a chisel, followed by trimming the walls with a chisel. It is necessary to achieve such a size of the groove so that the surface of the inserted lock coincides with the end surface of the door, therefore, while hollowing out the slot, periodically try on its compliance with the required dimensions. Further operations are carried out in the following sequence:
- having installed the mortise door lock in the recess, the position of the fastening plate is marked, followed by the choice of a place for its placement with a chisel;
- with an electric drill, holes are drilled for cylinder mechanisms on the door leaf and their position is checked;
- having drilled a hole in the place of the keyhole, a figured groove is cut out with a hacksaw for it. The edges of the groove are processed with sandpaper;
Expert advice: in order to clean the cut with a "sandpaper" was more convenient, attach it to a screwdriver
- at the end of the door with a thin drill, the places of the screws are outlined for fastening the lock case;
- a mortise lock with a latch, bar, handles is assembled and its performance is checked;
- after successful tests, the lock is attached with self-tapping screws in place.
The installation of the striker at the mortise lock is carried out in the same way as the overhead model.
The installation of a good door should be accompanied by the installation of an equally solid lock. Often metal doors already contain one and sometimes several locks in their structure. You will have to mount it separately on wooden canvases.
Overhead - locks attached directly to the door leaf. The most common mechanisms among them are: lever and cylindrical.
The installation of a patch lock on a wooden door and its correct functioning depend on the initial choice. To do this, you need to understand the differences.
Protection class
The first difference between overhead locks is the degree of their protection. There are several classes of it that correspond to the degree of protection of the home from penetration. There are only four of them: from minimal and medium to high and special.
The first of them is the simplest for an intruder, such a lock opens in a matter of minutes, about five is enough. You will have to tinker with a lock with medium security, but breaking it will take no more than 10 minutes. A high degree includes such fittings, which are equipped with protection against drilling the bolt shank. The fourth, highest, class of protection includes locks for special rooms or safes. Such devices are selected individually.
According to this classification, locks of the second and third class of protection are suitable for domestic purposes and civil buildings.
Device
The overhead lock on a wooden door has one more difference - a secret mechanism. Here it is subdivided into cylinder and lever. The latter are used as auxiliary devices; if it fails, it will have to be completely. Cylinder cylinders have in their design the so-called larva, which unlocks the lock.

An overhead lock on a wooden door can be one-sided or two-sided. It depends on which side of the door you open it from. The one-way lock can only be closed on one side. In this case, a rotary handle that opens the door will be located on the opposite side. There will be a double-sided lock, which can be closed with a key from both sides.
Functions
According to the principle of functionality, two groups of locks are distinguished:
With spring latch. Opening occurs from the inside with a handle, from the outside - with a key. In this case, the latch is wound into the body or a special button located in the body is pressed.
With a fixed latch. This mechanism completely blocks the door thanks to the triangular latch.
There are magnetic locks, which are advisable to install only in a place where there is a large flow of people. Often this is just work to open outward. Such locks may require an additional power connection or an autonomous energy carrier.
How to choose the right padlock?
Door protection is primarily the protection of the entire home, so it is better to give preference to well-known brands that are responsible for quality and reliability. The main criteria in how to choose an overhead lock for a wooden door:
Secrecy. It is better to give preference to cylinder rather than lever mechanisms.

They are cheaper to operate, but no less reliable. It is better to choose a cylinder patch lock on a wooden door, the device and repair of which will cost much less than a lever lock.
Locking element. Here the difference is in the crossbar and its absence. There can be up to five latches in the crossbar, and without the crossbar there is only one monolithic tongue.
Opening principle. Mechanical, electronic or electromechanical. The first one is the most common and the simplest one, since the access is done with a regular key.
Configuration of an overhead lock on a wooden door, depending on its opening? There are no special restrictions, the main thing is that the lock is chosen correctly - right or left. Each of them has a corresponding marking.
Additional elements. For example, a built-in latch that allows you to lock the door in the closed position so that it cannot be opened on the other side.
Repairs
It often consists of replacing the larva. To do this, you must:
- Remove the lock cover.
- Unscrew the fixing screw at the end of the door.
- Remove the cylinder.
Replace it with a new one and reassemble everything in reverse order.
Compared to other consignment notes, it is the easiest to repair, which is also a great advantage.
Installation: tools
Often home craftsmen ask themselves the question: how to put a patch lock on a wooden door? You need to start the installation after the lock is selected in all respects. Often there is nothing difficult in this, so you can produce it on your own, without resorting to the help of specialists. The only thing is, if the door is unique or very expensive, it is better to sweep away this method because of the likelihood of damaging the canvas.

The tools for the most common lock and door will also be the most basic. These are: an electric drill with drills and a crown for wood, a chisel, a screwdriver, a hammer, for marking - a square or tape measure. The masters of their craft have special milling cutters that perform not only quick installation of the lock, but also very high quality. For a one-time installation, a home craftsman does not need such devices, because they are not cheap.
Installing a patch lock
To independently install a cylinder patch lock on a wooden door, you will need the following tools: a drill, electric or manual, drills for it; pencil; screwdriver; self-tapping screws; hammer and chisel.
Before installation, be sure to familiarize yourself with the diagram attached to the lock. The order of installation steps is as follows:
Make marks on the door for future holes, for this attach the lock to the canvas.
Drill holes for self-tapping screws, while it is better to use a drill slightly thinner than a self-tapping screw, then it will be fixed most reliably.
Drill out the core channel.
Install the lock in the door and bring it to the larva.
Attach the fixing bar to After that, the patch lock on the wooden door, the installation of which is almost complete, must be checked for functioning, if there is no displacement of the door and the frame relative to each other, then all the elements can be fixed.
Installing a patch lock
On a door of standard height, the installation of the lock begins from a point that is done, marking one third of the length from the top of the canvas. Often, the installation instructions do not include the part in which the center of the device is measured. Therefore, you need to do the following:
Mark with a square and drill a hole.
Outline the outline of the lock on a piece of paper - this will be a template.

Install the cylinder in the prepared hole, fix the device body with self-tapping screws. An overlay for the key hole is installed outside. It is better to choose a cylinder patch lock on a wooden door, the device and repair of which will cost much less than a lever lock.
After that, the lock should be opened and pressed against the box. At this moment, it is necessary to mark the place where the locking mechanism will be located.
To do this, mark the upper and lower ledger strips. In this place the body of the girder bar is located and its contour is outlined with a pencil.
Make a recess with a drill or chisel so that the edge of the holder plate aligns with the door frame.
After that, the final stage is carried out - checking the correctness of the installation. If the lock is functioning properly, then the result can be fixed.
A door lock can become an impeccable keeper of the premises and the property in it. A padlock for doors must be reliable and match the material of the door leaf on which it is installed. Our article will show you how to choose the right product and install it.
The choice of the lock by type and features of operation
Among the locks on the market, there are three main types of locking devices:
- Lever locks are considered the most reliable. A set of locking plates (lever) fixes the lock (bolt) in the closed position. Such a lock is opened with a complex figured key, to which it is almost impossible to pick up a master key. The degree of security against opening is determined by the number of levers in the lock with high degree their invulnerability must be at least 6-8 pieces. The disadvantages of lever mechanisms include their cumbersomeness, large key sizes and the possibility of power breaking due to a wide keyhole. In terms of price and quality ratio, the most popular in the expensive segment are locks of the Cisa and Mottura brands, in the middle and cheap ones - Cale, PROSAM (Border), Elbor and Guardian. It is the optimal surface-mounted lock for metal doors, garage doors and other gates.

- Cylinder locks got their name from the shape of the fixing elements in the core ("larva", "secret"). The more cylinders there are in the "larva", the higher the resistance to burglary. One or more crossbars of the castle are fixed with levers. This common type of locks is easy to install, reliable and maintainable. 20 years ago, a cylinder door lock was considered vulnerable, it could easily be opened with a master key or drilling. Modern locking devices have additional protection, keys with side perforation and are equipped with plates made of high-strength materials that cannot be drilled. The simplicity of the design makes it easy to install a patch lock on a wooden door with your own hands.

- Smartlocks are a complex locking mechanism consisting of a mechanical and an electronic part. The most reliable are overhead locks with double protection. It is not enough to have a key to open it. Additional protection is carried out using a digital cipher, reading a barcode from a plastic card and even a fingerprint scanner. The modern electromechanical front door lock will reliably protect your home, office or warehouse. Self-installation will require certain skills, but it will not be very difficult.

When choosing a lock for a door, you should consider the following criteria:
- place of installation;
- door leaf and frame material.
Indoor and interior doors lightweight models of overhead locks are suitable. On the front door, you should select a mechanism that is resistant to opening and forceful burglary.
The strength of the lock must correspond to the material of the door leaf and frame. It is not recommended to install bulky locking mechanisms on wooden, plastic or composite doors. The burglar will be able to knock out the door by ripping the lock from the place of attachment.
You should not choose one bulky door lock, it is better to install two reliable ones.
The degree of invulnerability of a lock is determined by the amount of time it takes for an unauthorized opening and the amount of effort required to break it. Modern mechanisms cannot be opened in less than 10 minutes; they can withstand a load of up to 1000 kg.
Clear instructions for installing patch locks
It is not difficult to mount a patch door lock. You need to carefully study the instructions and follow the recommendations.
Installing a lever lock on a metal door
To work, you need the following set of tools:
- electric drill;
- drill;
- screwdriver;
- tap;
- self-tapping screws for metal;
- pencil.
Operating procedure:
- Carefully study the scheme and structure of the lock.

- Choose a place on the door where there are no longitudinal and transverse stiffeners.
- Attach the lock to the installation site, align, trace the contours and holes for the screws with a pencil.
- Drill holes for fastening the lock.
The diameter of the drilled channels should be 0.2 mm narrower than the diameter of the self-tapping screws.
- Use a tap to cut the threads in the channels.
- Drill a through hole and mount the cylinder.
- Install the lock in its original place using self-tapping screws and a screwdriver, aligning it with the core pin.

- Attach the striker plate to the door frame, align the holes on it with the lock bolts. Having chosen a place, make a marking with a pencil for drilling the fastening channels of the strike plate.
- Drill holes in the box and install the strike plate.
- Check the operation of the installed lock.
The metal door is heavy. In order to avoid jamming of the crossbars due to the sagging of the web on the hinges, you need to expand the holes on the strike plate by 1−2 mm down with an electric drill.
If done correctly, the castle will last for many years.
Installing a cylinder lock on a wooden door
To get the job done, you need a small number of tools:
- electric or hand drill with drills;
- screwdriver;
- pencil;
- screws or self-tapping screws;
- you may need a chisel and a hammer.
The work should start by studying the circuit.

The installation process itself consists of the following steps:
- Attach the lock to the door leaf and mark the holes.
- Drill out channels for self-tapping screws.
The drill should be 1.5-2 mm thinner than screws or self-tapping screws. This will help to securely fix the lock to the wooden door.
- Make a channel for the core by reaming it with a feather of the required diameter.
- Install the lock on the door leaf, attach it to the larva.
- Place, without fixing, the fixing strip on the door frame, check the operation of the lock. It often happens that the door leaf and the frame are not in the same plane. To combine the lock with the counterpart, it is necessary to deepen the striker plate seat using a chisel and a hammer.
- When both parts of the lock are aligned, mark out, drill holes and fix the striker plate with screws.
DIY smartlock installation
A person with basic knowledge in electrical and electronics can safely undertake the independent installation of an electronic patch lock for doors. Detailed step-by-step instruction described in the attached video.
An overhead lock on the front door is an important aspect of the security of a home, office or other premises. A reliable product will ensure safety and add psychological confidence. When choosing a door lock, you cannot save on quality, this can result in large losses.
Anyone can install a patch lock with their own hands, the instructions will help to overcome the apparent difficulties.
A large number of padlocks are sold - from a common latch to a cylinder padlock. If you cut such a lock into the door, then it will be as reliable as a mortise lock.
The surface lock has a degree of reliability, which depends on the number of pins. There should be at least five of them in a secure lock. For fixing the lock, the overhead locks are provided with a stopper.
Compared to a conventional overhead lock, a cylinder lock is equipped with a special cylinder mechanism, which is cut into the door leaf and opened with a key, and this increases the reliability of the lock.
Also, the effectiveness of a patch lock depends on its attachment to the door frame and the door itself. The lock together with the latch is installed on the door and secured only with screws. Do not use the screws supplied with the lock - buy longer ones with the same diameter.
A regular cylinder patch lock is suitable for all doors. Only when the key is turned will the tongue of the padlock come out of the locking housing. Before installing a regular cylinder lock, check the reliability of the door and door frame, otherwise your door may be knocked out without much difficulty.
Installing the lock
- From the top of the door, mark 1/3 of the door on both sides of the door. If the lock kit does not include a template for marking the center of the hole, use the manufacturer's instructions and a special combination square. Use an electric drill to make a through hole.
- Use a chisel drill to drill a hole with the diameter of the cylinder. As soon as the drill is slightly visible from the opposite side, immediately pull it out of the hole so as not to damage the door. Finish the hole on the back of the door.
- Insert the cylinder and pin bracket or retaining ring into the drilled hole from the front. Attach the mounting plate so that the cylinder connecting rod protrudes 12 mm beyond it. Measure the required length, saw off the extra piece with a hacksaw, fixing the rod with an adjustable wrench.
- Install the cylinder, pin bracket, or retainer ring into the face seat. Slide the setting plate into the rod and screw it onto the cylinder using the screws. When tightening the screws, make sure that the front edge of the plate is flush with the edge of the door. Now make holes with an electric drill and fix the plate.
- To release the latch and install the lock, press the special button on the lock, then install the lock on the mounting plate, while the connecting rod with the slot must align with the back of the lock. Place the lock body on the mounting plate and screw with small screws.
- Move the latch on the lock to the closed position, then press the door against the door frame and mark the bottom and top of the latch tongue on it. Set the locking body plate according to the marks and, using a knife, cut out its outlines.
- Take the chisel so that the bevel of its blade is facing inward, put it on the outlines and walk along them, tapping with a mallet. Remove excess wood to the depth of the lip of the latch plate. Keep the chisel beveled down when removing the finishing layer.
- Insert the locking body plate into the obtained cutout, then close the door and check that the lock latch fits into the locking body. Use an electric drill to make holes to secure the locking housing.
Not all entrance doors are now made of metal; many owners still prefer wood. Replacing door locks on wooden doors is somewhat easier than, but there are still certain subtleties. Next, we will tell you in detail how to install or change mortise and patch locks on wooden entrance doors with your own hands.
It is quite possible to embed or replace the lock with your own hands.
Replacing the lock on the front door is not a tricky business, especially if this door is wooden, but before changing the lock, you still need to choose it. There are 3 types of locks on the door: hinged, mortise and overhead.
- Suspended structures are the simplest option, reliability padlocks leaves much to be desired, they are only suitable for installation on a country shed for garden tools. Changing locks of such a plan is done in a few minutes, you just need to fasten a couple of awnings;
- Mortise locks in an apartment or a private house are installed everywhere. There are many varieties of such mechanisms - cylinder, cruciform, disc, pin, lever and others, you can learn more about all types. Replacing the lock on the front door is much more difficult here, but I am glad that the installation technology is the same everywhere;
- Overhead structures are considered less reliable than mortise, but this is a moot point. But replacing a door lock or installing a new one is quite simple here. On wooden doors, experts recommend installing 2 types of constipation at once - overhead and mortise.

The variety of door locks is impressive.
The technology of installing locks on wooden doors
We figured out the types of locks for the front door in general terms, now let's talk about how to change the door lock in practice. Let's start with the most difficult option, namely: how to change a regular lock to a mortise lock.
Often the lock is changed because it is jammed, and it is jammed when closed. It is quite possible to open a jammed lock without a key and at the same time not to spoil an expensive door leaf, and all these methods are outlined.
Installing a mortise lock
Naturally, before replacing the lock, you need to pick up a tool, you will not need expensive fixtures here:
- Electric drill with a set of feather drills on wood;
- A hammer;
- A pair of chisels, with a narrow and wide sting;
- Square;
- Roulette;
- Pencil;
- Screwdriver or screwdriver.
The insertion or replacement of the front door lock begins with the markings on the door leaf. We need to draw a central axial vertical, as well as mark the beginning, center and end of the mechanism. According to the rules, mortise locks should be installed at a height of 1 m from the lower edge of the canvas, but this is more a recommendation than a clear indication.

Marking is the first stage of the lock insertion.
The niche for the door lock needs to be cut a couple of millimeters larger than the mechanism itself, since the lock should enter it freely. We select the drill bit according to the thickness of the lock, and in order not to drill too deep a hole on the drill itself, you need to put a mark.

On the feather drill, you need to put a mark on the depth of the lock installation.
Now, along the centerline, we need to drill as many holes as possible. These holes should overlap one another, usually 2 - 3 mm recede from the edge of the extreme hole and the next one is drilled.
It is not worthwhile to go through the drill immediately to the full depth, because an inexperienced master can start the drill at an angle and then it will be much harder to correct the error. Therefore, you go deep in stages, about 10 - 15 mm at a time.

Gradually choose a niche with a feather drill.
The lock box itself is rectangular, respectively, and the niche for it needs to be made similar. To align the walls of the niche, we take a sharp chisel and gouge out all unnecessary, bring the shape to the ideal.

To quickly and efficiently change the door lock, you need a well-sharpened tool.
Niche for mortise door lock you need to hollow out very carefully so as not to make it more than necessary, because as soon as you choose a couple of extra millimeters and the lock pad will not be able to completely close the hole.

With a chisel and a hammer, we bring the shape of the niche to the ideal.
When you are convinced that the niche fits completely under the lock, it's time to mark out the lock bar. The first are the marks for the fastening screws. After that, you need to drill holes for the self-tapping screws with a thin drill and screw in the self-tapping screws themselves.

We try on the lock and mark the canvas for the fastening of the lock bar.
The lock bar should be flush with the end of the door leaf, so we need to cut a small recess for it. To do this, take a sharp knife and cut the veneer along the perimeter of the strip by about a couple of millimeters deep.

Trimming the door veneer along the perimeter of the lock strip.

We clean up the space for the lock bar.
Now you take out the lock and put it on top of the door leaf, so it will be easier for you to mark the holes for the handle and keyhole. And you need to mark it on both sides.

Keyhole markings.
The holes for the handle and keyhole are drilled with the same feather drill, but you need to drill on each side of the door leaf separately, and not one common hole through and through, otherwise, when the drill comes out, you will have ugly chips.


Handle and keyhole attachment with decorative overlays.
Now you can start installing the lock striker. Its installation is not much different from your previous actions. In the same way, mark the entry point of the locking tongues and cut a niche under them to the depth of the entrance of these tongues.

We cut the striker into the door frame.
Installation of a patch lock
To change the lock on the front door on the invoice, no new tool is needed, the same set that we talked about above is used.

The surface lock is placed higher than the mortise lock, according to the rules, it should be at the level of 1.5 m from the lower edge of the door leaf, but again this is only a recommendation.

Marking under the patch lock.
Now almost all of these locks are sold with a paper template for installation. You need to take this template, attach it to the door, and then mark with an awl 4 fixation points and a center point for installing the locking cylinder of the lock.

In order for the screws to enter smoothly and without distortions, we need to first drill holes for them with a thin drill. Usually the cross-section of a standard self-tapping screw is 3.5 mm, which means that the drill needs to be taken a little less than 2 - 2.5 mm. The holes for the self-tapping screws are made blind, and the central hole for the lock cylinder must be drilled through.

Now we select a feather drill according to the diameter of the lock cylinder and drill a through central hole. To make the hole neat, without chipped edges, you first need to drill it to half the thickness of the door leaf on one side, and then do the same on the other side.

In the overhead locks, there is also a side locking strip, which is attached from the end of the door leaf. In order for this bar to fit flush, we need to mark and cut a groove for it. After that, we attach the lock, drill preliminary holes and fasten the lock with self-tapping screws at 2 points from the end and along the front perimeter at 4 points.

Insert of the locking strip of the overhead lock.
Now we need to attach the counterpart to the door frame. To do this, close the lock and attach the counterpart to mark the attachment points for the screws with an awl.

After marking, we will need to drill preparatory holes for self-tapping screws in a wooden box and screw the counterpart with self-tapping screws at 4 points.

Fastening the counterpart of the lock with self-tapping screws.
Replacing the locks of the front door always ends with the installation of decorative or anti-vandal linings, as a rule, these linings are attached to self-tapping screws.

Decorative overlay for the lock cylinder.
Output
As you can see, replacing door locks on wooden doors is not such a difficult job. The video in this article shows the replacement of the front door locks in detail.

Wooden entrance doors are still popular among the people.