Many of our fellow citizens live in houses built in socialist times when the main task of the builders was to ensure the population affordable housing, and luxury and comfort often moved into the background. Then it was not customary to hide water communication communications, so to this day, in modern apartments, the pipes in the toilet often pass or in the corner, or are located in an open niche, right before your eyes.
It is not surprising that the desire to make the interior of the toilet room more refined and modern leads to the question, how to sew pipes in the toilet? This can be done in two ways that depend directly from the location of the pipes in the room.
Installing the box for pipes in the corner
If the plumbing communications are located in the corner of the toilet room, the best solution to hide them from an extraneous eye can be the mounting of a plastic or drywall box.
Due to the simplicity of the design of such a box, it is even a non-specialist to cope with its construction.
Getting Started, it is necessary to prepare the following materials and tools:
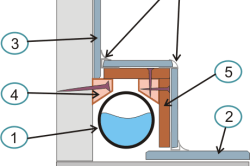
Digital Design Scheme: 1 - Pipe, 2 - Tile, 3 - Wall-mounted tiles, 4 - Bar, on which the box is based on, 5 - box, 6 - outer and internal plastic corners.
- rack profile;
- guide profile;
- moisture-proof drywall (quantity depends on the magnitude of the constructed design) or plastic panels;
- several screws for metal with a length of 25 mm and a diameter of 3.5 mm;
- the same number of dowels in a length of 40 mm and a diameter of 6 mm;
- level;
- several screws for metal;
- screwdriver;
- scissors for metal;
- pencil;
- plumb;
- roulette;
- perforator;
- hacksaw;
- metal mesh No. 100;
- mounting foam.
To sew pipes in the toilet competently and for a long time, it should be replaced. If the pipes are quite old, soon they can give to flow. As a result, all the built-in design will have to be disassembled. So that this does not happen, experts recommend to change the old pipes to new pipes before installing the box.
In order for the frame of the future box to be strong enough and served for a long time, it must be performed from the rack and guide profiles made of metal. In addition, galvanized tin, from which profiles are made, ensures high frame stability to the appearance of rust.
Making a frame for plasterboard or plastic panels, and then the box itself can be divided into the following steps:
- Place marking.
- Installing profiles.
- Fixing racks.
- Cover with plasterboard or panels.
When all the necessary material and tools are prepared, you can proceed to work. Instruction:

- With a pencil, a construction level and a plumb on the floor, walls and ceiling, the contours of the future design are marked. The vertical of the contours is checked by the level, horizontal - plumb.
- According to the battered lines, three vertical guide profiles are installed: two - on the walls, one - in the center, creating an angle with a size of 90 0. To overlaps, profiles are attached to dowels and self-draws.
- Roulette is measured the distance between profiles.
- This distance is measured on the rapid profile.
- With the help of scissors for metal, several blanks are cut. Their amount depends on the height of the structure.
- The billets are inserted between each of the guide profiles mounted on the wall and the central profile are fixed by metal screws.
- To the resulting carcass self-draws sews of plasterboard or panel sheets, precised by the width of the parties. At the same time, the self-tapping screws should be screwed into a sheet of drywall in such a way that their caps do not get drunk in more than 1 mm.
- If the sheets-carcarton sheets are screwed to the frame (plastic panels) protrude beyond its boundaries, they are spawned with a hacksaw, and the edges are aligned with a grid No. 100.
- If there are cracks between the plasterboard and the walls, they are filled with mounting foam.
When the design is ready, if desired, you can make it decorative processing. For this purpose, all seams in the box are closed, the design itself is ground and put off. After drying the putty, the box can be saved with wallpaper or paint in the desired color.
Hide pipes located in niche
If plumbing communications are located in a special niche, it provides an opportunity not only to hide them, but also to install household chemicals shelves and other home accessories. The main goal in this case is to sew pipes so that in the niche as much space remains as possible.
To achieve this will allow the layout of plumbing communications. By producing the replacement of old pipes to new, place them all in one corner, and then the roaster and arrange the shelves. Copyright pipes should be placed in the drywall box, it should not be forgotten about access to cranes. In the box you can make a special door or leave free space to provide sewer audit at any necessary moment.
After covering pipes in a standard niche, there should be about half a meter of free space. It can position the shelves or even organize a full-fledged locker. If you decide to arrange the shelves in a niche, you can hide them with a small screen or blinds suitable for the interior of the toilet room.
IN modern constructionWhen the market is saturated with construction materials, the question of how to hide the pipes inherited from the socialist times in the toilet, does not look difficult. The main thing is to take the basis of two principles: the design must comply with the overall design of the room and not to cause discomfort.
Getting Started in the toilet, most owners face the problem of masking of sewage pipes. Indeed, the accumulation of pipes does not adorn the room, so they need to try to hide. Consider how to close the pipes in the toilet with plastic panels, as well as using other ways.
In standard apartments, the bathroom can be separate or combined. In the first case, in the toilet, as a rule, there is a sewage riser, the water consumption counters are installed there. All these designs have an unavailable appearance, even if mounted from modern plastic pipes.
And if the cast iron riser, set up a couple of dozen years ago, then not to talk about the external attractiveness of the room. So you have to think about the question, how to close in the toilet of the pipe, and what to use materials for this.
Choosing materials for closing pipes

Planning the installation of the box to close the pipes, do not forget that you need to leave access to the valves and counters. As a rule, at the location of these devices make a closing hatch.
Using plastic panels
If it is decided to close the pipe in the toilet, then one of the most convenient options is the use of plastic panels.

The advantages of this solution:
- Installation of panels does not take away a lot of time.
- The resulting design is lightweight and, if necessary, can be dismantled without problems.
- Plastic panels are great for use in the bathrooms, as hygienic and are not afraid of humidity.
- Appearance Panels will not cause complaints, their design is distinguished by a variety, so it will be easy to choose a suitable type of material.
- The panels are inexpensive, but at the same time have a long service life.
To close the pipes in the toilet with the help of plastic panels, it will be necessary:
- Actually panels;
- Guide profiles for mounting panels;
- Starting profile;
- Fasteners (screws, screws, dowel-nails);
- Perforator;
- Mounted knife;
- Screwdriver and screwdriver:
- Construction level.

There are two options for installing panels:
- In the first case, the wall closes completely, that is, we close the pipes in the toilet, having them in space between the wall and panels. This method is attractive from aesthetic point of view, but significantly reduces the area of \u200b\u200bthe bathroom.
- In the second case, only the pipes are covered directly, that is, the box is built around them. This method allows to save material and less "eating" free space.
Before close the pipe in the toilet, you should make sure it is reliable.
Close the pipeline on which there are pronounced defects is irrational, as it will soon disassemble the closing design.
Procedure for performing work
- The first stage of the work is to apply markup on the walls, according to which guide profiles will then be attached.
- Next, you should set the profiles on the walls, creating a frame for fastening panels. For trimming profile in length, you can use special scissors and hacksaws for metal.
- For fastening profiles to the walls, a perforator and dowel-nails are used. The step of the location of the fastening elements is 30-40 cm.
- The collected profile is installed panels that are attached with the help of self-tapping screws.
Use of plasterboard

In some cases, the use of drywall for shelter pipes is a more preferred option. The fact is that the drywall box can be subjected to almost any finish. It can be painted, sack with wallpaper or tiles, that is, pick up the finish in accordance with the general interior of the room.
At the same time, it should be remembered that the construction of a plasterboard box is a more time-consuming option than the installation of plastic panels.
Consider how to close the pipes in the toilet with plasterboard. To perform this work, as in the trimming of pipes with plastic panels, a frame from a profile or wooden plates should be built. Then the panels are cut from the drywall, according to the measurements. Panels are attached to the finished frame with the help of screws.
To cut the plasterboard sheet panel on the specified dimensions, you should use the mounting knife. For this, the outlined line performs prophesions on both sides, then the sheet is reduced by section.

Before installing the carcass cut and drywall, the panel on the frame, they remove the edge using the plane. Then, screws for fastening are screwed into the resulting chamfer. After the box is mounted, it will be possible to start finishing work - shtlock, painting or pasting tiles.
Tips on the topic, how to close in the toilet pipe with plasterboard:
- When building, you can not forget about necessarily the presence of revision hatches.
- When screwing out the screws to fasten the plasterboard panels, it is necessary to monitor in order to accidentally damage the pipeline itself.
- Planning to close the pipe in the toilet, you should select this option of the design of the box, which would not interfere with the use of the toilet.
- If desired, a sliding material can be installed between pipes and a drywall box.
Other disguise options in the toilet

Other methods can be used to close the sewer and water pipes in the toilet. For example, one of the cheap and fast options are set to install a removable plywood box.
And people with artistic abilities and creative thinking can choose an option with a decorative decoration of the sewer riser. For example, you can save the pipe with a mosaic that will be combined with the color with the main finish of the room.
Naturally, such a solution is possible only if the owners of the apartment are confident in the reliability of communications in their apartment.
conclusions
Choosing a way to mask pipes in the toilet, of course, will be the owners in accordance with their tastes and financial capabilities. If you wish, do this work yourself, it is worth visiting how to close the pipes in the toilet - video with a demonstration of various options for doing this work can be found on our website and on construction and repair theme sites.
Conducting repairs in the rooms for hygienic procedures and management needs, many prefer to close pipes that spoil the view. It is so possible to add the premises of aesthetic, beauty and attractiveness. It is worth noting that sometimes it is much easier to finish the walls and gender than to engage in the firmware rear wall with pipes. There is a lot of ways to disguise the bathroom and toilet from the pipes, and each has its own characteristics and disadvantages.
Ways: how to close the pipes in the toilet with plastic panels
The most popular way to hide the sewer tube is to sew its plastic panels. The only disadvantage can be called the fact that the masking by plastic panels is substantially highlighted against the background of other walls, but it is possible to correct the disadvantage if you make a fully trim bath with plastic.

This option has several advantages:
- Ease of installation;
- Safety for human health;
- It is possible to get to the pipes at an accident or simply for inspection of integrity and suitability for operation;
- Long service life;
- Ability to quickly make dismantling if necessary.
The lack of a box still consists in the fact that the design is too voluminous and with the extreme case to get to the pipes is not too simple. The principle for which a box is installed to close the sewer pipes is the same, and should not be afraid of such upcoming work and contact a specialist for big funds. Tracts will be completely thoughtless, as it is possible, everything is done with your own hands.
What material is better to use to sew pipes on the back wall do it yourself? The options are many, however, the choice must be carried out by choosing the space for which the lifting and the budget is required for the design solution.

Before close the niche and hide the pipes, you need to hold a number of important actions that are extremely necessary to prevent serious consequences:
- Need to replace pipes to new;
- Defects are required;
- All tees, couplings and cranes are checked for leakage.
If desired, reorganize the niche and significantly save, it is worth a preference to such products like blinds or a plastic curtain, however, the cheapest option is a gypsum cardboard. It is advisable to choose plastic pipes. They have a long service life, and practice shows that with them there are practically no problems such as leaks and breakthroughs.
Principle of assembling box for pipes in the toilet
How beautiful to hide the pipes in the bathroom? You need to choose not only the material, but also to determine how the sewing will be conducted. It is important to note that such a plumbing decor will be able to make not even an experienced master, and for the construction it will be necessary to prepare a metal profile, a wooden bar and a material for closing the Communication.
When closing pipes using a box, you can use such a canvas as:
- Waterproof plywood;
- Leaf of waterproof GLK;
- Plastic panel.
If you close the sheet of drywall, it is required to decorate it, and you can decorate tile. In order not to disturb the integrity of the interior and the designer idea, it is best to choose a sheet of GLC and a tile. This room will be completely in one form and there will be no places standing out against the background of the rest of the room.

If the seal requires too much strength and time, which is simply not, you can always order the manufacture of such a box or buy ready. According to the cost, these methods are much more expensive, but there may be better. Turning the pipes can be box, with different configuration. False wall. This option of the box will be suitable if the room decoration with too small dimensions is carried out. When installing a false wall, many prefer to change the usual stationary toilet on the equipment of the suspended type with installation.
The box of square type is perfect for making the decor of pipes located in one part of the room. Be sure to make the window to track the data on the meters. The oblique fox wall is that it is installed under an acute angle regarding the back or side walls. With the help of such a variant, it is possible to close thinner pipes that depart from the main part of the riser.
Here will be inappropriate to install a large-sized box, as it is easier to make a small bevel.
The box is multi-level suitable for those rooms in which the pipes have to be cut into the space space. In other words, with their sewing, a peculiar small wall is constructed, which can split the area of \u200b\u200bthe toilet and the bath, if they are combined. In general, the process of creating a box is to install a metal profile, installation of hardening from the bar, as well as the extension of the casing material.
Before carrying out all the above works, you need to form a project, make marking on the wall, and only then engage in installing guide profiles. To establish a profile, use the fastener in the form of a dowel-nail mounted using a perforator.
Do you need a box in the toilet from plasterboard with shelves
Finish pVC pipes Or simply ordinary cast iron in the toilet is carried out in order to hide them from prying eyes, significantly improve the aesthetics of the room and get another smooth surface that can be decorate with shelves or any other accessories. The easiest way to sewing pipes in the toilet or bathroom is considered to install a plasterboard box.

This method has a number of advantages that cannot be ignored:
- Install the canvas is not difficult;
- If necessary, you can easily dismantle;
- For construction construction, you do not need to use super workshop skills;
- The material is completely safe for human health, even with severe heating;
- The canvas does not distinguish toxic substances;
- It is the canvas of GLCs perfectly suitable for the subsequent decoration by plastic panels, a tile and other materials.
It is worth paying attention to the fact that drywall has a disadvantage and this is that if you need to remove the box to repair or replace pipes, it must be completely dismantled. Himself plasterboard has a number of advantages, which only increases the demand for it when installing the box in the toilet - a long life, optimal cost, availability.
It is easy to cut and for this you need to apply the usual or stationery knife.
If it is impregnated with an additionally soil composition, its properties will be improved. The canvas has a sound insulation property. If you purchase a coating moisture resistant, then you can not worry about the formation of problems such as mold, fungus and similar consequences. As for the shelves, it is necessary to install them or no depends on personal preferences, since if the room is too narrow, then additional shelves can help remove excess furniture from the room, for example, a wardrobe, on which the door when opening takes a lot of space, and thus Free quadrature.
Blinds and box in the toilet or how to close the pipes
As already noted, it is possible to sew pipes in the toilet in various ways, and one of the newest are blinds. Thus, it is possible to emphasize the presence of aesthetic taste among the owners of the house and at the same time make a toilet more beautiful and stylish. Blinds are an excellent option for a small room, and besides one of the cheapest.
![]()
Due to the blinds, you can:
- Save the quadrature;
- Quickly hold the rear wall disguise;
- Conduct inspection of pipes, if necessary;
- Install the shelves in the niche and have permanent access to them.
Plinding has its drawback, and it consists in a minimum conservation period of proper species. As a rule, they quickly yellow and darken. It is better to choose the blinds in which you can easily replace their running part or, in other words, a curtain. If you purchase a finished box, then there will be no problems, and it will only be necessary to set the design to its rightful place. However, not every particular toilet feature allows you to establish such products, and therefore you need to first become familiar with the room configuration and all the possibilities.
Ways: how to close the pipes in the toilet (video)
If you correctly form a project, take into account the nuances in it, and at the same time choose only qualitative materialsYou can make a simple and stylish finish of the toilet, whereby the sewer pipes will be hidden.
Close pipes in the toilet with plastic panels is not difficult. This whole process will not take a large amount of time. But the view of the bathroom or toilet is changing dramatically.
It is no secret that the pipes of the sewage and water supply are not decoration. Against the background of beautiful tiles, they look like a foreign object and significantly spoil the overall interior. It becomes a reason for the fact that many of these pipes are squeezed by various materials, including plastic panels are most popular.
An invisible plumbing and drain network can be made in several ways. The most common one is Falstrenka. There are also other, more complex options. One of them is the shoes that are paved in the walls. The following method is rolling shutters.
- frame covering.
It is detailed about how to close the pipes in the toilet with plastic panels, tells the video provided. Here this process is described in detail, and any manual can cope with this task.
Carefully having studied the information provided, you can not only close the unsightly pipeline, but also create a beautiful decoration of the room or bathroom.
Features of applying markup
At the beginning, the contour is applied on the floor. How properly the angles are met, you need to check the coal. After checking for accuracy, the contour can be transferred to the ceiling.
A rack profile is mounted on the angular parts of the box. Its vertical position should be checked by a building level, while the ceiling is put point, this is a projection of the contour, made on the floor.
IMPORTANT! To accurately coincide the mark on the ceiling and on the floor. Before performing marking, it is necessary to check how exactly the horizontal is the floor.
Construction of carcass
To sew pipes in the toilet with plastic panels, without the construction of the base can not do. This design is needed not only when working with the clap, but also for the sheat by other materials.
Immediately need to notice that the most suitable fastening material for plastic lining specialists are called a galvanized metal profile. It provides the desired stiffness indicator, and its protective treatment saves metal from corrosion formations.
Many to close the system, typically taking ordinary wooden bars instead. But, this option is not considered the best, because the wood should be treated with an antiseptic. Also in this embodiment, fire safety becomes much lower.
To close the highway in the toilet panels, you can prepare a plastic crate. In this embodiment, install the panels by special clip. But, such a frame has a lot of drawback, it is distinguished by low rigidity.
The construction of the frame starts with fasteners of profiles to the floor. For them, the racks running in the vertical direction are mounted. Cross ribs put at the very end. The profile is bonded with self-draws with each other.
When working it is worth carefully monitoring the size of the gap between the ribs of the frame. When the plastic panels are located below - up, the distance is performed approximately 60 - 80 cm. When they go transversely, then the need for an additional rack can appear.
IMPORTANT! You must not forget about the fact that near the revisions and fittings should be left. It will be required to access the system. Its location of this window is advised to think over during the construction of a frame.
Any toilet is always a cluster of a wide variety of pipes, risers, and crants forming a communication network, which is directly responsible for the comfort of our life. But despite such an important mission, all these devices have one substantial minus - their unattractive view that even the most exquisite interior can spoil. It is impossible to remove communications - it remains only to fight their non-preventability. How? There are many ways to hide pipes and related equipment, but we will focus on the best projects - we tell how without unnecessary troubles, to close the Communications of PVC panels, roller shutters, drywall and tiles.
Available plastic panels
PVC sheets - one of the cheapest and simple ways Masking pipes in the toilet room. Due to its flexibility and low weight, plastic is easy to operate, so it's not difficult to build a false wall from it. For mounting, you will need:
- pVC panels with a thickness of 8 mm;
- metal or wooden planks;
- hacksaw;
- metal scissors;
- drill;
- screwdriver and self-tapping screws with press-washers;
- level.

PVC panels
Work begins with marking - mark on the walls, ceiling and floor where the framework of the frame will be attached. The latter should not touch the pipes - between the frame and communications from all sides, the distance of at least 5 cm should be saved. Then, on the markup by self-drawing, fasten the framework of the frame, wooden or metal, with an average step of 30 cm. Mount the remote profile rack, securing them in the ceiling and floor planks.
When the box is ready, set the starting bar on the bottom profile and start writing the "skeleton" panels. The first sheet must be inserted from the corner to the starting bar and secure self-drawing with press-washers. Second and the following sheets, place on a frame with a dense dock with previous panels. At the end, close the edges of the sheets and the corners of the false walls by plinths, and then process all connections with a sealant.
Council. In two or three panels, depending on the dimensions of the false walls and the nature of the location of the pipes, make a peculiar viewing doors to maintain communications.
Practical rolling shutters
Roller shutters - the most practical way to hide communication, as they always provide unobstructed access to pipes for their service. Mounting such a variety of blinds can be both on the entire wall and separate blocks. But you must be aware of: Installing roller shutters - the task is not from the simplest, so clearly follow the instructions of the manufacturer, which is attached to the assembly set.
Prepare for work:
- roller shutter with mounting kit;
- level;

Roller shutters
- drill;
- roulette.
Council. Before fastening the roller shutters, the walls are desirable to align so that there was an absolutely equal distance between the blinds of the blinds.
The first is the framework of profiles - the gaps between the straps must correspond to the width of the rolls. Then the guides are attached to the side straps, and to the top - the block of blinds. Next to the drum shaft, using the manufacturer's fasteners, lamellas are installed with mandatory fixation in the grooves of the guides. After installing the last lamellae, it is necessary to adjust the roller shutdown / closing process.
Multi-characteristic plasterboard
Gypsum Carton is good, first of all, the fact that it is almost any processing: you can paint the finished false wall, it is possible to darken the wallpaper, paint, bonded with plaster, decorate mosaic, etc. Thanks to this you get the opportunity not only to hide the pipes, but also to completely change the look of the toilet room.
For the manufacture of false walls will need:
- moisture-resistant plasterboard;
- watching rubber hatches with a magnetic lock;
- fasteners;
- steel profile;
- self-tapping screw and dowel;
- drill and screwdriver;
- putty;
- hacksaw;
- level;

Dancer from plasterboard
- insulating tape;
- reinforcing mesh;
- finishing material.
Mounting scheme of plasterboard false walls:
- Perform the markup of the working platform - mark on the walls, floor and ceiling line under the frame. For the outlined lines, fasten the canopies, and install profiles from them - starting from the floor and gradually passing to the ceiling. Then install remote profiles for racks, fixing them in ceiling and floor straps. And carports, and profiles fix with self-drawing.
- When the frame is mounted, start installing drywall - secure sheets to the profile planks with self-draws in 20 cm increments.
- Close the slots between the sheets with a putty and the reinforcing grid - the latter will protect the seam areas from the appearance of cracks.
- After completing the trim, make two or three holes in the drywall wall under viewing hatches and set the latter to the obtained openings.
- Treat the folding wall with a putty and perform the finishing facing.
Durable tile
- Traditional material for a bathroom, but it is used to mask communications not only at the expense of the classical species, but also due to durability. If you exclude the probability of mechanical deformation, then good tile It can serve in the toilet room not one or two dozen years, not covered with mold and without losing his appearance. Mounted tiles on a special box of plywood or drywall - it is fixed on the frame, similar to the previously considered options for the facilities of false walls. Do not forget to also install in the box already familiar viewing hatches.
Council. The material for the box under the tile should be durable to withstand the weight of the finish, so use plywood or drywall sheets with a thickness of at least 12 mm.
For direct laying of tiles prepare:
- ceramic tile;
- slab;
- glue for tile;
- toothed spatula;
- sealant;
- tile crosses.

First, seize the glue composition and prepare the tile - cut the products under the configuration of your box. Next, moving from the bottom angle, start finishing the box according to such a scheme: Spatula Apply the adhesive composition to the operating surface of the box; Moisten the mounting side of the tile; Leave the tile to the working surface and press up slightly. Between the tiles insert plastic crosses to ensure the evenness of the seams. After laying the entire material, remove the cross, and the seams themselves treat the sealant.
You have four spectacular way to hide the "web" toilet pipes and make it the interior as harmonious as possible. Panels, plasterboard, tile, roller shutters - all these disguise options and easy to perform, and are available financially, and attractive outwardly. Instructions before you - it remains only to make a choice, and you can safely be taken for the transformation of the bathroom.
Plastic box in the toilet: video
How to close the pipes in the toilet: photo