RawTherapee 5.0 + Portable - for professional image processing
is a powerful solution for professional image processing.
The program engine supports multi-threading algorithms, so any settings changes are instantly displayed in the preview window.
When adjusting an image, you can use the “Before and After” display option, when the final image is displayed next to the picture in the preview window before making changes in exposure, color balance correction, distortion suppression, noise, and other settings. The program has an integrated file browser. The built-in viewer allows you to set the rating of pictures. With a shortcut menu command, you can send snapshots to the queue for batch processing.
Opportunities :
- exposure compensation
- white balance adjustment
- removal of color and luminance noise
- setting color channels
- compensation for chromatic aberration, vignetting and distortion
- rotate and flip the image
- framing
- permission change
- editing Exif and IPTC tags
- batch file processing
Is an advanced raw image processor with a wide range of powerful features for processing the raw photos from your digital camera. Demosaicing, advanced color handling, exposure and tonality tools, denoising methods, and more are right at hand in the configurable interface.
Features
RawTherapee boasts a wide range of features letting you get the most from your raw photos including modern and traditional demosaicing algorithms, advanced color handling, enhanced exposure and tonality tools, multiple denoising methods, and several tools to enhance details. It uses multi-thread algorithms for high performance and works best on 64-bit machines, though it should work fine on most 32-bit machines with proper memory management. Batch processing is also available. A wide variety of digital cameras are supported including almost all DSLRs and even some medium format bodies. The interface is configurable into various layouts including: multiple tabs, single tab with filmstrip, vertical tab with filmstrip. RawTherapee (as well as the RawTherapee Portable launcher and installer) is free and open source, meaning you can use it free of charge, wherever you like on whatever hardware you like, as long as you abide by the GPL license.
Workflow in RawTherapee
(on the example of an overexposed photograph)
We launch RawTherapee, in the window that appears on the right, select the disk and folder with photos in RAW or DNG format, double-click on it with the left mouse button so that thumbnails of our pictures appear in the central part.
We move the mouse cursor to the image we need (it can be downloaded from this link) and double-click on it. This performs debayerization (the term will be explained in the sidebar) of the information received from the photosensitive matrix of the DPC, according to the default settings. I recommend setting the post-processing profile to neutral for now, later the default post-processing profile can be adjusted to your liking (hereinafter, by clicking on the picture, a full-size photo will be loaded).

Before proceeding with the processing of the photo, let's evaluate the upcoming front of work, which is further marked with a number in parentheses. The first step is to look at the histogram (the term will be explained in the sidebar) located in the upper right corner. It can be seen that the image has overexposed areas, and in all three color channels. This is indicated by small squares of the corresponding color on the right border of the histogram. You can determine which parts of the image were overexposed by pressing the button with an exclamation mark on a white background.

As expected, the sky in the gaps between the trees, the jets of the fountain and partially its sides turned out to be overexposed. It would seem that in these places everything is hopelessly spoiled, but let's not rush to conclusions (1) . By clicking on the icon with an exclamation mark on a black background, you can determine which parts of the image are underexposed. In our case, there are practically no such areas, which, however, was immediately clear from the histogram, which is initially shifted to the right edge, and, therefore, requires a reverse shift to increase the contrast of the image (2) . In addition, it can be seen that the colors in the picture are quite faded (the sides of the fountain are actually made of red granite), which means that an increase in saturation or color contrast will be required (3) .
But before we start processing the image, we should make global settings for our digital laboratory. These are the operations found on the RAW tab. In this case, we are only interested in the method of digital development (demosaic) (4) and chromatic aberration (5) . RawTherapee uses several types of demosaic: eahd , hphd , vng4 , dcb , amaze , ahd and fast . You can see a comparison of these methods. There is no best demosaicing method, in some cases one method is preferable, in others the other. However, they also differ in speed. The fastest, as its name suggests, is fast , while the slowest is eahd . You can independently choose the method of demosaic that suits you. Now you need to set the image preview to full size (the button on the screen with the magnifying glass icon and the inscription 1:1) or larger (the button with the magnifying glass icon and the + sign) and shift the image, for example, to the upper left corner in order to assess the degree of chromatic aberration.

It can be seen that there are colored halos on the contrasting borders, and quite significant ones at that. Unlike the previously suggested method of removing them, located on the "Transformations" tab, now you can use a different method. It has the ability to perform automatic correction, which is suitable for most photos with this defect. And only in rare cases manual intervention is required. For example, in our case, to get a similar automatic result, we had to set red to +4.0 and blue to +2.0.

You can compare how a piece of a photo enlarged twice before and after removal of chromatic aberrations looks like by clicking on the picture (this feature does not work in some versions of Microsoft's Internet Explorer browser).
Other aberrations, such as vignetting or geometric distortion, are not noticeable in our image, so there is no longer a need to perform operations on the "Transforms" tab, as described in detail in a previous article. Now you need to decide on the overall color tone of the image. It is also called white balance. On the tab "Color" are all the necessary operations for this. By default, the program uses the white balance that was determined automatically by the camera or selected from the list of preset modes (for example, sunny day, cloudy day, flash, incandescent lamp, and so on).

In our case, it is worth noting that the camera's automatics determined the white balance almost exactly, since the temperature is 6500 ° and shade 1 corresponds to the sunny day when this picture was taken. However, you need to check if there is an error in the correct definition of colors. To do this, click the "Specify White Balance" button in the "Color" tab or, which is the same, click the button with the image of an eyedropper above our image. Then click on the "H" button in the upper left corner of the screen to open the color information window under the pipette tip. In addition, you can choose the size of the pipette (from 2 to 32 points on one side of the square). The color of each of the three color channels will be averaged over the pipette area. A larger pipette size should be selected in case of noisy images, and a smaller one if the pipette goes beyond the boundaries of the measured object (for example, a twig).

Now in the image you need to find an area with a neutral gray color. That is, this area was real life, since if the white balance is incorrectly determined by the camera's automatics, it may take on a color cast in the photo. But in our image, the medium gray (i.e. R=G=B=128±43) is probably the paving slab or the curb next to it. Let's check this by moving the tip of the eyedropper to different places in the image, including the jets of the fountain, the sky, and the darkest areas.

There was no doubt about the white areas, they are hopelessly overexposed and devoid of any color information (R=255, G=255, B=255). From the rest of the control points, you can tell that the image has a greenish tint, which, however, is not surprising due to the abundance of greenery in the frame, so that even supposedly gray objects took on a green tint due to the sunlight reflected from the leaves. However, these gray objects (such as a lawn curb or a gray lamppost among trees) cannot be used as a gray reference, as the entire image will take on a noticeable magenta tint. The ideal candidate for a medium gray object turned out to be metal pipe fountain, which has a color (R=130, G=140, B=138), and it is on it that you should press the end of the pipette by clicking the left mouse button. This made the whole image look more natural, and the pipe, in turn, acquired an almost perfectly medium gray color (R=137, G=138, B=138).

In addition to determining the white balance using the camera settings and the eyedropper, there is also an automatic method. In this case, the program itself tries to equalize the color tone of the image. Unfortunately, this operation does not always lead to satisfactory results, but in some cases it copes with its task quite tolerably.
It should be borne in mind that sometimes the mid-gray color may be completely absent in the picture, in this case it will be necessary to determine the white balance for objects that have white (but not overexposed) or black (but not embossed) color. Or manually by moving the temperature and tint sliders. You need to know that the higher the brightness of the light source, the higher its color temperature (for example, a flash can have a color temperature of up to 12000 °). Conversely, the candle flame has a very low color temperature, then the slider must be moved to the left. Moving the color hue slider to the right shifts the hue to green tones, and to the left to shift it to magenta. In addition, it is far from always necessary to bring the picture to a state with the correct white balance. So, for example, photographs taken at sunset and having a clearly visible reddish tint, noticeably lose their expressiveness after reducing gray objects to really gray ones. Likewise, winter photographs tend to have a cool blue tint, which makes them more believable. Details on white balance will be discussed in the next article.
Now that we've dealt with color, let's go back to the Exposure tab. To simplify processing, you can simply click on the "Auto Levels" button, while the program itself will perform the necessary actions to normalize the image (leveling contrast and brightness). It can be seen that the picture has improved slightly, but not enough to consider our work completed.

Unfortunately, this operation does not always do what is really needed to obtain beautiful picture, so it is preferable to do all the necessary settings yourself, relegating "Automatic levels" only a reference role. By the way, to cancel any operation, you need to press the "H" button in the upper left corner of the screen, and then in the "History" list, click on the operation to which you want to return.

So, we have finally reached the point where we will try to solve the problem with overexposed parts of our image. For this purpose, the “Restoration of bright areas” item is intended, where you can choose one of three methods. The Brightness Restoration method shades the overexposed areas of the image so that they stop hitting the eyes. The Color Reconstruction method tries to restore the original color of the overexposed parts of the photo and, it is worth noting, it copes with this very, very well! True, sometimes he makes mistakes and then strange artifacts may appear in the photograph. These methods work in conjunction with the item "Compression of lights". Select the appropriate method for restoring highlights, check the "Enable" box, and move the "Highlight Compression" slider to set the appropriate value.

By clicking on the image below, you can see how different methods of restoring overexposed areas differ.
It is clearly seen that the “Color Reconstruction” method has a very strong magic - it was able to restore color where everything seemed to be hopelessly lost: the water jets received volume, and the granite side of the fountain again became red and embossed. True, a color artifact appeared in one place of the frame, but in general the picture became much better than it was originally.
Our next step is to increase the contrast. As mentioned above, the automatic contrast equalization method does not always lead to good results, so we have to do it ourselves. by the most in a simple way is the shift of the "Contrast" and "Brightness" sliders, but the tone curve is a more flexible and accurate tool. For our picture, we need to move the lower left point of this curve to the right to the left border of the histogram, and then bend the straight line in the form of the letter S. By the way, such curved lines, called S-curves, are very widely used when editing graphic images. For example, it is this curve that is used in the DPC for in-camera processing of a photo and saving it in JPG format.

With the overall brightness and contrast of the photo done, now you should move on to the details of the image, this is the “Details” tab. To perform the operations on this tab, it is better to set the image display mode to 1:1. Since our photo was taken at minimum ISO and with a slow shutter speed, there is no need to resort to noise reduction (this will be discussed in detail in one of the following articles). Let's take a closer look at the upper left corner of the picture. It can be seen that after the operation to restore the color of the overexposed areas, colored halos reappeared at the contrasting boundaries. You can level them using the "Ghosting Suppression" command, for this you need to check the "Enable" box and use the "Radius" slider to set the width of the discoloration border. In our case, you need to set the maximum value to 5.0

You can determine the effect of this operation by clicking on the image below.
Now it's time to sharpen the image. To do this, check the "Enable" item of the "Sharpness" element. It should be borne in mind that in the vast majority of cases, at the same time, you need to check the box “Borders only”, otherwise the noise level will increase even in areas with approximately the same brightness and tone (for example, the sky). By default, the "Blur Mask" method (synonymous with unsharp mask) is used to enhance the sharpness - it gives a fairly good result. The "Radius" slider sets the width of the border of the impact of this operation, and the "Amount" slider - the strength of the impact. The "Threshold" slider sets the value of the threshold for triggering the operation on neighboring pixels of the image. You don't usually need to change these sliders, but sometimes you need to change the border width, impact level, or trigger threshold. The Chromatic Aberration Adjustment item is for suppressing chromatic aberration caused by the sharpening operation.
Editors for processing RAW files are a very specific thing, but in last years, with the popularization of cameras among the people that allow taking such pictures, it is becoming more and more in demand, not only by avid photo enthusiasts, as before, but also by a more “moderate” public in love with photography.
Unfortunately, there is not much choice here - the software that comes with the camera, as a rule, does not shine with functionality, and Adobe Lightroom immediately comes to mind from third-party software, but with a price tag of $ 300, the language does not dare to call it the best tool for amateur photographers. With free utilities in this category of software, the situation is not the best, but, fortunately, there are still some, and RawTherapee is one of the best free RAW converters.
The cross-platform RawTherapee has been developed by the Hungarian programmer Gabor Horvath since 2004, and in 2010, after the source codes were opened, a team of like-minded people gathered around the project, and the development of the last few versions continues.
The main advantage of the fourth version, the developer calls the use of a floating-point engine for image processing. The move from 16-bit integer calculations to 32-bit integers greatly improves processing accuracy, which should be especially noticeable in the bright areas of images, where more information can be recovered and, among other things, smoother transitions are achieved. True, such a solution also has a drawback - a significant amount of consumed random access memory. For this reason, the priority version of RawTherapee is 64-bit, and when installing 32-bit, the installer even displays a warning about the possibility of unstable operation and offers instructions for switching Windows to 3GB mode.
The RawTherapee interface is made in the traditional style - the central area is reserved for the main element of the current window (photo thumbnails in the browser window or the image being processed in the editor window), all available tools are collected on the right, and the directory tree (in the browser) or editing history is on the left.


Of course, the interface is highly customizable - you can choose a single or multi-tab interface (in the first case, all images are processed in one editor window, in the second case, each photo opens in a separate tab), change the proportions of the blocks (for example, expand the tool block by narrowing the main editing area), temporarily hide unnecessary ones, and also change the general color scheme– if you don’t like the classic dark gray background of the window, you can choose any of the dozen available options in the options. There is also a full screen mode.

All tools are combined in 6 tabs: in "Exposure" you can change its compensation, set the black level, adjust the brightness / contrast / saturation, determine methods for restoring highlights, and edit the image using curves. The Detail tab contains tools for adjusting image sharpness, micro-contrast, as well as noise suppression tools - you can separately adjust the values for brightness, chroma and gamma, plus enable impulse noise suppression. Tools for working with color are located in the tab of the same name - here you set the white balance (according to the camera, automatic detection and custom values), adjust the values for color channels, hue and saturation using the HSV equalizer, select the input color profile, etc. The "Transformations" tab allows you to crop the image, change its size and geometry - although such things are usually done in a regular graphics editor, but if you are going to do without it, such functionality in the RAW converter will obviously not be superfluous. The RAW tab specifies the demosaic method (a procedure for restoring a full-color image from data obtained from the photosensitive matrix cells), chromatic aberration correction, green value (which allows you to compensate for demosaic artifacts for images from some cameras that use green filters different from others), hot and dead pixel filters, RAW white point correction, thermal noise reduction in long exposure shots, etc. And on the last tab, "Metadata", you can view information from EXIF and choose what should be saved in the resulting file, as well as fill in metadata (copyrights, tags, etc.).


The processing result is saved in JPEG, PNG or TIFF, and RawTherapee can either perform this procedure immediately or put it in the queue - both at its end and at the very beginning. At the same time, the editor can save the processing parameters along with the image - they will be in the xml file with the same name as the image itself, and in the future they can be used when re-opening the RAW file. In addition, if desired, the user can create their own post-processing profiles (in addition to a dozen available ones) based on the operations performed and subsequently apply them to other images.
In previous articles, I raised the topic of the possibility of effective use of the RAWTherapee + GIMP bundle in the practice of an amateur photographer who does not want to mess with hacked products or overpay for the somewhat unnecessary functionality of Adobe Photoshop. The use of RAWTherapee is in many cases preferable to using the built-in Adobe Camera Raw utility, and in all cases known to me, it provides faster and at least no less high-quality results than the converters supplied with the cameras. (The exception here is, perhaps, the Olympus Viewer, which is monstrously slow, but capable of fully letting the user experience the famous “magic of Olympus signature colors”. How to achieve this using RAWTherapee will be discussed below.)
I want to warn you right away that the full course of work with RAWTherapee is, as they say, not for the faint of heart. While most converters provide only some set of algorithms and approaches that are most optimal, from the point of view of developers, for performing various operations on RAW files, literally everything is crammed into RAWTherapee. Getting lost in the algorithms and settings used for an inexperienced user is easier than ever.
That is why today I want to touch on the basic operations performed using the RAWTherapee developer in amateur practice. The fact is that there is still no detailed tutorial (not to be confused with the manual!) on RAWTherapee in Russian, and many things have to be determined intuitively, especially since the methods and interface of work undergo quite significant changes from version to version. Here I set myself the goal of eliminating the main gaps that arise for an amateur (especially who has not slept for several years in an embrace with Margulis's book on digital photo processing) when working with this developer, wonderful in every respect. And each, as his specific needs arise, will discover additional opportunities and knowledge for himself.
Operations with photos at the stage of digital development
In the last article (“”), I recommended moving the maximum possible number of available color operations to the development stage of a digital image in RAWTherapee. The reason for this is simple: RAWTherapee supports 16-bit color depth (typical for professional work in TIFF format and superior color depth in camera RAW), while the main drawback of GIMP has long been its ability to work only with 8-bit color, which leads to posterization, excessive clipping and other interesting problems.In order to correctly distribute the work being done, I will give here a typical list of operations on a RAW image, usually performed in amateur practice.
1. Preview and sort
2. Digital development (demomosaic, debayerization)
3. Exposure correction (restoration of highlights, shadows, general and local contrast)
4. Correction of the geometry of the image (elimination of distortions, inclinations, unwanted angles, distortions)
5. White balance and color balance fixes
6. Noise removal
7. Correction of sharpness, microcontrast, highlighting details
8. Correction of individual sections of the image by the above methods
9. Retouch
10. Completion of processing (imposition of frames, collage, rendering of details)
Some will consider this list self-evident, but it is not. Do not forget, for example, that many amateurs shoot in JPEG. (By the way, RAWTherapee is great at editing JPEGs, applying almost all the features of the program to files in this format.) In most cases, “image processing” comes down to the notorious “red-eye removal”, sharp with default settings and, for the most advanced, to fix BB to "Auto". Those for whom this is not the case sit on Photoshop, or sigh languidly, looking at other people's "professional" pictures and scolding their "soapbox". Hence the need to name the above steps.
In the future, I proceed from the following two premises, verified by the practice of amateur photography (and professional photography, which takes traditions from film times):
Steps 1 to 7, like many other operations, are more correct and easier to perform in a specialized developer than in a photo editor's RAW file opener.
It is best to do without steps 8-10 at all. If you can't do without them, GIMP has everything or almost everything you need to do them.
Therefore, below I will detail the strategy for completing steps 1-7 for amateur photographers using RAWTherapee. I warn you again: this is not a manual! This is the answer to the question "why" or "what for", but not to the question "how". However, in the last question, anyone will understand intuitively.
How to work with RAWTherapee
The RAWTherapee interface is organized using tool tabs. True, in order to understand what this or that tab means, you must either read the instructions, or strain and act by the method of scientific poke. For simplicity, I've included a picture of the RAWTherapee tab buttons here.
What can be done in the general case in amateur practice using the tools on these tabs, I will briefly describe below.
Preview and sort
Everything is simple here. Open the folder in the RAWTherapee browser. Choose a "star rating" for each picture in the folder based on personal preference. Remember to look carefully at the EXIF data displayed on each shot.The two gears in the corner of the picture will place the file in the batch processing list. I will not expand on the necessity and scope of this possibility; who knows will understand. Let me just say that it’s not shameful for an amateur to process a bunch of pictures at once with a package, with or without development in JPEG, but using general settings, for example, to reduce noise and ghosting.
The trash can icon in the corner of each file is also for a reason.
Digital manifestation
Debayerization algorithms (demosaic) are quite diverse. In all cases, if you do not want something special, use AMAZE. But if you have an old Olympus (SLR), you may prefer the recommended VNG4 for it. Although I developed with AMAZE and had no problems with sharpness, color, or moiré.RAWTherapee supports ICC profiles. If you got a profile that suits you for your camera, load it in the corresponding interface panel (in the same place as switching tabs with tools). In older versions of RAWTherape, you could cram color profiles for Photoshop (DCP up to version 4); As with this in the new versions, I do not know.
Exposure compensation
Complete, terrifying totalitarian control provided by RAWTherapee on the very first processing tab. For those who have not read Margulis, it is better to do this: open the “Curves” tool (the first of the proposed curves), select a custom curve shape and carefully pull the bars on the histogram, controlling the result on the monitor.I think it would be useful to remind you that in order to “pull” the picture out of the shadow, you need to “pull” up the left side of the curve, and for greater contrast and juiciness, on the contrary, lower the right side a little and raise the curve on the left, so that the whole curve becomes a little similar in Latin S. You won’t believe it, but many do not know these two operations, continuing to use the “Brightness / Contrast” sliders in the old fashioned way, which give much less control over the picture.
The curves in the RAWTherapee interface are implemented directly on the toolbar, not as a floating window, which makes them not very convenient to use, especially on a laptop with a relatively small screen.
Image geometry correction
Use the "Geometry" tab. Distortion for most lenses can be removed automatically. I do not recommend touching chromatic aberration correction on this tab unnecessarily, for most tasks there is a more convenient tool here.Before rotating or correcting perspective, and indeed any geometric procedures, I advise you to enable the "Autofill" checkbox. The interpolation algorithm for autocompletion in RAWTherapee is very good, I have never been able to notice significant loss of detail on real objects.
By the way, these tools perfectly correct the geometry on JPEG files.
BB and color balance fixes
As with all converters, RAWTherapee has fanatical fans of the “default” color provided by the developer, as well as its ardent haters. Let's be moderate positivists and admit that the color in RAWTherapee is at least as good as in Adobe Camera Raw/Adobe Lightroom, but perhaps inferior to the color from RPP or Capture One. However, the color profiles already mentioned above are at the service of lovers of “genuine” color.The white balance, as expected, is corrected in one click. You can adjust the color temperature and hue manually after installing the most suitable preset.
I won’t go into the details of the theory, but I’ll note that on old Nikon crops (Nikon D5000, Nikon D7000) I calmly removed the famous “carrot” from skin tones, the vile yellow-orange tone that made many portrait lovers “jump off” Nikon. All it took was unlocking the pastels and saturated tones, then lowering the overall chroma slightly and boosting it back up for just the pastels.
Another great but powerful exposure and color editing tool is Lab Curves. I recommend using it in all problematic cases, but only when you are aware of what you are doing.
Noise Removal
Many people did not like the “noise reduction” in the old versions of RAWTherapee. On the other hand, I never had any problems with it.To remove noise, open the photo at 100% or larger. Assess whether your noise is luminance or color. Color can be removed safely, without loss of color and sharpness, up to a value of at least 40-50%. With brightness, be careful not to "smooth" the picture. The optimal values for luminance noise suppression are from 2.5 to 5. K large values should be resorted to only when the picture is doomed to resize or when the situation is completely hopeless.
The Lab method seems intuitively better than the RGB method for removing noise, but this is probably just superstition.
Sharpening and micro-contrast correction
Leave the picture in magnified mode (100% or more). Find a plot with important plot details.It's time to crush chromatic aberrations (if you have them in the picture)! To do this, use the "Halo Suppression" tool on the "Details" tab.
Sharpness can be adjusted (there are 2 methods - the well-known unsharp mask method and the RL inverse convolution method), or you can uncheck this box and adjust the sharpness later in the graphics editor. I recommend messing with sharpness only if the image is not planned to be further processed. In general, it must be borne in mind that some sharpening is necessary for all digital photos without fail.
For the unsharp mask method, the optimal radius value is from 0.3 to 1, the mask strength is from 125 to 333. Higher values lead to the appearance of artifacts around the boundaries of objects, and even in uniform zones.
Microcontrast is a separate feature, which has no analogue in GIMP. In fact, it allows you to additionally emphasize or blur details of different sizes, depending on their relative size in the picture. Using the sliders in the Detail Level Contrast section, under visual control at 100% magnification, see which combination of settings the best way conveys the texture of your image. The game is worth the candle, trust me.
Do not forget that sharpening and playing with detail is always one of the last stages of processing, in any case, applied after noise reduction and geometry correction. Otherwise, you may accidentally sharpen, contrast, and make objects such as noise and ghosting, as well as unwanted color reflections and glare, more visible!
I emphasize once again that all the processing tools mentioned above are potent. Incorrectly selected settings, too much interference in the picture can completely kill the picture. Luckily, RAWTherapee doesn't edit the original file, but creates a separate file with the snapshot settings. At any time, you can undo all unsuccessful corrections and return to the original, or correct what was done incorrectly.
The final stage
At the last stage, the images are either batch processed using the settings you made, or using a special button, the current image is transferred to Photoshop or GIMP for final editing. This is a topic for a separate discussion, and I leave it for the future.Many times I was asked to write about the processing of RAW files by novice photographers, but I thought that a lot had already been written about this by other authors, and then I was asked again good man so I share my knowledge and experience.
RAW File
If you are still filming JPG, then know that this is a pathetic likeness RAW file in terms of the ability to extract useful information for the photographer. RAW the file is essentially almost raw data that did not (should not at least) be processed with white balance, correction, and so on. V RAW The file "stretches" shadows better and overexposure is better compensated. That is why it is best to shoot in RAW, and do not write additional jeeps on a memory card because:
1. you can always make it out of RAW
2. he takes up space
3. it slows down shooting by overflowing the buffer in the camera when writing to a memory card (more than one is written RAW, and also a jeep)
Though RAW the file is essentially raw data, it is not so simple when you open it in a RAW converter. He comes with a trailer. A profile for distortion correction, vignetting, and noise reduction is often embedded in the file. Probably, the discoverer of such a petty "fraud" can be considered Sony, for the files of which the noise reduction began to work from certain ISO values. She was followed FUJIFILM and made the situation worse. You open a RAW file in Adobe Camera Raw(hereinafter ACR), and there is no longer distortion and vignetting, and often the noise is already “crushed”. This is probably good for a novice photographer who does not want to learn photography, but wants to “clack-clack” and bad for someone who is trying to figure out which ISO is better to shoot at and what characteristics his lens has.
RAW converters
RAW converter is the program that decrypts (I write in simple terms) initial data the right way and shows us visually, in the form of a picture.
In fact, data can be decrypted in different ways, and therefore the result is slightly different for different RAW converters. The most famous and most "advanced" is, of course, Adobe Camera Raw. It understands DCP color profiles, has many controls for perspective, distortion, vignetting, color shifting, and working with noise and sharpness. Promoted by the giant of the graphics market - the company Adobe, so you want it - you don’t want it, and everyone else has to be guided by it one way or another.
Here, everyone who uses another RAW converter (from experienced photographers) will be indignant, remembering their undeservedly "forgotten" Capture One or RPP but a fact is a fact ACR stronger, simpler, and faster.
However, this favorite of RAW converters is not so perfect. The important point with him is that he uses all these “appendages” that the camera manufacturer hangs on its RAW file format and turns them on without notifying the user and the possibility of turning them off. To understand how this happens, you can see. V ACR There are no noises and everything is somehow smooth. But once you open it in another RAW converter, it turns out that there is actually a lot of noise. In fact, when you open the file of this camera in ACR, automatic noise reduction, correction of distortion and vignetting occurs. Software of course.
Why do I, for example, like 90% of other photographers, use Adobe Camera Raw? The answer is simple - this program has a large corporation behind it and will continue to develop, while others, including very promising RAW converters, are kept by one person. When he gets bored, he will simply quit the project and you will be left without your favorite instrument. So let's talk about the possibilities. Adobe Camera Raw.
Features of Adobe Camera Raw
I use the standard photo cataloging tool, Adobe Bridge. It is closer to me in ideology. This is a full-fledged tool only to scroll through, rate photos, view shooting parameters, etc. Nothing extra. For those who want a "harvester" exists Adobe Lightroom, which also uses ACR, but the ideology there is from streaming photography.
First, update your ACR to the current version. It is updated quite often and there are some features that were not in the older versions.
As you can see, there are three important element control of the RAW development process:
1. main panel
2. auxiliary panel
3. histogram
Basic parameters / Basic

white balance
The first thing we do is set the white balance. Well, if we know him, the camera guessed him or we used the color scale.


Select the gray eyedropper and click on the gray patch, third from the left. It is a medium gray neutral color. So we have the white balance will be the most accurate.
If there was no scale in the test frame, then use the standard settings in the white balance menu or move the white balance sliders until you start to like the skin color of the model. Also, there may be something neutral gray in the frame, which you can poke with an eyedropper, assuming that it is gray. This support comes up from time to time.
For example, in the frame where the girl is sitting on the couch behind her back is the perfect "gray card" of gray and black stripes. But keep in mind that objects that at first glance may appear gray, in fact, can easily have a bluish or beige tint, and then you will not be able to use them as a calibration element.
bar graph
Now you need to make sure the overexposure and underexposure indicators are turned on. To do this, check that the small triangles are included (circled in a square) on the histogram, as in the example.

Now, if my picture is incorrectly exposed or too contrasty, the overexposed areas will be highlighted in red, and the underexposed areas in blue.

Places highlighted in blue have a color value: 0, 0, 0

Places highlighted in red have a color value: 255, 255, 255
You should avoid both cases, unless this is a catalog shoot where the background should be pure white or black.
exposition
If you have a small overall error in plus or minus, then use the “ ” slider.

Contrast
Sometimes it can be useful to increase the contrast of a photo in order to get a more vibrant color. This is the most effective way to improve a photo without spoiling it (if you increase the contrast within reasonable limits).

"Sveta"
"light" is not White color. But close. And you can lighten them to white or darken them to grey.

In this photo, the main "lights" have accumulated on a white shirt and a "mouse" that lies on the table.
They could go into "overexposure", but the exposition here is ideal and therefore they are exactly as they should be - on the verge.
"Shadows"
"Shadows" is the whole jumpsuit, stripes on the wall, under the sofa, etc. There are a lot of shadows in this picture and they set a great contrast with the light wall and the white shirt.

Shadows could be brightened with this slider, but I conjure you to use it. In the shadows lives a terrible beast - "noises". Any area of the frame where little light has fallen is a potential source of "noise". Many beginner photographers believe that absolutely everything should be visible in the photo. This is not true. "You can see everything" is the same as "I can't see anything". The picture should have a plot focus and unimportant areas. It is these insignificant ones that should go into the shadows, setting the overall contrast compared to the bright protagonist of the picture.
If you lighten the shadows, then you pull out the “noises” from there, and then you have the insane task of destroying the monster that you yourself created.
I have a relatively new Canon 5DsR camera, so the shadows are drawn well and there is little noise. I had to raise the exposure by 2 steps to see them.

These green and purple dots are “noises”. You don’t need to fight them, you need to avoid them with competent shooting and competent processing. And if we can’t go anywhere without it, then we will reach the “noise reduction” tab.
"White"
The "white" slider is needed much more often than the "shadow" slider. often allows a slight movement to avoid overexposure in the frame, if it is not critical.

How much you can "pull" a shot out of local overexposure depends on your camera. Although modern cameras improved their performance in this regard around 2008, underexposure is still not so bad compared to overexposure. Simply put, “overexposure” is almost always the inability to save a photo, there is not enough stock. But if you didn’t light enough, but you can pull out something, albeit with noise and dirty colors. This applies to all cameras, do not think that you have some special one. I tried the newest and Sony A7R II. Miracles don't happen :)
"Black"
Sometimes you need to increase the contrast of an object that has white areas. We raise the contrast by brightening the whites and darkening the blacks. If we cannot touch the white, then we will darken the black. That's what this slider is for. You can also remove black from the entire frame, but I don’t see a case when this may be needed throughout the frame, except perhaps locally, but this slider acts throughout the frame.

When working with this slider, make sure you have the underexposure indicator on the histogram turned on. This will avoid "bumping" into black areas that you would not like to see as a completely black spot.
Micro contrast / Clarity
Micro-contrast behaves roughly like coarse sharpening. Of course, it does not add sharpness, but it adds the illusion of sharpness.

Use very carefully or don't use at all. There are much more gentle methods of increasing visual sharpness, including in the RAW development process (we'll get to that).
"Nuclear Color" / Vibrance
The literal translation is resonance. I call it "nuclear color" because it just disfigures all colors. After such amplification of colors, it is simply impossible to look at them.

Most often, lovers of this slider "pierce" on objects to the color of which our eyes are especially sensitive: the sky and grass. You know all the colors of the sky if you're not a permanent resident of the subway. Same thing with grass. An error in the color of the grass is very easy to recognize. The wrong color of grass and sky is rejected by most viewers. Forget this slider!
Instead of this slider, use "Contrast" and another tab called HSL/Grayscale (more on that later).
Color saturation
The effect of this slider is almost as destructive as the previous one. In fact, all three last sliders are harmful.

Harmful, because they give the appearance of an easy achievement of results and the beginner thinks that everything is ok. But in fact, he spoils his possibly good initially photo with poor processing. It would be better not to do anything then.
If the colors in your picture are too faded, then there are usually reasons that led to this during the shooting process. Accept that this picture is a marriage. Establish the reasons for such a marriage and in the future try to shoot better. There is no need to take a piece of the city and try to squeeze out of it what is not in it. To get a great picture, you must first take at least a good picture, and then process it with high quality and minimally. This does not mean repainting it completely! As a rule, all processing consists in removing dust, increasing contrast and correcting some small geometric defects. Everything! You are a photographer, not a retoucher. Leave the retouching to the professionals.
Image straightening and cropping
Here I will have to make a small digression from the “Main panel” and switch to the auxiliary one. The fact is that after aligning small flaws in the photo, I want to align the horizon as well. Those. neither the person nor the horizon in a landscape photo should lean to one side. But some shots always come out tilted, especially when you're into the story.
In this case, I was lucky and there are vertical lines on the wall. It is highly likely that they were glued exactly vertically and the wall is even.
I'll select the ruler tool, click anywhere on the line that should be vertical, and drag it down or up.

The picture will rotate a little, correcting its position and you will see the line of the intended crop of the photo. On this line, you will also see controls - small squares that you can drag and move the cut line.

Control boxes are marked with red arrows.
In this case, I don't like the second layer of curtain at the top, so I'll omit the trim line. I will also move the left line to the right to cut a wire on the floor and some box. It would be possible to restore the floor in this place if I really needed a whole shot, but this is not a job for beginner photographers and therefore does not apply to the topic.

I press Enter and the excess is cut off from the picture. In fact, nothing was physically cut off. we are working with a RAW file, but the XMP file that is now attached to RAW has been changed with our settings. Now the picture will open like this...

If we leave the RAW file for now by clicking Done, we can always go back and undo the crop later by selecting the Crop tool (indicated by the red arrow) and pressing Esc.

If you did not need to align the image, then you can always simply crop the image to the desired aspect ratio by using the Crop tool right away.
Now, with a clear conscience, we return to the “main panel”.
Second tab - Tone Curve
This tab allows you to work with the Adobe Photoshop tool called "Curves". It's a very flexible tool and it's great to be able to use it before getting into Photoshop itself, because it's not destructive. You can always undo these changes. And changes with the help of “curves” can be very global. There is both lightening and dimming pixels of a certain brightness, as well as work in color channels.

If in the Basic tab we didn’t have settings for “highlights”, “shadows”, “white” and “black”, then special controls are offered here that limit the slider’s action. Which brightness range should be considered as shadows and which as highlights? You yourself determine this by the points indicated in the picture by red arrows.
If you do not change the default settings, then the sliders for “light”, “shadow”, etc., which I circled in a red frame, will work exactly the same as on the first tab.
I deliberately shifted the control points and in the area circled in red you can see that the range of lights that I influenced turned out to be quite small.
There is also a second tab called Point. It gives the most flexible curve setting. There is nothing complicated here, but be careful when working with the curve. Most of the time, the highlights and shadows are already distributed more or less normally, so if you drag the lights to white, you can lose color, and “noise” can be pulled out of the shadows. At the same time, such a curve can be very useful to you, for example, when processing underwater photographs, where the red channel, as a rule, is very bad. You can create a profile setting for yourself that will weaken the green-blue and increase the red and apply to all photos. Plus, this is again not a destructive technique, your settings are all saved in a separate file.

I marked the drop-down list with a large arrow, where you can select the standard settings “linear contrast” (by default, the curve is linear), “medium contrast” and “strong contrast”.
You can toggle Linear-Medium-Strong to see how they are achieved. The curve becomes a sine wave, darkening the shadows and brightening the highlights.

Based on this knowledge, you can decide for yourself what to highlight or darken. You need to do this for all channels or for some one.

This feature is not included in the list of simple functions (especially when working with individual color channels), so if you don’t understand something, don’t worry, you will understand it later when you really need it.
Detail tab
The detail tab is responsible for the visual sharpening of the photo and for the ill-fated “noise reduction”.

Sharpening
The first menu with red arrows is visual sharpening. Obviously, we can't pick up extra detail in a shot out of nowhere, but we can always trick the viewer's brain into thinking the photo is sharper than it is. For this purpose, the long-known (but no less surprising) method of processing image contours (the method is also called contour sharpening in Russian) is used, where the contour itself is darkened and outlined on both sides with a white line (in simple terms, again).

With the strength of the effect, everything is clear, the more - the stronger the effect of increasing visual sharpness. There is a threshold at which artifacts begin to crawl out. Try not to overdo it with the strength of the effect, it's better to find the right radius for your photo size and detail size and then increase the strength of the effect.
The menu item “small details” / Detail makes it possible to enhance the textures in the photo, and small values \u200b\u200bof this parameter make it possible to work only along the edges.

The "Mask" item makes it possible to focus on sharp contours, applying the enhancement method to them. Here it is worth paying attention to the fact that all menu items have a visual mode if you hold down the ALT key and move the sliders.

Noise suppression
I brighten the shadows with the Shadows slider from the first tab and I naturally get noise where the shadows were. I start by analyzing these noises. The fact is that noise is divided into two types: luminance and color. Brightness points are points of different brightness, randomly distributed throughout the image. Nothing special can be done with them, just blur the picture a little. The picture will be less sharp, but the dots will be less visible. Luminance noise is typical for very high ISOs when shooting.
Color noise is always present in the shadows at any ISO. They are what show up when you lighten the shadows. They look like colored purple, green and red dots arranged in a chaotic manner.

Accordingly, the arrows mark the sliders that allow you to deal with different types of noise.
For now, we are only discussing work in RAW converter, but you should know that in addition to RAW converter there are still a lot of ways to deal with "noise".
There are plugins for Adobe Photoshop, For example, Imagenomic Noiseware or Topaz Denoise. Both are considered good noise canceling options when you have a difficult case.
There is also a technique multishot which helps when shooting with a tripod. You take a series of shots at a high ISO (for example, you shoot a starry sky at a short shutter speed, because the stars already turn into tracks at a long shutter speed), then you add the shots and only stationary objects remain in the pictures. Noise is a chaotic thing, because in this case they are subtracted from the image. I think it will be important for you to know that there is such a method.
HSL/Greyscale
Tab HSL/Greyscale controls color ranges. HSL is a color description model and stands for Hue / Saturation / Lightness (Color / Saturation / Brightness). This model can describe any color.
You can select a range of colors and change their color, color saturation and brightness. This is a very effective and, when used skillfully, neat tool.
Hue (Color)

The last two lines put me in difficulty in translating the color. both of these colors are purple in Russian :) But in English, purple is divided into three types.
Thus, by dragging, for example, the red slider to the right, I get not a brown, but a red table.

Please note that a rather narrow range of colors was captured when repainting, the floor remained brown. This is because the computer knows the floor only appears brown, but is actually closer to orange. If you touch the orange slider, the floor will immediately begin to repaint. In any case, all colors in the image are in one of the ranges from this list.
Saturation (Saturation)

Here you can enhance any color. In this case, I pulled the red slider and even the lips shone with new makeup.
Lightness (Brightness)
By changing the brightness of a small range of colors, you can achieve good results. I use this tab from time to time to darken a light blue sky without affecting its color. You can make it darker and reduce the saturation. It looks like the real color of the sky.

I recommend not raising the saturation, but only reducing it when necessary. It is also useful when Adobe Camera Raw handles red color incorrectly. You can lower the saturation and get a softer skin tone.

In this case, I darkened the orange colors, making the girl tanned.
split tone
Tab split tone Literally translated as "separate toning" and its essence is to paint the light in one color, and the shadows in another. For example, the lights are warm, and the shadows are cold. This tool was not introduced by chance, and why it works can be understood from the article in its part.

Using the color slider, we change the color of the highlights or shadows to the desired one. Usually, warm toning is used for highlights, and cold toning for shadows. Next, you choose the saturation of this toning with the "saturation" slider. Between the adjustment of the toning of highlights and shadows is the balance slider between these actions, i.e. what actually count as lights and shadows.
Example

To your taste, of course, the picture needs toning or not. Sometimes toning saves a mediocre shot and this is very often used by photographers who shoot weddings.
To cancel the effect, it is enough to set the saturation sliders to zero.
Lens Corrections
This tab is designed to eliminate the influence of lens imperfections on the picture. On this fragment, you can see if you look closely in the form of purple borders on white vertical elements.

Here you can see the automatic correction of the influence of a particular lens in the Profile tab.
Remove Chromatic Aberration- removal of chromatic aberration.
Enable Profile Corrections- correction of the influence of lens imperfections using a profile (correction, distortion and vignetting)
There are a lot of photo lens manufacturers of all brands in the drop-down list.

You can enable corrections separately, as well as manually additionally correct distortion (initial value 100%) and vignetting (initial value = 0) with the sliders just below if you have enabled automatic correction using a profile.

Additional corrections for distortion and vignetting are indicated by red arrows.
effects-FX
Next tab effects respectively applies to special effects.

Three types of effects are offered:
DeHaze- haze removal
Grain– grain
Post Crop Vignetting —
You can now see the effect of DeHaze in the picture in the form of high contrast and increased color saturation.
Influence Grain(grain) similar to natural film grain. Can help create the appearance of a film shot.

With the help of additional vignetting, you can add emphasis to the center of the picture, which is useful for not very successful portraits. In any case, this is another tool to add visual dimension to the picture (a large bright spot against a darker background draws the viewer's eye).

The vignetting function has many settings, but I will not stop at all.
The main ones are: vignetting strength (amount), distance from the edges (midpoint), roundness (roundness), feather (feathering)
Camera Calibration
This sets the color profile for the camera.

Top tab process shows us that the style of working with color is Adobe Camera Raw changed three times, so if you suddenly open your old files, you can find an exclamation point in a triangle in the lower right corner of the picture. This means that the old process was used and if you click on this label, the color process will be updated and the picture will change its appearance a little.
Next you see the menu Camera Profile. The fact is that the camera can be calibrated in relation to color reproduction. To do this, you need a color scale, like X-rite Color Checker. "Canon is red" and "Nikon is blue" are a thing of the past. In addition, here you can connect your own profiles for special needs. For example, I've connected an infrared color profile that allows me to colorize my infrared images without limiting the color temperature.

Presets
Tab Presets(settings) contains a list of your settings for White Balance, framing, contrast and sharpness settings, and so on. from past photo shoots.


The red arrow indicates how to get to the menu to save, load or apply presets.
The menu for saving snapshot settings looks like this...

A wide choice of what settings you want to keep and what not.
Snapshots - snapshots of settings
In the process of setting up the development of a picture, you can find some good solutions, save them and then continue experimenting with the ability to return to the saved settings. This tab just implements this feature. Customize the snapshot to your liking, then click on New (indicated by the red arrow) and give your settings snapshot a name.

After that, you can change the current settings as you like. When you get tired and you decide that the old settings were better, you go to this tab, click on the name of the settings snapshot and your snapshot miraculously returns to the previous view.
Auxiliary panel
I called the top panel auxiliary because. it has to be used less often, in the picture it is in a red rectangle.

In fact, tools are concentrated in this panel, although some more complex elements have migrated to it in the latest edition.
magnifying glass

Pro Lupu nothing much to say. Enlarges and reduces part of the picture. You can do the same with Ctrl + "+" / Ctrl + "-" (for Mac, use Cmd instead of Ctrl).
Hand

Tool Hand allows you to drag an image fragment around the screen if the image is larger than the active window.
White Balance Tool
Color Sampler Tool

In the picture you see three "sights" in different places. And an information space that shows the color values for those three points in the image.

As a rule, you need to put several control points on the image in order to track changes in important places when you work with the color, lightness or contrast of an image. This option is for relatively advanced photographers / retouchers and allows you to stop in time while improving the image during the “development” process.
Targeted Adjustment Tool

Tool Targeted Adjustment Tool allows you to influence the image using tabs Tone curve and HSL/Greyscale. In my opinion, not a very useful tab, in the same way you can use these tools through the main menu.

In this tool, you can select the aspect ratio of the future fragment and “turn on” the grid.
TransformTool
A very useful tool that I first discovered in the RAW converter Capture One. Allows you to correct the geometry of the image, where there are straight lines by placing these lines in the correct position.
![]()
In this picture there are straight lines on the left and on the right, along which you can see the geometric distortions of the image and, guided by them, you can correct the distortions. This was due to the fact that I tilted the wide-angle lens down a bit. The vertical lines began to diverge at the top. If I raised the lens up, then, on the contrary, they would converge. A regular lens often comes in handy either up or down. the field of view of the lens does not always capture what is needed. Only gimbal cameras can change the composition without tilting the lens. I already wrote about lenses, but we will talk about gimbal cameras in the following articles (very soon).
I marked the guides with red rectangles, which I simply placed along these straight lines, which should be vertical. The program itself understands where the lines should be vertical and where horizontal (estimates the angle of inclination), so you just need to put a guide in the right place and the picture will straighten itself.
![]()
Another example.

Old photographs, before 1925. approximately, please us with the correct geometry. Why is that? Yes, because up to this point, all photographers shot on gimbal cameras, which made it possible to correct the geometry of the image. This is easy to see in architecture shots, the walls of buildings along the edge of the frame are always parallel to the edge of the shot.

Parade of the Life Guards Cavalry Regiment

photo: Karl Bulla, famous St. Petersburg photographer of the early 20th century.
Interior view of the Passage of St. Petersburg. 1900
It would seem, why did they come up with other cameras, if the cardan ones were so perfect? For a simple reason - they are very heavy.

Karl Bulla himself.
Filmed with such cameras almost exclusively from a tripod. They were transported only on a cart, on a horse, and later on a car.

Ansel Adams stands on the roof of the car with his gimbal camera. Another legend of photography, whose creative work I highly recommend to get acquainted with if you have not already done so.
In 1923, Mr. Oskar Barnack, after having toiled with the then cameras on his mountain walks, invented the camera, which later became known as Leica I. From this moment, you can start counting pictures with distorted geometry :)
But on the other hand, it became possible to climb even Everest with a camera, which some took advantage of (some, however, remained there with the camera).
![]()
This picture was taken on ZEISS Distagon 15/2.8. A very wide-angle lens that, when tilted down (to capture the path into the frame), tilts the walls strongly towards the center.
I highlighted the additional menu for the tool with a red square TransformTool. There are simple perspective controls in this menu and if I was exactly in the center, I would ideally straighten the walls with one movement of my hand, the topmost item of this menu (in the box).
![]()
I was standing slightly to the right of the center of the corridor, so the right wall leaned more (when correcting the right wall, the left leaned the other way) and for this particular shot it is preferable to use guides, as in the previous case. But if it was in the center, it would be corrected in one step.

geometry correction result
Another example is a shot of a building from the front if I'm not standing in the center of the building. In fact, in the case of a wide-angle lens and the absence of special means for checking the position of the camera, it is difficult to stand exactly in the center, and sometimes it is impossible when there are some obstacles in the form of other houses, poles, etc.
![]()
From the picture, I see that the left side of the buildings is larger than the right side, which means I was standing to the left of the center of the subject (two buildings). To correct the geometric distortion, I will use the second menu item.
![]()
The perspective was corrected at the cost of a significant piece of the frame. But nevertheless, for amateur filming, this good way make an acceptable frame.
I will not comment on the rest of the instruments in such detail. they are too simple:
Rotate - image rotation, allows you to align the horizon line. We used to do the same thing more carefully with a “ruler”.
Aspect - Corrects the aspect ratio (never used for real shots).
Scale - image scale (never used for real frames).
Offset X, Offset Y - offset along the axes (never used for real frames).
Spot Removal
Spot removal tool. It is convenient because its action will be saved even if you open the RAW file later and change the exposure, contrast, or any other element of the image development. Also you can remove this spot fix, this action is non-destructive.

On the right there are settings for Spot Removal, which includes the brush size, brush feather amount, and brush opacity.
Understanding the correct settings will come with experience quickly.
Red Eye Removal
Tool Red Eye Removal, as the name implies, serves to remove the red spot in the eye, which is formed due to the illumination of the pupil portrayed by the flash "forehead".
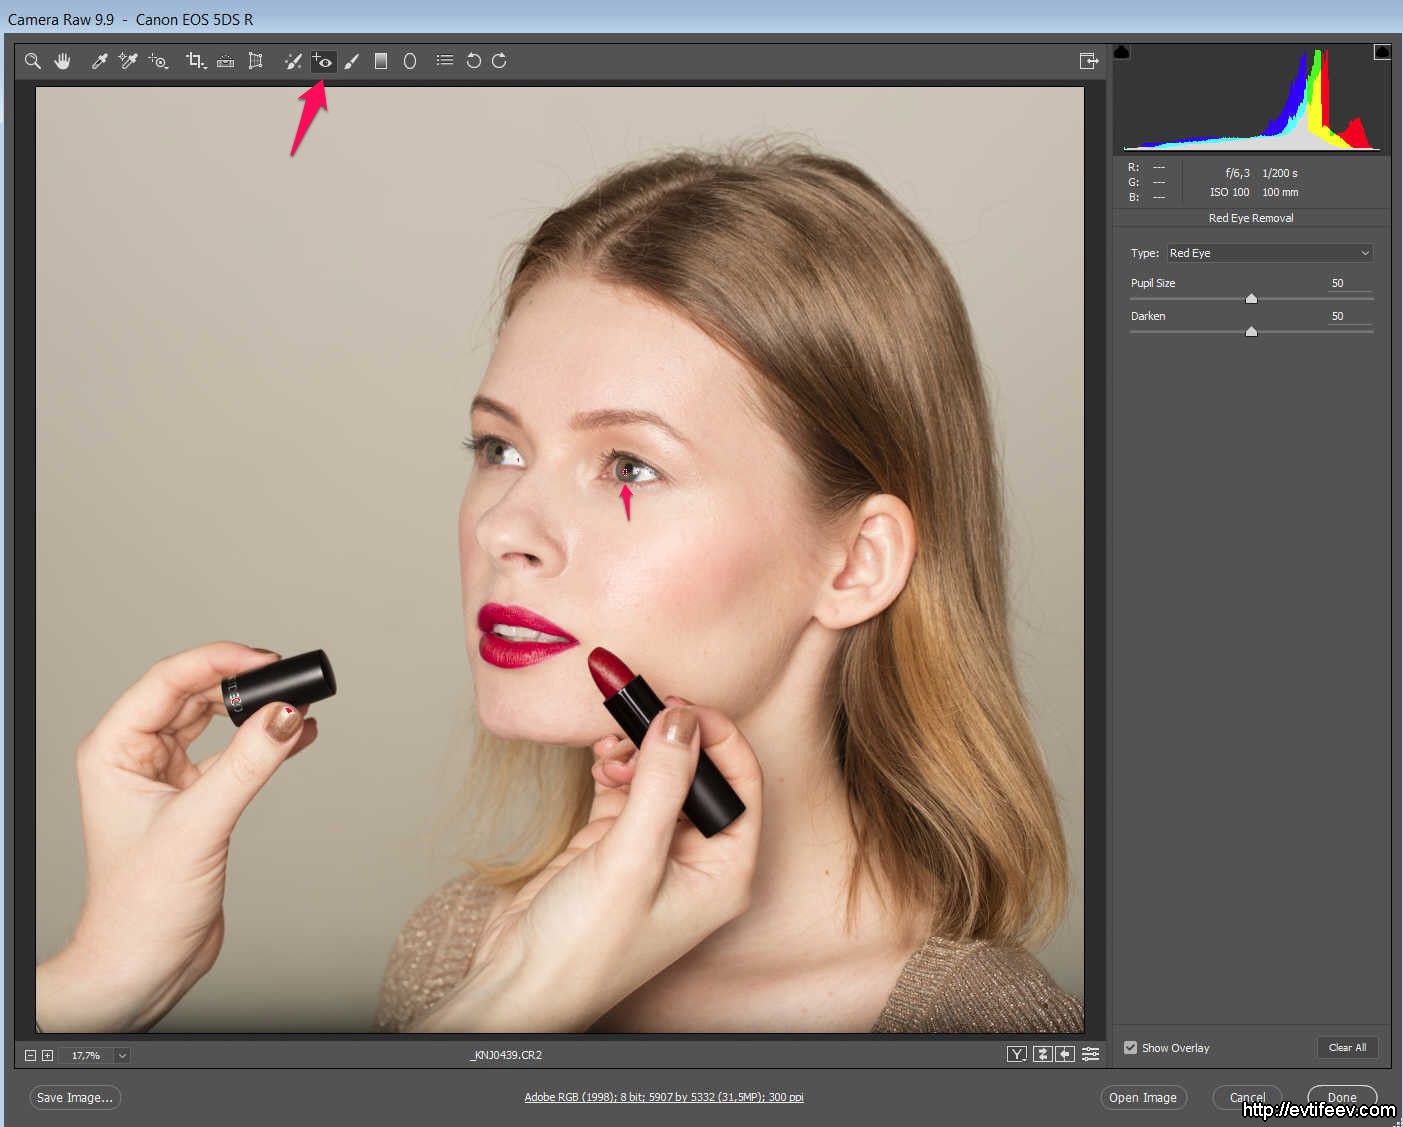
In the left menu, you can select the pupil size and the degree of obscuration.
The red pupil is selected by a stretching frame, the program itself finds a red spot and decolorizes it. Works quite efficiently. There is nothing to show me. “In the forehead” I do not candle with a “naked” flash and I do not advise you. Most often this happens when shooting on a smartphone or a “soap box”, where the flash is built-in.
Adjustment Brush
Adjustment Brush is a very useful tool!
Allows you to make all adjustments locally, i.e. only where they are needed. Adjustments can include everything: exposure, white level, black level, contrast, micro-contrast, and a bunch of other settings.

Let's say you took a picture of the liner. Lights are burning on the liner and they, by themselves, are knocked out in white and yellow highlights on the night landscape. This is not always good, because. there is also a so-called “halo” around a large glare, i.e. glowing circle.
In this picture, embossed in white light shown in red. We will "eliminate" them.

I took Adjustment Brush and drew everything you see in purple (the mask showing your actions with a brush can be turned on and off with a tick at the bottom of the menu). In fact, I set the white to -6 and brushed over the lanterns and the glare from them. In a real picture, there will be less overexposure if they are not knocked out at all, Adobe Camera Raw there is a margin, a safe white shift to plus when developing, so you can take advantage of highlight recovery.

Result
Now let's try to increase the microcontrast locally.

original image
Here we see a not very contrasting stone, but with the potential to increase the contrast. it has colored facets, white and dark gray facets. We will remove the highlights with a brush and increase the micro-contrast.

Sketched a stone to increase the micro-contrast.

Increased microcontrast and removed overexposure.

The result is something like this. This is a very fast shot and very fast processing (only I shot on black, where the dust is less visible).
Graduated Filter
Let's say you went out on a photo walk without your favorite gradient filter, which allows you to even out the lightness of the earth and sky. And then there's this scenery...
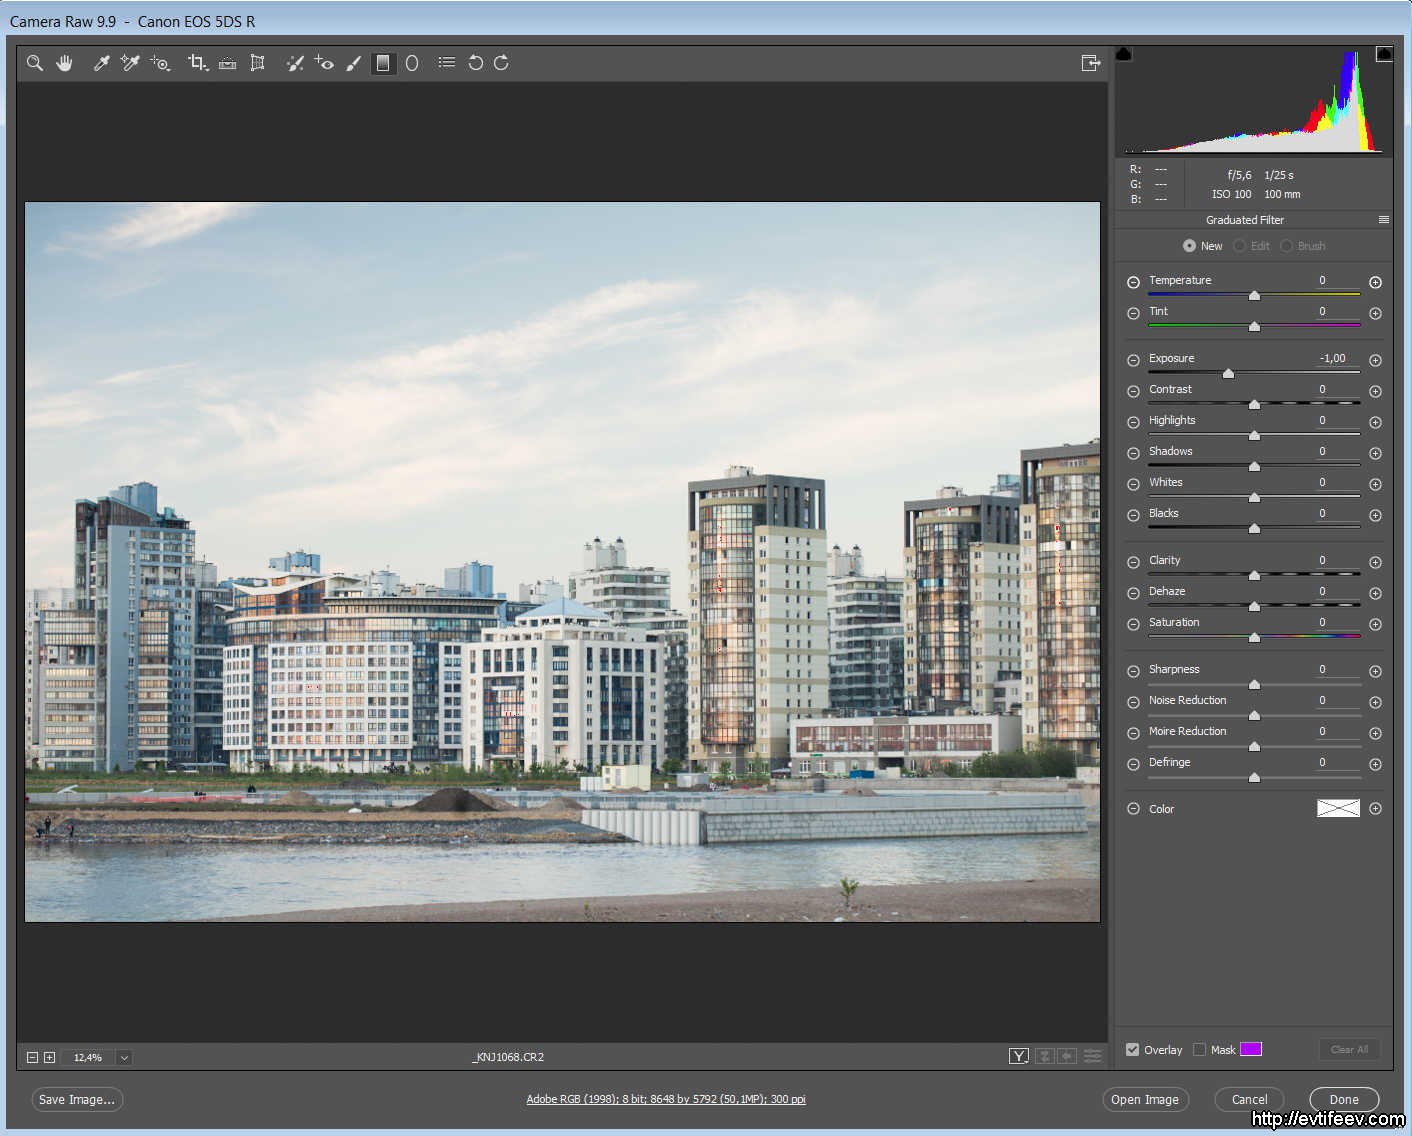
Everything is fine, but the sky is too bright. This is where the gradient filter comes in. Adobe Camera Raw. First you need to set the exposure to minus (as much as you need - try experimentally), and then stretch the gradient from top to bottom. To make it stretch straight down, hold down the SHIFT key.

Accordingly, the gradient can consist of completely different effects, any of those indicated in the right menu. For example, it can be colored.

regular gradient

Radial Filter
The last of the considered filters will be Radial Filter. It allows you to apply all the parameters of the image in the form of a circle or an oval. Sometimes it is convenient to highlight the center of the composition.

Auxiliary Panel Menu - "Secret Functions"
Suppose we decide to shoot something very long or tall. This will help us create a panorama. We take multiple shots by turning the camera on a "panoramic" head, on a true panoramic head (where the lens is fixed at the nodal point), or by tilt-shifting the lens. At the output, we have several frames with an offset.

Open these files in Adobe Camera Raw.

At the top left there is a small button, when clicked, we will see a small menu. In the screenshot, it is already open.
The menu offers us three functions:
1. Synchronization of pictures according to development parameters (it can be very useful for a series of photos)
2. Creating an HDR image (we will not dwell on this function, because Photoshop does not implement it well)
3. Create a panorama (this photoshop does well)
Creating a panorama
Select three pictures with Ctrl+A or simply mark them with Ctrl key and mouse click.
We select the function of creating a panorama.

Panoramas are different and, accordingly, their projections too. Panoramas are a separate topic, we will talk about them in the article about panoramas, but for now we just select the “Perspective” panorama type. I shot on tilt-shift and all the lines are straight.
Adobe Camera Raw will think a little and make you one more picture under the already existing three in the list - this will be a stitched panorama.

Now you can work with it as with a normal picture, change: exposure, contrast, remove noise, etc. All actions will now be applied to a large panoramic image in DNG format (the program itself will offer you to save it as DNG in order to preserve all the features of the "raw" original).

Then open file will turn into open object and you can open the photo as a Smart Object in Photoshop. This is convenient for later work on pulling out shadows, stacking shots, etc. because by clicking on the icon of the layer with the image, you will again get Adobe Camera Raw and you can change all the settings for developing the image.

On the one hand, this is very cool, but on the other hand, it greatly increases the file size and slows down the work with the image.

As you can see, we got a 81 megapixel panorama, you can make a poster 120 x 50 cm with the quality of a glossy magazine.

Results
skillful work with RAW converter often eliminates the work in Photoshop itself, so you save a lot of time when using functions RAW converter to a greater extent. Plus work in RAW converter is not inherently destructive, i.e. There is always something you can change or change.
I hope my three-part impulse to write this article will be useful to you, make your work more efficient. If you want to continue to see such articles, do not forget to click repost in social networks(buttons for Vkontakte, Facebook and others are a little lower in the form of small icons).
We advise you to read
 Will the registry office replace nikah Who exactly is it talking about
 Infernal all fields marked with an asterisk
 How the Alawites - the descendants of the Cilician Armenians, became a separate people How many Alawites are in Syria
 Uthman ibn Affan - the third righteous caliph See the meaning of Usman ibn Affan in other dictionaries