When installing various structures and manufacturing small parts, fillet welding is often necessary. Such a joint differs from the usual connection of two sides into a common plane, and requires prior knowledge and training. Such work is fraught with large defects and time costs. The welder is expected to have a special ability to drive off the slag in the weld pool, otherwise it will work out. What are the features of this type of seam and how to cook such joints in different ways?
Fillet weld is a fairly common two-plate or shaped pipes, between the sides of which are less than 180 degrees. In metal structures, joints are often used where the sides are set at 90 degrees. This is necessary for uniform loading and structural stability.
Fillet welds are of various types:
- with adjoining edges at the junction;
- with one edge applied to a flat plane (T-shaped);
- overlapping;
- with and without grooving.
Fillet weld welding can be performed in various spatial positions, which adds complexity to the work. For example, an uneasy upside-down T-joint is one of the most difficult even for experienced welders. In addition, the fillet weld can be welded with a continuous and intermittent method. They also differ in length. Up to 250 mm are considered short, and up to 1000 mm are considered medium.
Fillet weld difficulties
To be able to weld a fillet weld with high quality, you need to know when performing it. Common problems are:
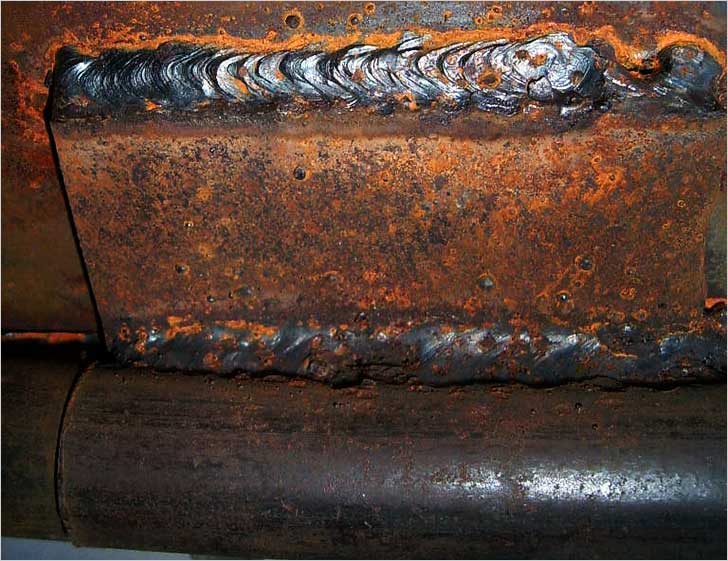
- Irregularity of deposition of the weld metal on the sides of the joint. As the molten iron from the electrode and edges gravitates downward, most of the weld ends up on the bottom plate. The top edge can only melt slightly and such a joint will easily disintegrate under load.
- Undercuts. The electric arc "gnaws" small areas from the metal surface. When welding in the lower position, this can be controlled and the electrode is held back to weld the filler material to the damaged area. But in the case of a corner joint, it is much more difficult to "drive" the hot metal droplets onto the side wall. Therefore, the weld has a recess on one side.
- Lack of root fusion. Inexperience, some welders begin to overly manipulate the end of the electrode on the sides to fill the joint, but this leads to metal settling on the sides, and complete or partial lack of fusion of the root of the weld.
- Incorrect fillet leg. To create quality connections, it is important to adapt to the correct electrode speed and the correct voltage settings. Too little current and slow passage will result in excessive bulging of the leg. This will mean poor penetration of the base material. High amperage and fast electrode guidance will create a concave negative leg. Although this structure implies deep penetration of the sides, there is not enough metal in the seam to resist the loads.
- Wrong angle. Welding joints are rarely freeform in relation to the degree of the angle. This requires exposure of the correct size. When passing from one side, the attachment plate often "falls" in the direction of welding, which spoils the quality of the assembly of the structure.
In addition to these features that are found on fillet welds, the joint is subject to other defects. Among them: holes and voids, solid inclusions, cracks at the boundary of the base and filler metals, mixing of the weld shape.
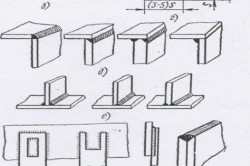
Preparation of the parties
To successfully weld fillet welds, you must not only be mindful of defects, but also be able to. When welding plates up to 5 mm, no preliminary measures are required. If the iron is covered with rust, it is brushed off with a metal brush. Then you can do the marking, installation and welding. You can act in a similar way when connecting with an overlap. Usually two seams are applied, one on each side, which is sufficient for strength under load.
If the thickness of the sides is more than 5 mm, then one-sided grooving is required. A 45 degree bevel on the extension plate will create space for the filler material to flow and strengthen the seam. If it is necessary to weld an element thicker than 10 mm, then double-sided grooving is carried out. The cone of the plate can be left blunt, with a thickness of 2-3 mm. This will help to align the side element more evenly, and will protect against burns and sagging from the back side.
After preparing the edges and installing the parts in place, tacks on both sides are sure to be exposed. This will prevent distortions and deformations during seam guiding. Welding must be carried out alternately on each side. It is not allowed to make several passes from one part, and then go to another. The potholders will not hold such a load and will burst.
Welding methods for fillet joints
Fillet welds during welding are fraught with many defects, therefore it is necessary to remember the causes of their occurrence and to prevent this. Several methods have been developed that manage to connect metal parts at a certain angle. Each welder can use them depending on the situation or to identify the best quality result in his case.
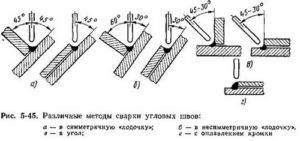
"Boat"
Welding with this method is applicable in the case of small structures that are not fixed to the floor, which can be turned over. This is the most suitable option for novice welders. The product is placed in a V shape, which resembles a boat, and from this comes the name of the method.
The electrode is held vertically with a slight tilt towards itself. Welding is carried out without oscillatory movements in order to fill the root. After breaking off the slag, the next pass is performed, depending on the thickness of the metal. Subsequent seams can be laterally manipulated with the end of the electrode to give the desired width. This method allows the filler metal to be applied evenly on both sides and to avoid undercuts with poor fusion.
Down position
Large structures that cannot be tilted for the boat position are welded in the lower position. To fill the root of the weld with high quality, the electrode is placed at 45 degrees relative to the shelves and tilted to the right or left. and the seam is being carried out.
During the first pass, there is no need for lateral movements of the electrode. But it is important to regularly make longitudinal jerks with the end in order to drive off the liquid slag, otherwise it will flow ahead and completely block the visibility of the weld pool. If the root seam has been performed correctly, then subsequent layers can be applied with a crescent movement. It is important to create a slight delay for the electrode on the side and move without delay on the underside.
Fillet welds will be obtained by following the above tips. The optimal current strength for a metal thickness of 4-6 mm is 250-300 A. Regular practice will help you master this difficult type of joints and become a better welder.
Comments:
- Some characteristics
- Workflow options
- Features of the process of welding a ceiling seam
- How to get the "right" equipment
In order to answer the question of how to cook a ceiling seam with electric welding, you need to have an idea of what a ceiling seam is, its features and methods of cooking.
Some characteristics
The ceiling seam is the most difficult to perform.
This is easy to explain. Indeed, during the welding process, metal that has reached the melting point may leak.
An experienced welder should have the skills to weld this type of seam.
It is rarely used in industrial applications. But as for the repair and installation of a pipeline or shipbuilding, this type of seam is in great demand there.
Safety precautions must be followed when working with molten metal. They can burn open areas of the body, such as the face or hands.
Welding a ceiling seam has a number of features:
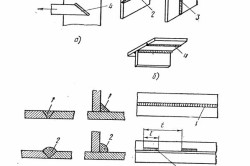
Views welded joints: a, b - butt, c - butt flanging, d - overlap, e - angular, f - tee, g - slotted, h - end, and - overlap with penetration.
- the weld pool should be the smallest size;
- when a seam is applied, the metal is held on the ceiling due to the force of attraction in relation to the surface;
- to avoid spreading of the metal, the seam is applied in such a way that the electrode is retracted to the side;
- the size of the electrode is about 0.4 cm;
- the produced rollers should be 2 times smaller than the electrode;
- the electrodes must be dry to avoid the release of gases that damage the seams;
- you should cook in your direction, thanks to this, you can choose the optimal pace of work, and this will allow you to track the process to the smallest detail;
- to give the seam the greatest strength, all edges of the parts should be carefully processed and dirt should be removed from the welded rollers.
To weld parts about 1 cm thick, the work is performed in several stages:
- Use an electrode 0.3 cm in diameter.
- Subsequent welding is performed with a 0.4 cm electrode.
Back to the table of contents
Workflow options
There are several types of ceiling seam welding.
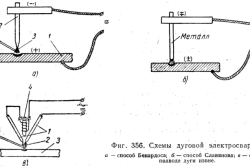
Electric arc welding: a - Bernados method; b - Slavyanov's method; в - the way of the arch submission from the outside; 1 - electrodes; 2 - arc; 3 - electromagnet; 4.5 - filler rod.
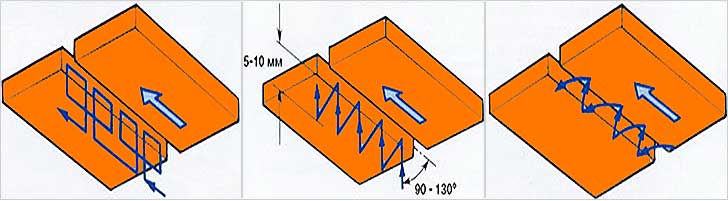
- Welding with a crescent moon. The electrode is positioned to the ceiling at an angle of over 90 degrees. The maximum tilt level is 130 degrees. A professional performing this type of work makes zigzag movements. They also resemble the image of a crescent. This method is carried out in several approaches. It's light enough. Even a non-professional can handle it. The main thing is to constantly control the welding speed, otherwise you can ruin the seam. To avoid metal leakage, do not boil large rollers.
- Reverse-translational. This type of welding is also not done in one go. First, the root seam is welded using a 0.3 cm electrode, the level of current supply should not be higher than average.
- Ladder. The electrode is positioned to the ceiling at an angle of over 90 degrees. The maximum tilt level is 130 degrees. This method differs from others in that the electrode must be moved to the side to avoid spreading of the molten metal. When it solidifies, the electrode is returned to its place and welding continues. With this method, the seam becomes longer. Despite the difficulty and complexity of implementation, the final result of the work is the highest in terms of strength and reliability.
Back to the table of contents
Features of the process of welding a ceiling seam
Ceiling joints are divided into:
Classification of welds: a - by location relative to the effective force, b - by position in space, c - by reinforcement, d - by width, d - by the number of layers, e - by length.
- turning into vertical;
- solid;
- lower.
Safety precautions when welding ceiling joints:
- work must be carried out in a dry room or in an enclosed space. It is not allowed to perform welding work outdoors during a thunderstorm or snowfall;
- the body should be worn with specialized clothing with a top protective coating;
- use a mask;
- disconnect unused equipment from the mains;
- carry out work on the insulation of the wires.
An unexpected nuisance can occur at the moment when you need to make a ceiling seam. This is not as easy as it might seem.
On an industrial scale, such a welding method is practically not in demand, since the parts to be joined are actually located in the correct position. However, the garage owner needs to know how to electrically weld a ceiling seam. The need for such a seam may arise during the installation of the pipeline, the manufacture of a metal structure and various devices in the garage.
Since there are many difficulties when welding a ceiling seam, experience and care must be present in its implementation. The problem with this type of welding is the location of the weld pool, which is upside down. And the molten metal does not want to linger in it. Therefore, when working, you need to follow special rules that will help avoid smudges of molten metal. A special role in such welding is played by safety techniques, if ignored, you can burn the body in the face area.
Safety regulations
- When welding, special attention must be paid to excluding the possibility of being hit by an electric shock. The cable must not be damaged. If the welding machine is not currently in use, it must be in the off position.
- It is forbidden to work in case of precipitation and even in rooms with high humidity. In most cases, inexperienced welders cannot determine the degree of moisture.
- Overalls are required, which, if necessary, must completely cover the whole body. All its elements must be securely filled. Particular attention should be paid to the availability of protective goggles and a welding mask.
- It is forbidden to perform actions that can lead to fire and explosion.
In welding, surface tension plays an important role, the force of which does not allow molten metal to break off from the workpieces. To reduce the force of gravity, the weld pool should be as small as possible. This can be achieved by removing the electrode at the right time, thereby allowing the metal to harden in time.
The width of the rollers should be 2.3 times the diameter of the electrode. As a rule, when welding a ceiling seam, electrodes with a diameter of up to 4 mm are used. Sometimes there are cases when the working part of the tool is removed - undercuts appear. To avoid this, it is necessary to reduce the strength of the welding current, and fix the electrodes at the edges.
Only dry electrodes are suitable for work. When the working element is raw, the emitted gases reduce the quality weld, and instead of forming an arc, the electrode "sticks" to the welded surface. In addition, the characteristics of the metal welding seams on the ceiling are inferior to the properties of the surface formed with other types of joints.
Ceiling welding is best done by moving your hand with the tool in your direction, which will allow you to fully control the process, the speed of work and the welding method. If the thickness of the area to be treated exceeds 0.8 cm, the penetrations must be repeated. For the root weld, as a rule, electrodes with a diameter of 3 mm are taken, for the rest - 4 mm.
Note! The chamfer and processing of the ends connected by welding must be performed in accordance with GOST 10948-64. After the formation of a roller, do not forget to remove slag deposits. Tolerances for welding connections specified in GOST 5264-80.
Cooking options
- When cooking with a ladder, the working element is located vertically to the ceiling or with a deviation of 40º from itself. The electrode rises to the ceiling surface and ignites. When the metal begins to melt, the working element is pushed back by about 8 mm, then the process is repeated with the overlapping of the solidified metal by a third of its length.
- When cooking with a crescent moon, the working element should be in the same position as in the previous version. The working movements should be zigzag and continuous, with the electrode applied to the metal on the frozen metal part. The passages are repeated several times. This welding option is considered the most affordable.
- The most reliable, but difficult, is the back-and-forth welding method. The end of the working element constantly moves back and forth, while engaging the frozen metal part and increasing the length of the seam.
Process
![]()
Ceiling welding is a multi-stage job that begins with root sealing. In this case, a Ø 3 mm electrode is used. The current strength should not exceed the average value. The existing conditions that determine how to seal overhead joints by welding.
- If there is access for welding and sampling from the outside, then when carrying out work, you must carefully monitor the formation of a bead from below. Undercuts and overhangs should be avoided. It is most practical to make this seam in zigzag steps with honey edges with fixation on them. Then, after removing the weld from the joint, it will be the turn to execute the next bead.
- If it is necessary to form a bead from the outside, progressive steps should be done in the middle of the gap at a short distance. If a welding arc will come out on the other side, then the weld will be formed in a semicircular shape.
With this kind of work, you need to focus on the roller on the back. At the same time, it is necessary to control the speed of the welding process and observe the formation of the bottom bead. It should not protrude from the resulting structure, otherwise you will have to make a sample to the base of the metal.
Chopping filling
The next 2 rollers are made with a Ø 3 mm electrode at a current with an indicator above average or Ø 4 mm at an average value. The choice of penetration depends on the size of the width of the starting bead. In order to avoid tuberosity, it is necessary to fix on the edges of surfaces. After that, the arc is gradually transferred along the edge and by the ladder method, a transition is made to the opposite edge. If it becomes necessary to change the configuration of the roller, it is necessary to change the speed of the work, change the angle of inclination of the electrode and increase the penetration step.
Note! When carrying out welding work, it must be borne in mind that when creating a large roller width, the red-hot metal will leak and drip.
The next 2 layers depend on the size of the width of the previous 3 rollers and are made over the entire width or in the number of 2 rollers. Further, the layers are simply fused without zigzag movements. When approaching the edge, stop at a distance of the size of the coated electrode. This applies to the edge and the penultimate bead.
For the layer on the front side, a depression of up to 2 mm is required. The number of penetrations will be calculated based on the dimensions of the last layer and the metal base. If the depression of the penultimate layer up to 1 mm in size is made 1-per pass and it is made with an arc forward. The welding step is selected based on the configuration of the bead. If the cavity is up to 2 mm in size, the ladder method is used. If you need to make several passes, the rollers at the edge are welded using different methods. The final central roller is installed flush with the 2 side rollers.
As it has already become clear, you need to deal with ceiling welding with the necessary baggage of experience. It will be difficult for a beginner to make such a seam, since he does not yet have enough skills and knowledge, which, as you know, come during work. Therefore, you first need to practice on the simpler connections. The video provided demonstrates how professionals cook a ceiling seam with electric welding.
Video
This video shows how a vertical and ceiling seam is cooked: