Of all the communications that are arranged in private households, the water supply system is the very first to be created. Moreover, for a long time it has been something more than a banal pipeline ending with a water tap. Modern technologies make it possible to create an efficient water conduit that provides all the needs of the residents of the house, regardless of what is chosen as the source of water supply. That is why the topic of how a do-it-yourself pumping station is arranged, which is an indispensable element of a well-thought-out functional water supply system, is relevant.
Which station is right for you?
Depending on operational tasks
Today, the consumer is offered two types of pumping stations - domestic and industrial. Let's leave the second type to professionals, we are more interested in installing a domestic pumping station.
The tasks that a household pumping station should solve: providing drinking water, watering the garden, hot water supply in the house, meeting household needs (bathroom, toilet, washing machine, dishwasher), providing water to the heating system.
It is necessary to clearly understand what tasks the pumping station should solve, the further choice will depend on this.
Depending on the water source
The connection of the pumping station depends on which source of water supply is planned to be arranged or is already available in the individual courtyard. In principle, choosing this equipment according to this criterion is not difficult, since water can be supplied to the house from three sources: a well, a well or a centralized water conduit.
Depending on the optimal operating mode
The station can operate in manual or automatic mode. If necessary, you can choose a mobile model. In addition, you need to understand what volume of pumped water per hour is needed in a particular case. That is why, before going to a specialized store, it is worth making simple calculations.
So, it is believed that one person per day consumes 250 liters of water to meet all his needs in a private house. Installation of a pumping station in the country can be performed taking into account lower rates.
Where to install the station - in a caisson or basement?
The station can be installed in one of two places - in a caisson or in a special room in the house. At the same time, the most practical option is still considered to be the installation of equipment in a room, for example, in the basement. In this case, the installation must be arranged in such a way as to protect the station from damage due to a possible rise in groundwater. That is, the pumping station must be installed on a stand or shelf, while making sure that there is no contact with the walls, which will avoid their vibration when the equipment is operating. The basement must be heated.
If the decision is made in favor of the caisson, then it must be insulated, and the station itself must be installed below the freezing level of the soil. That is, the depth of the caisson will be at least 2 m.
The basement must be heated, and the station in it, as a rule, is arranged on a stand
Two-pipe option for connecting equipment to a well or well
If the depth of the well (well) does not exceed 10 m, then the one-pipe model of the station will be relevant. With a depth of 10 to 20 m, preference should be given to a two-pipe station with an ejector. Naturally, before proceeding with the installation, a scheme for installing a pumping station should be developed, which will be put into practice.
The procedure for performing connection work
Option #1 - connection to a well or well
The algorithm is usually the same:
- An ejector is being assembled - a cast iron assembly with three outlets for connections.
- A mesh filter is installed in the lower sector of the ejector.
- The drive of the required length (diameter 32 mm) is put on a plastic socket in the upper part of the ejector.
- A sling of the required diameter is assembled. As a rule, it consists of two parts, endowed with transitional connections.
- A coupling (bronze) is mounted at the outlet of the squeegee, through which the transition to a polyethylene pipe is made.
- To ensure the tightness of threaded connections, you can use flax or sealing paste.
- Trenches are dug to a depth below the threshold of soil freezing.
- A water pipeline is laid in the trenches - the length of the pipes should be with a margin.
- The casing pipe must be equipped with a specially purchased head. However, in practice, such parts are not easy to find on sale, therefore, as an option, a knee with a smooth angle can be used.
- Couplings are used to connect the pipe to the ejector.
- Before lowering the second end of the pipe, it is pushed into the knee at an angle of 90 °. To seal the space, it is filled with mounting foam. The pipe is then connected to elbows (90°) which are in turn connected to the outside of the pipeline.
- The complete ejector is lowered into the well to the desired depth, which is marked in advance, while the mark is made at the level at which the casing pipe exits.
- The pipe head is fixed on the casing pipe using reinforced sanitary scotch tape.
Possible installation errors:
- When laying pipes to the house, a certain margin of length is not taken into account, that is, bends and turns are not taken into account, and possibly the thickness of the foundation through which the pipeline will pass.
- Threaded connections are not tightened with a wrench. Simply sealing and screwing by hand is not enough. During operation, water leaks are possible.
- Due attention was not paid to the hydraulic accumulator. If the pressure drops below 1.2-1.5 atmospheres, then it must be increased using a compressor or a car pump.
Read more about setting up the hydraulic tank and adjusting the pressure switch.
Option #2 - plumbing connection
The need to connect a pumping station to a centralized water supply usually arises when there is not enough pressure in it for the heating equipment to work correctly. This, in turn, can be caused by several reasons:
- changed hydrogeological conditions;
- outdated equipment;
- increase in the amount of water consumption due to population growth, etc.
It is important to note here that before you connect the pumping station, you need to take care of purchasing and installing a storage tank.
So, the algorithm works:
- In a premeditated place, a water pipe is disconnected.
- The end, from the city highway, joins the storage tank.
- From the tank, water is directed to the inlet of the pump, the end of the pipe leading to the house is connected to the outlet.
- Electrical wiring is being installed.
- Equipment setup/adjustment.
Setting up the pumping station is primarily aimed at setting the optimal pressure in the system. To adjust the equipment, first, about 2 liters of water are poured into the snail through a special hole. Now you need to trace at what stage the pump turned off, and then when it turned on. Cut-off pressure - 2.5-3.0 bar, turn-on pressure - 1.5-1.8 bar.
If it is noted that the station turns off earlier than necessary, it is worth reducing the pressure generated. In general, setting up the equipment is quite simple. It is necessary to open the relay cover and turn the screw with the designation "DR" in the direction of "+" or "-". And to regulate specifically the switching pressure, a screw with the designation “P” is used.
Another detail that should definitely be taken into account before properly connecting the pumping station is the chemical and physical characteristics of the water. Regardless of the source of water supply, it contains harmful impurities that must be removed before the water enters the pumping station. The easiest and most effective way to solve this problem is to install a station on the suction device.
What happens if you don't install a filter? Mechanical impurities in the form of sand, clay, etc. will gradually accumulate in the accumulator, which will eventually lead to a breakdown of the pump, which is an integral part of the pumping station. This problem is especially relevant when using a vibration pump.
On the other hand, one cannot help but focus on the negative aspects of installing the filter. Thus, additional resistance to the flow of water is created, the created pressure and pressure are reduced. To avoid such problems, the filter must be constantly cleaned. And a situation may arise when a dirty filter will not let water through at all, which can cause the pump to fail.
By installing a pumping station on your own, you can save significant funds that will be directed to the purchase of really high-quality equipment. And this, along with proper installation and configuration, will allow you to forget for many years that there may be any problems with the water supply system. We draw your attention to the fact that you can not only buy a station ready-made, but also assemble it yourself.
Answering the question of how to assemble a pumping station with your own hands, you need to understand what parts it consists of and why it is called that. Let's start with the fact that a pumping station is equipment for moving water through a water supply system in a certain amount with a certain pressure. And most importantly, the water in the water supply should be constantly required, regardless of the operating conditions of the equipment itself. Therefore, a pumping station (assembled with one's own hands) is first of all a pump, secondly a storage tank, thirdly an automation unit, suction hoses, valves and pipes.
The simplest do-it-yourself pumping stations
Selection of elements for the pumping station
You need to start with the fact that different pumps can be part of the pumping station: borehole, submersible or surface. Their main task is to engage in water intake from a hydraulic structure. But here it is necessary to choose the source of water itself.
- If the water will be used only for domestic needs and watering green spaces, then an open natural or artificial reservoir can be chosen as a source.
- If the water is to be used for drinking and cooking, then a well will have to be dug or drilled.
From open reservoirs, water can be pumped with surface or submersible pumps. The same applies to wells and shallow wells. From artesian water can be pumped only by deep (borehole) pumps. That is, first you decide on the source of water, then make a choice according to the brand of the pump.
 Water intake from an open source
storage capacity
Everything comes in comparison, so it is necessary to speak of storage tanks in a double sense. Today, containers of this type are represented on the market by two models: ordinary tanks made of metal or plastic and hydraulic accumulators. Therefore, before assembling a pumping station, it is necessary to decide on the choice between these two devices.
Storage tanks have been around for a long time. This is a conventional tank with a float water level sensor. In order for it to create pressure in the water supply system, it is necessary to install the container above the installation level of consumers. And the higher, the greater the pressure at the outlet of taps, faucets and other plumbing fixtures.
 storage tank
But there is one moment. Installation at a height is not always possible, although attic spaces are adapted for this. True, they are not always heated, so the tank itself and the pipes leading to it will have to be insulated, which will increase the cost of operations.
In this regard, the accumulator is simpler. This is a ready-made device that automatically creates pressure inside the water supply network. It can be installed anywhere, regardless of height. Horizontal type accumulators are made with ready-made beds for pumps, so that the latter can be installed directly on the tank, which reduces the installation space of the entire pumping station.
Hydroaccumulators have other positive qualities.
- They equalize the pressure when starting the pump, which protects the plumbing from water hammer.
- With their help, the number of starts and stops of the pump is reduced. And this affects the duration of its operation.
- And, of course, this is a certain supply of water, in case the pump fails or there is no electricity supply to it.
As for the price, it is higher for a hydraulic accumulator than for a plastic barrel. But this is a one-time investment that will pay for itself quickly. Therefore, experts recommend choosing a hydraulic accumulator when assembling a home-made pumping station.
 Hydraulic accumulators
Control block
It is impossible to install a pumping station without using an automation unit. After all, we are talking about a modern water supply system, which means that everything in it should work automatically. A person should only configure this mode. And the system should do everything else itself.
In principle, the standard automatic control unit of a pumping station is a pressure switch, which will need to be configured, and a pressure gauge that shows the water pressure in the system. In the relay unit itself, there are only two contacts that turn on or turn off the pump for the pumping station. They are connected to plates, which are pressed by metal springs. But before setting up the pumping station, it is necessary to deal with this particular unit.
- A large spring is responsible for the high water pressure, and it turns off the pump.
- Small, on the contrary, is responsible for low pressure, therefore, with its help, the unit turns on.
 Setting up the automation unit
By tightening or loosening the nuts over the springs, a setting is made at which the threshold for high and low pressure is set. In fact, the entire pumping station works according to this principle.
The pumping station is being launched. Water begins to flow into the accumulator and into the plumbing system itself. A pressure of up to 6 atm is created in the tank, because the water fills the rubber bulb, between which and the walls of the metal case of the tank air is pumped under a pressure of 1.5 atm. When air is compressed, its pressure increases more.
If an indicator of 4.5 atm was set in the control unit, the pump will turn off as soon as the air in the accumulator reaches this value. Of course, in this case, water will not completely fill the rubber membrane. It will fill it at a pressure of 6 atm. That is, the pressure setting will affect the amount of water pumped.
The same applies to the lower pressure threshold. That is, if this limit is overcome, the pump will immediately turn on, and water will flow into the accumulator. Everything is very simple.
Attention! If we talk about the rules for choosing an automation unit, then experts recommend choosing one whose options additionally include turning off the pump at idle.
By the way, in terms of choosing a horizontal or vertical hydraulic tank. There is no difference, both models are assembled according to the same design, therefore they work on the same principle. Here, preference should be given in terms of the space that the vertical sample will occupy less.
It is made only after studying the characteristics of the pump. This is especially true before increasing the pressure necessary to turn it on, in order to understand whether the pump can develop such pressure. If not, then the station will not be able to turn off, since such pressure cannot be reached, and the relay will also not work for the same reason. As a rule, the characteristics of the pump are indicated in the passport or on the packaging. The unit of measure is the meter of water column, which is approximately 0.1 bar. When adjusting, it is not recommended to tighten the nuts to the extreme position - this can damage the relay.
 Pumping station with vertical hydraulic accumulator
Assembling a homemade pumping station
It is clear that assembling a pumping station for a private house with your own hands is not the most serious problem. Difficulty will depend on the selected elements. If a downhole pump was chosen, then first of all it will have to be installed in the well, which is not as simple as it might seem at first glance. After all, this is the connection of a pipe that feeds an electric cable. After that, a cable is attached to the pump, and after that, this entire prefabricated structure is lowered into the trunk of the structure.
With a surface unit it's easier. For him, the main thing is a warm room, where the temperature does not fall below + 5C. It may even be the basement of the house. It is installed on a solid foundation, and then connected to other elements of the pumping station. All piping in both cases is plastic. For the convenience of maintenance, repair and cleaning, each element must be cut off on both sides with shut-off valves on removable fasteners, for example, installation must be carried out on American women.
 Pumping station with both storage tank and hydraulic accumulator
Filters are considered obligatory elements in a home water supply system: it is better to install coarse cleaning before the pump, fine after the accumulator or storage tank. Be sure to provide a drain valve, which is better to install closer to the sewer. They will have to be used infrequently, but during repair work in some areas it will be necessary to drain the water from the water supply.
Be sure, before you start the pumping station and the home plumbing itself, you need to check everything for leaks. To do this, through any consumer, water from a bucket is poured into the system until it is full. This is usually done if the water route is not very long and branched. In principle, everything, you can turn on the pump and use the water supply. On this we can assume that the answer to the question of how to make a pumping station from a pump and a tank has been received.
The need for water supply in a private house is satisfied by a self-made pumping station, especially since the design, installation, and subsequent repairs eliminate special difficulties. When choosing a suitable system, it is necessary to take into account the features of operation. Ensuring water supply in a small cottage is an option that involves seasonal use, periodic pumping of water. An ordinary household pump will also cope with these.
But the organization of water supply to a residential building, where the number of residents is not limited to a couple of people, implies, in addition to watering the plantations, the presence of a water supply system that solves the problem of sanitary and economic needs. In this situation, it really makes sense to install a pumping station with your own hands, which will cope with the task of pumping, transporting liquid, or will make the existing unit work at full capacity. How to assemble a pumping station with a submersible pump, we will consider further.
Purpose and functions of the equipment
The main purpose of any water system is water intake from a specific source - a well, a well, a reservoir - and subsequent transportation to places of use. The operation of low-power installations makes it possible to compensate for the lack of pressure in the water supply system of private houses. In such cases, they play the role of additional devices to the main surface or downhole units.
In addition to performing the main functions, the station has a lot of other advantages:
- acts as a source of backup water supply in emergency situations;
- provides full-fledged water supply - creates, maintains the pressure of the working environment of the system;
- protects pipes from water hammer.
The assembled do-it-yourself pumping station gives priority to adapting the equipment circuit to specific operating conditions.
VIDEO: How to choose a pumping station
Station equipment
The water system consists of a pump and a pressure tank. The working elements of modern installations allow external differences and different performance. However, the list of components, the presence of which allows you to make a pumping station yourself, remains almost always unchanged.

- Pump equipped with an ejector. Performance indicators provide for the possibility of water intake at the maximum allowable source depth - 20 meters.

- Membrane tank (hydraulic accumulator). Production material - steel. The closed structure of the pressure tank consists of two compartments, one filled with liquid, the other with compressed air, which creates and maintains system pressure. The accumulator is important because it accumulates a certain amount of liquid (different modifications accumulate a volume of 20-500 liters). This ability allows you to arrange breaks for equipment, maintain operating potential, and extend the service life. Due to the pressure in another part of the storage tank, the device continues to supply water to the pipeline even without power supply.

- Relay. The presence of this component provides pressure control of the water system. Fixing the drop in the level of the working medium below the permissible limit, the relay starts the pumping device, making up for the lack of water in the membrane tank.

- Pipes carry fluid. When planning to assemble, mount a pumping station with your own hands, it is preferable to choose metal-plastic pipes. The technical characteristics of the products guarantee the durability of the structure, resistance to corrosive damage.

The presence of a safety margin of metal-plastic pipes eliminates the violation of their integrity during a critical drop in temperature or at the time of system startup (water hammer).
Additional elements are represented by a non-return valve, a protective mechanism that prevents the installation from running dry.
The principle of operation and design features
Equipment designs may differ in the type of pump, the volume of the accumulator. When choosing a unit, the following indicators should be considered:
- depth of water intake source;
- quality indicators of water - purity, the presence of impurities and suspensions.
Of course, it makes no sense to place a rod well installation on the backyard territory, therefore, preference is given to the installation of a submersible or surface device.
Depending on the capabilities of surface equipment to suck in the working medium, given the depth of the water intake source, there are:
- units with a built-in ejector. The maximum depth indicator is 9m. The scope is limited exclusively to sand wells. The launch is carried out by filling the device with liquid through the outlet or a special hole;
- devices with an external ejector. Permissible depth - 45 m. The presence of a remote ejector implies the need to connect it to two pipes. The first provides water supply, the other, being inside the well, lifts.
An apparatus with an external ejector is more sensitive, it reacts to water quality and the presence of air, which is compensated by the possibility of separately placing the installation - at home, an ejector in a well.

Often, the desire to assemble a pumping station on its own is due to the extremely simple principle of operation of such equipment. The pump draws water from the source. The liquid enters a special container - a pressure tank. The relay regulates the operation of the pumping device by switching off when the required pressure level is reached. When the tap is opened, the pressure of the jet provides the pressure created by the air of the accumulator. When the pressure inside the pressure tank reaches a critical value, the relay starts the pump, the cycle starts again.
Choice of mounting location
When choosing a station installation site in order for this installation to work technically correctly, several requirements must be observed:
- The closer the water source, the less problems with the supply of liquid and there is no waste of energy when pumping into the membrane tank.
- An accessible installation site guarantees no difficulties in inspection, equipment repair.
- Comfortable temperature conditions reduce the risk of damage to important system components.
- Availability of reliable sound insulation. The noise of operating equipment should not be heard in the house.
Convenient placement of the installation implies different options.
- Inside the building. A closed intra-house boiler room is the best place. A heated room with good sound insulation simplifies operation and repair.

- Basement of the house. Cons - it will be necessary to provide for heating, the lack of soundproofing of the room will create some discomfort.
- A caisson is a special underground reservoir. Traditionally, a homemade pumping station is placed in this way.

An alternative to building a brick, concrete site can be the installation of a finished steel, plastic tank. Any method requires compliance with the main condition - placement below the freezing level of the soil. The advantage is the absence of sounds of the equipment, the possibility of freezing nodes.

The latter location makes it somewhat difficult to access the equipment. Pipeline insulation reduces the risk of freezing of the pumped medium.
- For laying water pipes, it is worth giving preference to metal-plastic pipes that are resistant to external factors.
- The optimal pipe diameter for the external pipeline is 1 inch, for the internal - ¾ inch.
- All external communications are insulated to prevent freezing.
- In order to make it convenient to remove the pump from the well, it is better to use a thick-walled flexible hose for connection.
- A ball valve is placed at the outlet.
- If the bathroom has a washing machine, a toilet bowl and a sink, a tee is installed at the outlet.
- All components must be from the same manufacturer so that the diameter and quality match.
- To protect the equipment from power surges, circuit breakers are used.
- All connections are sealed with insulating tape.
Installation rules
Having determined the installation site, it will be necessary to prepare the base - a solid, even base that prevents vibrations, where the water system will be installed. The thickness of the base must be more than 10 cm. Instead of placing a finished concrete slab or screed, you can get by with a wooden shield. Pre-treatment of the tree with an antiseptic composition will be required, tar is often used. The shield is buried in the ground, supported by two beams, covered with a mixture of sand and clay.
Having prepared the surface, they place the finished equipment elements, be sure to fix them with special bolts. The assembly of the pumping station eliminates the occurrence of special difficulties. It is important to pay attention to the cross section, the correct fastening of the pipelines that connect the nodes of the system. The pressure accumulator is connected by a pipeline to the control unit. The option of placement inside a residential building involves the use of rubber gaskets that are placed under the installation supports. This will reduce the noise level, prevent premature wear of the device.
Then the building's water supply system is connected to the system's pump by connecting a branch pipe and a pressure pipe. The connection between the installation and the source of water intake will require the placement of a check valve and a stopcock. The exit from the system also involves the installation of a check valve - this is the inlet section of the water supply pipeline. Careful isolation of connecting pipelines and elements of the installation will prevent leakage.
Testing and launch
A test run requires a preliminary check of the tightness of all elements. Further, the equipment is filled with liquid using the filler hole, which involves filling all lines, the pressure accumulator. After opening the shut-off valves, the pump motor is started. An indicator of proper operation will be the filling of the pressure pipe with water, the displacement of air completely. The permissible value of the working pressure is 3 atmospheres. After reaching the parameters set by the automation, the relay is activated, the pump automatically turns off.
Creating your own water supply system for a private household is not an easy task, however, subject to the necessary installation conditions, a home-made pumping station will operate smoothly, provide a continuous supply of water and make life outside the city more comfortable.
VIDEO: How to assemble and install a pumping station with your own hands
For a private house, one of the main problems is a reliable and efficient water supply system. If there is a well or a well on the site, then this issue can be easily solved with the help of pumping stations. Such a unit allows you to establish a uniform supply of water to the house with a high performance value.
Of course, pumping stations also have their drawbacks. Chief among them is the high cost. In this case, you can assemble a pumping station with your own hands. But, such a process requires certain knowledge, moreover, it is not always appropriate.
1 When is self-assembly appropriate?
Before you assemble a pumping station with your own hands, you should consider a number of important points. The pumping station is a set of a surface pump, a hydraulic tank mounted on it, a pressure gauge and a pressure switch. Many models also have an ejector for the pumping station.
But, not always, assembled in each individual model, the equipment suits the user in terms of performance. For example, a pump may lag behind in terms of performance or pressure. Or the fluid supply in the accumulator is not large enough. Such cases are among those in which the assembly of a water pumping station is advisable. Based on various components, it is possible to assemble your own version of the unit that will meet the needs of the family.
The second option, in which it is more convenient to make the pumping station yourself, suggests that the factory model in terms of design does not suit the person using it. So, for example, a hydraulic accumulator and a pump may not fit in a small room. In this case, assembled independently, the unit is divided into two connected nodes, which are placed in different corners of the room. Also, the power of a surface device may not be enough for a deep well, and it is necessary to assemble your own version of the station based on a submersible well pump.
And yet, the main criterion for the expediency of assembling and installing a pumping station with your own hands is the availability of components. Moreover, we are talking about the two most expensive elements of the system, which include:
- hydraulic accumulator;
- pumping device.
If none of the above elements is present, a self-made unit will cost more than the purchased model. In the case when one of the components is available, it remains only to purchase the remaining parts and proceed with the assembly.
2 What to assemble a water supply installation from?
Before you make a pumping station, you need to clearly understand what is included in its design. The basis of the entire installation is a powerful electric pump. Any device that suits the consumer in terms of price and performance is suitable here. Surface pumps can be used, in which the fluid is drawn by means of a flexible hose. In the case when it is necessary to pump out liquid from a deep well (40-70 m), it is better to choose a suitable submersible model. A vortex or centrifugal model is fine. In addition to the pressure characteristic and water flow, it is necessary to immediately select a model with a suitable cable length, based on the distance from the power point.
Without fail, a home-made installation for water supply at home includes connection elements, in the role of which pipeline sections act. The most suitable option is the connection using polymer pipes, which are easy to adjust to the features of the interior.
In order to organize autonomous operation, the general scheme of the device is supplemented by a pressure switch. Such a device is quite affordable in price terms and has a simple design. The device reacts to changes in pressure in the line and turns on the electric pump when it falls below the set value. It is best to choose a model with a built-in thermometer. This will allow you to monitor the status of the device.

Another mandatory component of the circuit is a coarse filter. With it, the pump is protected from sand and dirt from the source. In addition, the impeller without such impurities will last much longer.
2.1 Should a hydraulic tank be connected?
The question of assembling a station with or without a hydraulic accumulator is quite serious and includes several nuances. The main task of the accumulator is to protect and extend the life of the used pumping apparatus. The tank accumulates water and maintains a stable level of system pressure. In this case, the automation turns on the device only when the volume of liquid accumulated in the tank is used up.
Without a battery, automation turns on the device at the slightest pressure surge, which leads to its quick breakdown, which means that you will also have to repair the pumping station with your own hands. An alternative to a hydraulic accumulator can be a better automatic with protection against “dry” running, but at a cost it is often comparable to the cost of a tank.
2.2 Assembling the unit
There are a lot of schemes according to which a pumping station is assembled with your own hands. Each of them includes both positive and negative points. In the case when a submersible electric pump is used, the diagram is as follows:
- the pump is located at the source;
- then there is a section of the pipeline to the hydraulic tank;
- on the horizontal section of the pipe in front of the tank, a non-return valve, a coarse filter, a pressure switch crashes (in that order);
- the pipe is connected to the accumulator;
- on the pipe section leading to the tank, at a distance of 10-15 cm from it, a fork is made that leads to the collector (comb).
This scheme allows you to achieve high performance equipment and ensure a smooth supply of fluid.

In the case of a surface pumping apparatus, the assembly diagram will look like this:
- the suction section of the pipeline is equipped with a check valve, or an ejector for the pumping station is mounted on it, after which the pipe is lowered into the source;
- the pipe is brought to the electric pump, where a filter is installed on it before connecting;
- the pump with the hydraulic accumulator is connected by means of a flexible supply;
- a relay with a pressure gauge is installed in the area where the fork to the battery is located, which will allow you to more accurately control the line.
In this case, the pump can be installed on a battery or diluted to different points in the room.
2.3 How to make a pumping station with a submersible (deep) pump? (video)
3 Installation and connection of the station
Installation of a finished water supply installation is a fairly simple procedure, but at the same time, it includes a number of mandatory points. Such moments will increase the life of the device and ensure the comfort of use.
3.1 Choosing a suitable location
One of the most important moments of installation is the correct selection of the location of the unit. Such a place must meet a number of criteria:
- Acceptable temperature conditions in the cold season. Severe frosts can damage the pipeline and the main components of the station.
- Close proximity to a water source.
- Comfortable use if the noisy version of the electric pump is selected.
- Easy maintenance and repair of the device.
Based on these criteria, there are three main ways to locate the unit:

The first type of location is distinguished by comfort in terms of noise and good protection from frost. At the same time, there is no free access for routine maintenance. How to make a pit for a pumping station? It is necessary to build a pit in the head of the source. To do this, a well is dug around the casing pipe, with a depth of at least 1.8-2 m. The bottom of the caisson is lined with crushed stone or poured with concrete. Along the perimeter of the well exposes a wooden formwork. Next, concrete is poured under the formwork.
A more expensive option for making walls is brickwork. At the same time, under the brick and the bottom, on the ground, you can lay out a dense film that will protect the pit from groundwater. For better protection, the caisson is closed on top with a lid. It is advisable to take dense metal or wood, and insulate it from the inside with mineral wool. To save space, only the pump can be placed in the caisson, and the tank can be taken out into the room.
Installation of the device in the basement is the most desirable. This will make it easy to maintain or repair the device, besides, there are no sudden temperature fluctuations. The only point is that during the operation of the device, a hum and other noises are possible, which not all residents of the house can perceive comfortably.
The removal of the installation to a separate room includes the optimal temperature regime and comfort of use for residents of the house. But, in this case, as with the caisson, there is no possibility of quick access to the unit.
3.2 Station connection
When the exact installation site is determined, it remains only to connect the pumping station to the well. But, before dealing with the question “How to connect a pumping station to a well?”, It is necessary to firmly fix the unit in the chosen place. This is done with a solid foundation. This base comes in two versions:
- in the form of brickwork;
- in the form of a concrete slab.

In any case, the base involves the organization of a small pit for the size of the unit. The bottom of the pit is lined with a sand cushion, the thickness of which should be at least 10 cm. In the case of brickwork, two rows of bricks are laid out on the cushion, which is fastened with cement. The resulting base is ready for use in 5-7 days.
If a concrete slab is chosen for the base, then steel bars are laid out on the sand with a grate, after which they are tied at the intersection. The structure is poured from above with concrete. The shape of the slab is limited by boards around the perimeter. After 3 weeks, the apparatus is placed on the stove. At the same time, it is desirable to set and adjust rubber shock absorbers under the legs of the device.
Next is the installation of the pipeline to the reservoir. It is important to choose pipes exactly for the section of components. The finished pipeline is placed in a trench, the depth of which is not less than the level of soil freezing. For reliability, the pipes can be wrapped with mineral wool.
One pipe entry passes into the well through the wall of the casing. The entrance to the circle is sealed with cement. Pipes also enter the utility room or basement below the freezing level of the soil. It is advisable to make a line with a minimum number of bends, as this can affect the pressure. Further, all the elements are interconnected, and the joints are sealed.
Before the test run, the position of the station is once again adjusted, the connections are checked. Further, liquid is poured into the neck of the working chamber and the device is turned on.
Having only an electric pump available for drawing water from a well or well, you can ensure regular water supply at home if you carry a switch for supplying electricity to the pump and a coil of wire with you. In this case, the pump motor will quickly burn out, and the water supply pipes at the junctions with the fittings will be broken. The use of pumping stations will require significant costs, but will save you forever from the above problems.
Fig 1. Factory-made pumping station
The pumping station can be compactly placed in one place and occupy a small volume in the room during installation. When working, it performs the following functions:
- Automates the process of taking and supplying water to the consumer.
- Sets the required mode of operation, turning on and off the water supply depending on the pressure or water flow in the plumbing system.
- Protects pumping equipment from failure in the absence of liquid in the water intake tank - for this, built-in relays and sensors are used.
- Allows you to avoid water hammer that occurs in the line when the flow of water suddenly stops - their consequence may be the destruction of the joints and connections of the elements of the water supply.
- Simplifies monitoring and maintenance of the system using built-in sensors.
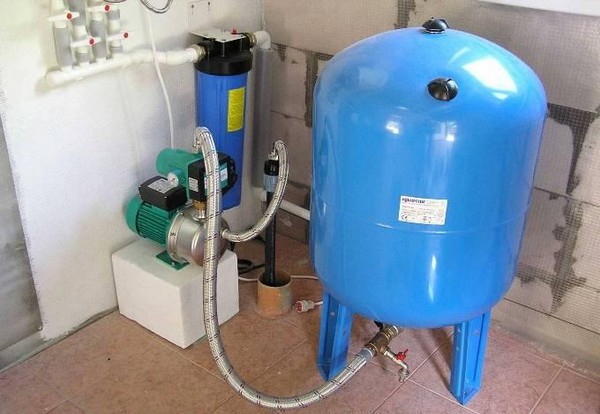
 Fig 2. Connecting pumping equipment
 Accessories for pumping station
Before you assemble a pumping station with your own hands, you need to determine the necessary devices and components.
Electric pump. An automatic water supply station is assembled by hand for surface and submersible types of pumps. The industry produces ready-made pumping stations with built-in centrifugal-type surface electric pumps, while all devices are placed on top of the hydraulic tank. For submersible models, the station is assembled by hand from individual elements.
 Fig.3 Electric pumps
Hydraulic accumulator. A metal tank of various capacities with a rubber elastic membrane performs several functions in the system. It protects the line from water hammer, taking in water and thereby reducing the pressure surge in the system after a sharp stop in the flow. The storage tank is a stabilizing element that smooths out sudden pressure drops in the water main. This is convenient for the consumer of water and does not allow the pump to turn on and off too often, which increases its service life.
 Fig 4. Expansion tank
 Pressure switch. An indispensable element of all pumping water intake systems. The device allows you to automate the process of water supply using built-in adjustments, provides protection for the electric pump from running in dry running mode. The relay allows you to configure the system to work with a specific brand of pump by setting the range for turning it on - turning it off.
 Rice. 5 Pressure switch
 Dry running relay. To protect borehole pumps that do not have a built-in float switch, a dry-running relay is used that turns off the electric pump when there is no water in the system.
 Rice. 6 Dry run relay
 Pressure gauge. The device is used to control the operation of water intake equipment and the plumbing system, allowing you to detect malfunctions and leaks when readings change. The pressure gauge is used to set the pressure switch, allowing you to set the upper and lower limits of its operation.
 Rice. 7 Pressure gauge
Filters. When water is taken from wells and wells, it is not uncommon for particles of sand and silt to enter the system. This can happen to even the cleanest source if water consumption rises sharply. Therefore, the use of coarse and fine filters in individual water supply systems is a prerequisite. The coarse filter has small overall dimensions and consists of a mesh and a small outlet, where the retained sand is poured. Devices for fine water purification have large overall dimensions, cleaning is carried out using replaceable cartridges.
 Rice. 8 Coarse and fine filter
 Plumbing fittings. To connect and connect devices, you will need plumbing fittings in the form of ball valves, couplings, taps, fittings, fittings (five-pin five), tees and manifolds, plastic polypropylene pipes and flexible connecting hoses.
 Rice. 9 Plumbing fittings
 Pump station for submersible electric pump
After purchasing all the components, you can begin to assemble equipment for connecting a submersible electric pump. Do-it-yourself pumping station is mounted using a simple tool in the form of an adjustable wrench and linen tow. The main difficulty during the work is soldering plastic pipes and setting the pressure switch - in this case, you will need the help of a specialist.