The idea of creating an electronic cigarette was spinning for a long time, but only after some time did he decide to create this contraption. Buying a ready-made cigarette somehow hit the amateur radio self-awareness, so I took up the development of the project myself. Here's what she can do:
- on/off with one tact button
- sound notification when power on/off
- inability to turn on the spirals at the threshold value of the battery
- LED indication of battery status and discharge
- sound signal with a discharged battery
- battery threshold setting in 0.1 Volt steps
- there are 7 color schemes
- screen blanking after about 15 seconds with inactive menu buttons
- has a settings menu
Display indication:
- memory location number from 1 to 10
- filling PWM for a specific memory cell from 0 to 255 in steps of 1
- current battery voltage
- minimum settable battery cut-off voltage
- there are only 7 colors
At first I decided what I would soar. I would like to vape with both an atomizer and a drip, so the control should be universal.
There will be two 18650 25R batteries in the case and the cigarette circuit board itself with details.

Power keys are designed for significant current and it is possible to connect to the mod both just atomizers and drips with a different number of coils and their resistance, thanks to the PWM adjustment, it is possible to adjust to a specific winding option and the number of coils, so as not to swallow burning.
The long-term output power is calculated on the order of 150 watts, which is of course a lot, but there must be potential. The five-second output power is about 370 watts, to be honest, this is useless, but there is also potential.

I push it into the case, the extra 0.2 mm in height does not allow the "suitcase" to close tightly.

In the work of an adapter for a stainless steel drip, since there is a catastrophic lack of space, the adapter is planned as one piece with a drip and having a 510 connector inside.
I pushed everything into the Z23 case, it barely fit, but it still fit. Since the rack was in the middle, I had to cut it down and fasten everything with a draft through the metal of the rack, later the case will be finished externally, but so far somehow. Here you can see the back side of the case:
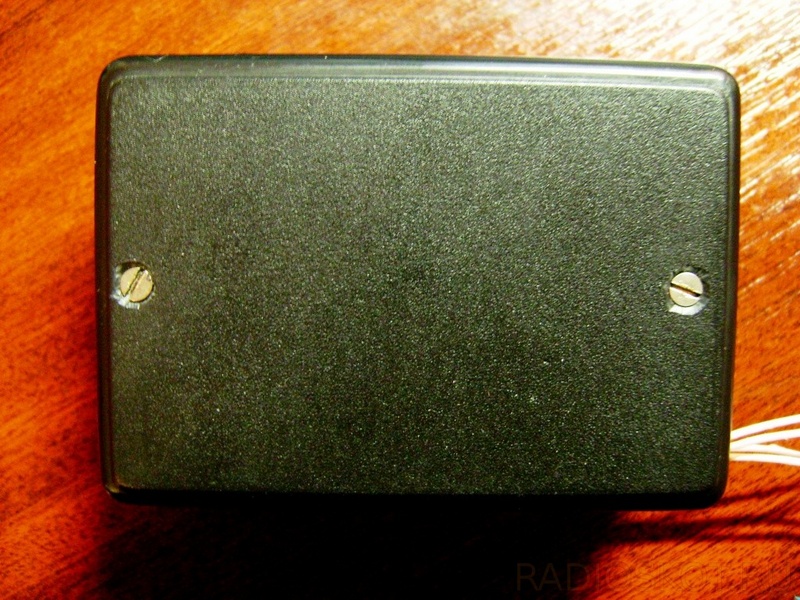
In this photo, the rear half of the case is taken, there is still one battery, you can see that a booster is hanging on the wire, there is nowhere to put it - there is no place, it will become tight between two batteries.

There are two buttons on the end, the left one - power on / off, the right one - turning on the spiral. The left LED, red, indicates the battery operation mode, the right green LED lights up when the coil is heated.

This photo shows the main screen, mode control with four buttons (SET, OK, +/-).
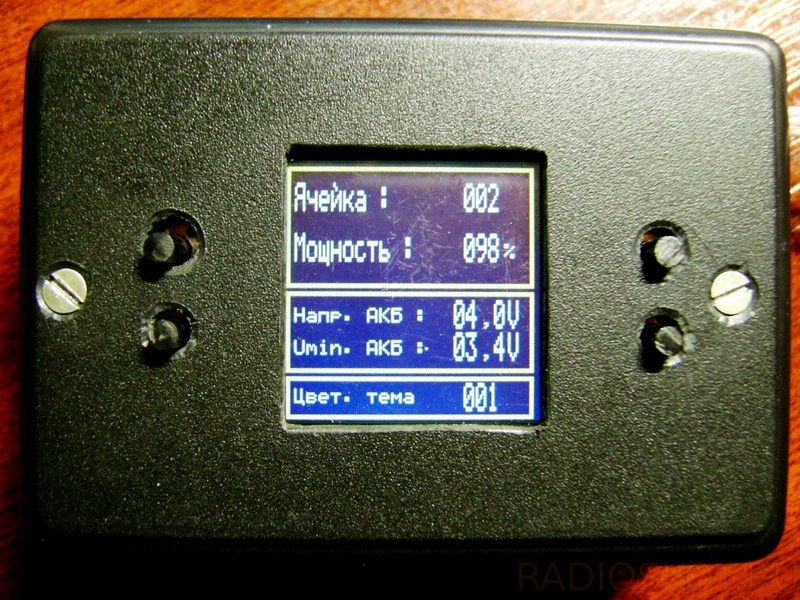
Here is the menu of an electronic cigarette, control by the same buttons.

While our brothers are promising me to send an atom, for the time being I had to attach just such a "pacifier" (which was not expensive).

Due to the lack of space in the case, I had to carve a stainless steel adapter for a drip with a diameter of 23 mm. And in the end, a little more about management:


The device works really well, so far there is one battery, which lasts for 3 days of intense vaping. For details on the scheme and firmware, please contact the author of this commercial project. GOVERNOR.
Discuss the article ELECTRONIC CIGARETTE WITH YOUR HANDS
Buying a ready-made mod in a store is easier and even cheaper than doing it yourself. But a handmade device is exclusive, unusual and unique. Do-it-yourself box mods are experiments that will help you find new tastes and ways to improve vaping.
What is needed for assembly?
Do-it-yourself box mod scheme is presented on the Internet in a wide selection. As a standard option, you can take the following equipment:
Before you make a box mod with your own hands, you should take care of finding a soldering iron - the main tool.
When you first experience working with household models, you should familiarize yourself with the safety rules so as not to get burned and not damage the details of the future vape.
How to assemble a box mod from PowerBank?
PowerBank is mobile Charger, perfect for creating a powerful and stylish vape. Firstly, the PowerBank for the mod fits in size (it's easy to fit all the details inside). Secondly, appearance models attracts attention, which is important for those who do not want to hide with vaping from fellow vapers.
Homemade box mod is assembled according to the following steps:
- First, accompanying materials are prepared. A part of the textolite is sawn off, in which a hole is drilled.
- Next, the connector and the textolite base are connected. This is done carefully with a soldering iron. It is important that the connector fits snugly on the textolite plate exactly in the hole.
- The soldered connector is fixed on the case. Hot glue will help to assemble the box: the composition will fix the textolite on the plastic in a matter of seconds. For this, almost a couple of drops of the substance is enough.
- The most difficult stage is the installation of the button. It is better to practice beforehand and choose a comfortable hand position for pressing.
- The hardest part is fixing the transistor. Assemble the element and solder it to the textolite base with the attached connector.
Testing and validation
Test drive is a painstaking process if you are going to get a quality vape. It is not always possible to solder parts the first time or start the current supply.
The body of the box mod is not glued. It is wise to make some mini bolt holes. This will help to carry out the service without damaging external parts.
It remains only to insert the batteries, connect the atomizer, pour e-liquid and start vaping.
The advantage of PowerBank is that the product comes with a USB connector for charging batteries, which does not have to be assembled from scratch. This reduces the cost of purchasing components and the complex installation of the port. By the way, the factory batteries themselves are ideal for preparing a powerful box mod.
What problems might arise?
 It is easy to make a mistake when assembling a vape. The most common problem is a poorly charged battery. This is due to natural battery wear, poorly soldered or deformed wires, or a damaged USB port.
Batteries from a laptop that have been actively used for 5-7 years are unlikely to give a good charge. It must be understood that even one spiral consumes a large amount of energy. Chargers from the new PowerBank are a guarantee of long autonomous soaring.
If a wooden mod is being made with a new USB board, the quality of the soldering of the connections is carefully checked before starting. During the soldering process, it is easy to critically damage the component. It will take 2-4 hours or more to charge the PowerBanl, depending on the modification.
Why is a homemade box mod better than store-bought?
 The disadvantage of box mods made at home is frequent breakdowns. Without professional skills, not everyone succeeds in soldering and connecting parts with high quality. However, here is the advantage: it is easier and cheaper to repair such mods.
If you are constantly looking for the perfect box, get lost among the inexhaustible stream of new products, or even find yourself at a dead end - perhaps it's time to turn on your imagination and try to make a box mod with your own hands? There is nothing complicated in this matter, and our article may just come in handy for you.
Necessary materials for work
Of course, first of all, you need to prepare everything you need for work, namely consumables. We will make a box mod for two 18650 batteries with a transistor.
There are many different schemes on the Internet, so you will not have problems with their searches. So what you need:
- Connector 510 (there are two types of connectors that differ in diameter sizes);
- Button. It is advisable not to neglect the quality of this part and take into account the power of your mod. Buttons can be plastic and metal of various colors - it's a matter of taste;
- Frame for batteries. The simplest and necessary detail;
- Box. Without it, you will not assemble a homemade box mod. Again, a lot of variations with material and colors.
- Wires for connecting parts of the device - select their thickness individually for your box mod (as an example, you can take a single-core copper wire 1 mm thick);
- Mosfet transistor (not a problem to find on any radio market, or you can take it from a used motherboard). Instead, you can take transistors K 3918, IRLB3036PbF, IRF3107, IRl3803, IRF1404;
- Foil textolite;
- hot glue;
- 18650 batteries (it is not necessary to take new ones - you can take it from a netbook, for example)
- Soldering iron.
The rest is up to your imagination and the ability to bring it to life. Next, we will tell you how to make a box mod using a Power Bank battery pack (made in China).
Making a box mod - one of the ways
So, why exactly Power Bank? It is convenient in that its body contains the necessary space for the relevant parts.
If you have all the materials, you can get to work:
- Saw off a small rectangular piece of PCB, drill a hole in it.
- Take a connector (it can be from an old electronic cigarette that you no longer use) and solder it into the textolite at the hole.
- Put the resulting part on hot glue and fix it on the box mod body.
- A homemade box mod, like any other, must have a button - install it on the case as well.
- Solder the transistor to the textolite with the connector.
In fact, the do-it-yourself battery mod is almost ready - it remains only to assemble the case, insert the batteries and check the device in action.

The box mod fits comfortably in your hand and, thanks to the mini-USB connector, allows you to charge the batteries without removing them from the case. Agree, it turned out to be a very convenient and practical thing with a minimum cost. And the manufacturing process itself is so simple that even a beginner can handle it without any problems!
Mankind has not yet come up with a way to get rid of nicotine addiction, while not exposing your body to torment. There is a sparing option for abandoning conventional cigarettes - use an electronic analogue.
But their prices are quite high. Therefore, "craftsmen" continue to look for ways to make electronic cigarettes with their own hands.
If it came to your mind to make a smoking device on your own, then you should consider the simplest and most common option - from a cardboard tube.
The steps in this case are:
- Stock up on batteries and wire. For a cigarette, either 3 "D" or 4 "C" is best, it depends on the preferences of the person. Batteries are very important to connect correctly and in series. This can be done with wire, which should be 3 centimeters longer than the total length of the batteries.
- Prepare the wire. To do this, remove the insulating coating from it and align it.
- Make a contact spiral. Using a wire 5-8 centimeters long, make a spiral, the clip of which (of the "crocodile" type) is installed from the opposite end of the wire. The spiral must be flat.
- Connect spiral. To do this, its end must be connected to the minuses of the battery, wrapped with electrical tape.
- Build a body. We need a cardboard tube cut along the entire length, fitted to the size of the batteries. It should allow you to insert batteries without effort, but also not leave a lot of extra space.
- Insert the batteries into the case. We insert a battery structure into the tube, the minus should be located at the bent end. Place the wire in such a way that the clip protrudes from the cardboard device.
- Make a cartridge. This step requires great care and time. The plug can be made with a screw, electrical tape and metal. To do this, wrap the screw with insulating tape, and cut out the shape of the letter “T” from the metal. Bend it around the plug.
- Assembling a cigarette. Connect the clip to the outer edges of the cartridge outlet.

It starts to act if the central output is connected to the plus side. If the cigarette does not work, make sure that the contacts do not touch each other - perhaps this is the reason.
Electronic cigarette from the sleeve
For such a cigarette, two types of sleeves are used - brass and plastic. Start work from the second.
For this:
- Boil the plastic sleeve for twenty minutes, then remove the part from the "skirt". Drill two holes with a diameter of nine millimeters for a 510 connector in the skirt of the case. Place them at the end and side (for the button).
- The button is attached inside with a soldering iron. Insert the connector into the end.
- The next step is to install a transistor, which is needed to protect the button from the strong effects of the batteries. In order to reduce the size of the transistor, you need to grind off the mounting plate to the radiator. Solder a resistor with a resistance of eleven kOhm (a little more is possible, but this one is the most optimal). Wrap with electrical tape and insert into the sleeve.
- The brass sleeve in this cigarette will play the role of a “plus”, a “minus” contact must be attached to it. To assemble it, attach a circle of thick rubber to the wire that comes from the transistor, and then solder the wire with a contact spring attached to a plastic mug. After these steps, you need to insert the 18650 battery, it should stand minus to the top.
- Assembly does not require much effort and fasteners, since the part with the button is easily put on the brass structure.

It remains only to polish, and you can start smoking.
Is it worth risking your health?
There are times when amateur performance directly leads to a hospital bed. And there are a lot of them.
Therefore, those who want to make a cigarette themselves must be very careful and have experience in assembling electronic devices.
Improper assembly and operation threatens with burns to the face, hands, and respiratory tract. To reduce the risk of burns, cigarette liquid should be bought and not made on your own.
Among other things, and inflict grievous bodily harm.

Summing up
So, if you have not given up the idea of making a vape device yourself, follow these tips:
- All materials for the device must be carefully selected.
- Liquid is better to use purchased.
- Pay special attention to assembly.
Our opinion is that it is better to spend money on a branded vape once than to spend money on treatment for the consequences of amateur performance for a long time.