In this article, I want to tell you about several ways to change the case of characters in Excel from upper to lower or how to capitalize each word. You will learn how to deal with such tasks with the help of functions CAPITAL and LOWERLINE, using VBA macros, and also using Microsoft Word.
Excel functions to change text case
Microsoft Excel has three great features that you can use to change the case of text. This UPPER(UPPER), LOWER(LOWER) and PROPER(PROPNACH).
- Function UPPER(UPPER) Converts all lowercase characters to uppercase.
- Function LOWER(LOWER) makes all uppercase letters lowercase.
- Function PROPER(PROPER) capitalizes the first letter of each word and lowercases the rest.
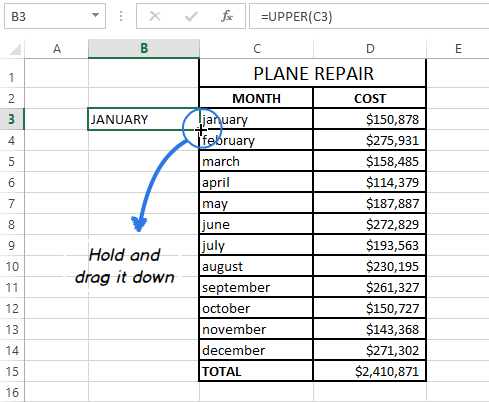
All three of these functions work in the same way, so I'll show you how one of them works. Let's take the function as an example UPPER(UPPER):
Entering a formula in Excel
- Insert a new (auxiliary) column next to the one containing the text you want to convert.
Comment: This step is optional. If the table is not large, you can simply use any adjacent empty column.
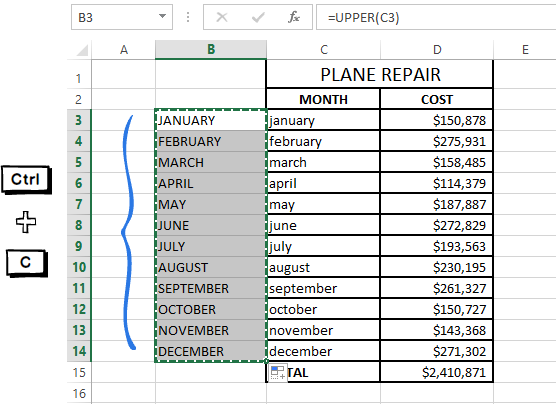
Copy the formula down the column
Now you need to copy the formula to the rest of the auxiliary column cells:
Comment: If you need to completely fill a new column (to the full height of the table), then you can skip steps 5-7 and just double-click on the autofill marker.
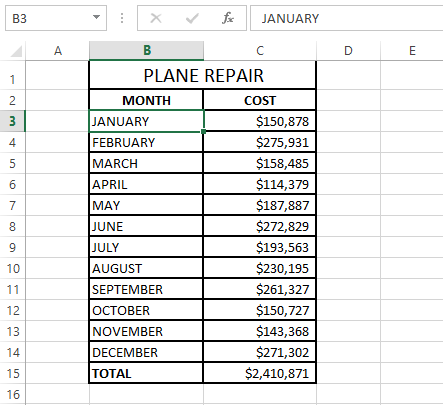
Removing an auxiliary column
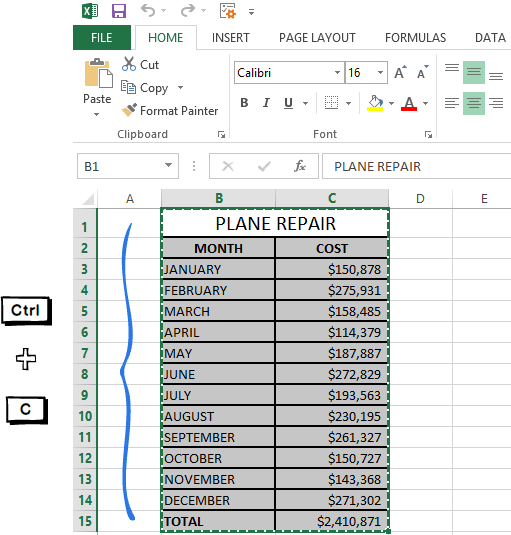
So, you have two columns with the same text data, differing only in case. I assume that you want to leave the column with only the desired option. Let's copy the values from the helper column and get rid of it.
In theory, this may seem too complicated. Relax and try all these steps on your own. You will see that changing case with Excel functions is not difficult at all.
Change the case of text in Excel using Microsoft Word
If you don't want to mess around with formulas in Excel, you can change case in Word. Here's how this method works:
Comment: In addition, you can press the combination Shift+F3 until the desired style is set. With these keys, you can select only upper and lower case, as well as case as in sentences.
Now you have a table in Word with the text case changed. Just copy it and paste it in its original place in Excel.
Change text case with VBA macro
I will not digress from the topic and tell you how to insert and run VBA code in Excel, as this is wonderfully described on our site. I'll just show macros that you can copy and paste into your book.
- If you want to convert text to uppercase, use the following VBA macro:
Sub Uppercase() For Each Cell In Selection If Not Cell.HasFormula Then Cell.Value = UCase(Cell.Value) End If Next Cell End Sub
- To apply lowercase to your data, use the code shown below:
Sub Lowercase() For Each Cell In Selection If Not Cell.HasFormula Then Cell.Value = LCase(Cell.Value) End If Next Cell End Sub
- Here is a macro that will make all words in the text start with a capital letter:
Sub Propercase() For Each Cell In Selection If Not Cell.HasFormula Then Cell.Value = _ Application _ .WorksheetFunction _ .Proper(Cell.Value) End If Next Cell End Sub
I hope that now that you know a couple of great tricks for changing case in Excel, this task will not cause you any difficulties. Excel functions, Microsoft Word, VBA macros are always at your service. There is very little left for you to do - decide which of these tools you like best.
The document should look beautiful, be pleasant to look at, all tables should be tidy, the most important thoughts are highlighted, so that there is nothing superfluous on the page and at the same time there are no unnecessarily empty spaces. The ideal is not achievable, but there are a number of tricks that make it easier to change the document so that by trial and error, at least a little, but get closer to the cherished perfection.
An important role in the perception of the text is played by the effects of fonts. Let's consider some of them in more detail.
To underline a word, you need to select it, and then simultaneously press the key combination Ctrl + U. This will underline both all characters of the selected text and the spaces between them. To underline only words, use Ctrl+Shift+U. To select a block of text in italics, you can use the combination Ctrl + I. If, to increase visibility, it was decided to highlight some phrases in bold, then for this there is a convenient alternative to the mouse - Ctrl + B.
It is often necessary that the phrase be typed in capital letters. The easiest way to do this is by immediately typing in upper case. However, it is not always possible to do everything and always do it right, so a special command was developed to translate the selected text fragment into upper or lower case - Shift + F3.
All of the key combinations described above work as toggles. This means that in order to return to the previous text input mode, you must repeatedly press the same key combination that changed the standard mode. For example, the Ctrl+U command will set the font attribute responsible for the underscore. To remove this attribute and return to the normal style, press Ctrl+U again.
Notes and footnotes are an integral part of any creative work. Of course, you can use the menu item of the same name to insert a footnote, but it's much easier to do this by pressing Ctrl+Alt+F.
To insert a page break, it is convenient to use Ctrl + Enter.
Some things can only be done by using the mouse and keyboard at the same time. The most common example is smooth resizing of table cells. This is achieved by resizing the cell with the mouse while pressing the Alt key.
It's no secret that text looks much better on a computer screen or in print when it's justified. This alignment is achieved by increasing the length of the space between words. However, this behavior is not always justified. For example, you need to type a sentence that contains a surname and initials. If you put a simple space between them, then when aligning, the initials can be located far from the surname, which is not true. To eliminate this effect, there is a special character - a fixed space. The easiest way to insert it is by pressing Ctrl+Shift+Space at the same time.
So, let's sum up.
- to change the font effect, use the commands: Ctrl + I, Ctrl + B, Ctrl + U, Ctrl + Shift + W;
- to convert letters to upper case: Shift+F3;
- to set a fixed space: Ctrl+Shift+Space;
- to break pages: Ctrl+Enter.
It is impossible to know all the keyboard shortcuts for quick menu access, to simplify basic text editing operations. But the main thing is different. The main thing is to learn how to use the set of commands that are used more often than others. Each person will have a unique set. Of course, there will be similarities, but in general, everyone will plan work with documents differently. By trial and error, you can find how you can quickly do the same type of operation in order to save time and effort.
Comments
2010-07-14 14:55:45 - Andryushchenko O.N.I knew something, and yet it is very pleasant to read systematized information (I did not know about footnotes). THANKS!
2010-09-18 22:12:16 - Boyko Anna V.thank you so much for Shift+F3 !!!
2010-09-28 20:28:39 - Zhumaseitova S.D.thanks for shift+F3, ctrl+alt+F
2010-10-29 14:54:49 - Yakubitsky O.Yu.Thanks for the information. I used (with a link to the resource) on my website (on the page http://www.yak15.narod.ru/freim6.html). Note: "To underline only words, use Ctrl+Shift+U". But in "So, let's summarize" - correctly (Ctrl + Shift + W). Regards, Oleg.
2011-01-30 14:10:43 - Galagaev I.I.Thanks for Shift+F3 and Ctrl+Shift+W!
2011-06-11 22:17:03 - AlexeyThanks, it helped. Was looking for a fixed space. Here's another if anyone needs Ctrl + = - subscript - often have to deal with
2011-08-11 17:04:58 - Sergeyshift+Ctrl+= - superscript font
2012-04-26 10:26:40 - SanychNon-breaking hyphen CTRL+SHIFT+HYPHEN. Text with double underlining - Ctrl+Shift+D (Ctrl+Shift+v) Text typed in small caps (reduced capital letters) - Ctrl+Shift+K (Ctrl+Shift+L) Paragraph alignment: left - Ctrl+q, right - Ctrl+r, centered - Ctrl+e, formatted - Ctrl+j Bulleted list Ctrl+Shift+L Shift paragraph to the right Ctrl+M Increase left indent (except first line) - Ctrl+T
2012-11-24 20:48:57 - Yagodin Sergey MikhailovichThere is another function. At the top of the Word there is a special menu where you can add any commands for quick access to them. You can run them very easily by holding ALT + "1 or 2 or 3..." depending on the order in which you have the commands. The order can be changed. I use the FORMAT CLEAR command so VERY much. I have it on "ALT+2". A very useful feature!
2015-08-24 20:56:29.523349 - VictorThe other day I had to use Word and I realized that I can’t do without knowledge of at least basic hotkey combinations.
2015-12-06 17:22:47.856014 - Semyon PetrovichUse macros guys, the thing is indispensable.
To change the case of characters in the typed text, select a text fragment and select the Case command from the Format menu. In the dialog box that appears, select one of the following radio buttons:
As in the proposals- increase the first letter of the first word of the sentence;
all lower case– set all letters of the fragment to lower case;
ALL CAPS– set all letters of the fragment to upper case;
Start with uppercase- set the first letters of each word to upper case;
CHANGE REGISTER– replace uppercase letters with lowercase letters and vice versa.
32. Microsoft Word. "Using Hyperlinks in Documents"
A hyperlink is a highlighted area of a document that allows you to navigate to another document containing related information. The simplest example is an encyclopedia, in which each article contains links to other articles.
Type texts, saving them in separate files. The names of the files correspond to the names of the texts.
We need to link these texts into hypertext. To do this, highlight the "title" in the first text. From the Insert menu, choose Hyperlink. The Add Hyperlink dialog box will appear on the screen, in which you need to find the required file.
Click the OK button and the "title" will change color and become underlined.
Repeat these steps for others...
After all the names are highlighted and underlined, place the cursor on any of them. If the cursor changes its shape and looks like right hand with an extended index finger, then everything is done correctly. Hold the cursor on the word "title", a sign with full name file associated with this word. Clicking on this word will load the Title.doc file.
The Web site toolbar will appear in the downloaded file. Go back to the original text by clicking the back arrow button. The word "title" has changed color. This means that this link has been viewed.
Follow steps 4-5 with other words.
Click on the hyperlink with the right mouse button and select the Hyperlink command from the context menu, and select the Edit Hyperlink command from the pop-up menu. The Edit Hyperlink dialog box will appear on the screen. To change, click the Delete Link button.
33. Microsoft Word. "Pagination. Printing a finished document»
If you have multiple pages, you can create their numbering. To do this, in the Insert menu, select Page Numbers, then in the window specify the location of the number (bottom or top) and alignment (left, right, center, inside, outside). The last two alignments (inside and outside) are used when mirror margins are set for the page. You can also choose to display or not the number on the first page. When you click the Format button, another window appears where you can set the number format (in Arabic numerals, letters or Latin numerals) and specify which digit the numbering will start with. The numbering is displayed in the non-printing area of the page, so you don't have to worry about accidental deletion or misalignment.
Renumbering
To change the font and other numbering options, triple-click on the page number or select Header and Footer from the View menu. After this action, the number will be in a frame that can be stretched, moved. The number inside the frame can be selected as text and set the font, its color, size, style, and other parameters.
Insert Page Number - performs automatic page numbering. In this case, it is possible to select the numbering format.
Date and time - inserts the current date and time, and each time you open the document, these values will change accordingly.
To remove pagination, select the number as described earlier and press the Delete key. The numbering will be removed on all pages of the same section.
Printing a finished document
The finished document can be printed on the printer. But before that, it is desirable to see how it will look in print. You can switch to this mode using the menu File - Preview or press the button
Preview- This is a view of the file on the screen in the form in which it will be printed. When you turn on the view, a toolbar appears:
One page- display of the current page.
Multiple pages- Show multiple pages. To specify the quantity, it is necessary to select the required number of pages in the grid.
Page Fitting- reducing the document by one page to prevent a small piece of text from falling onto the last page.
After previewing, you can make adjustments to the text if necessary. The next step is printing.
Printer selection
In the Print window, you need to configure the following settings.
If it is possible to select a printer, then in the Printer area, in the Name drop-down list, select the type of printer used. Specify the print range in the Pages area. The pages to be printed can be specified in several ways:
All - prints all pages of the document.
Current - prints the page where the cursor is located.
Numbers - print the specified pages. Can be listed separated by commas, such as 1, 6, 8, 10, or a range of pages, such as 12 - 22, 25 - 27
Number of copies
Specify additional options
Printing on even/odd pages is useful when pages and text are on both sides of a sheet. In the Scale area of the Pages per Sheet list: You can specify the number of pages printed on each sheet of paper. In the list by page size, you can change the paper size.
A service key labeled CapsLock is intended. This is the third button from the bottom in the leftmost row of keys - press it before entering text and the case will change. If at the same time the indicator with the same designation (CapsLock) lights up, then you switched the keyboard to upper case, and if it goes out, to lower case.
Text already typed in any editor can also be translated into another case. For example, in the word processor Microsoft Office Word 2007 or 2010, to do this, start by selecting the fragment that needs to be transformed. Then open the drop-down list "Register" in the menu - this is an icon with the image of the capital and lowercase letters "Aa" in the "Font" group of commands on the "Home" tab. From the five options listed in the list, select the desired change method register. In addition to the command to replace it with the opposite one - “Change case” - you can capitalize the first letters of each word, convert all characters to uppercase or lower case, format the text in accordance with the rules for formatting sentences (the first letter is capital, the rest are lowercase).
You can change the case of text in an HTML document using the style description language - CSS, for this purpose the text-transform property is intended in it. Set this property to uppercase to uppercase it, lowercase to lowercase, and capitalize to capitalize every word. For example, a div block containing text that needs to be converted to uppercase must begin with a tag with the following style attribute:
Many programming languages also have built-in functions for changing register text. For example, in PHP, use the strtoupper function to convert characters to uppercase, strtolower to lowercase, ucwords to capitalize, and ucfirst to capitalize only the first letter of a text fragment, and capitalize the rest.
The Windows registry is a hierarchical database that contains system information. An incompetent change of its parameters can lead to various unpleasant consequences, up to the need to reinstall the system. However, sometimes you have to edit the registry manually.
Instruction
Select "Start" and "Run" in sequence. In the "Open" window, type regedit, after which the "Registry Editor" window will open. In the left part of the window you will see the registry keys arranged in the form of folders, in the right part - the values of the key settings. To change the value of a parameter, double-click on its name and enter the new data in the "Value" box.
Before changing the contents of the registry, it is better to create a backup copy in case your actions fail. From the "File" menu, select the "Export" command. Enter the appropriate text in the "File name" field. From the File Type list, select the desired type. To save a partition hive, first open desired section register. In the Files of type list, select Registry hive files.
If the changes you made to the registry were unsuccessful, you can revert it original version. Use the Import command from the File menu. To import the entire registry, find the desired file, select it and click "Open". To restore the value of an individual registry key hive, open this key. In the File name field, enter the path to the saved file. From the File Type list, select Registry Hive Files and click Open. If you have saved the settings as a registry file with a .reg extension, double-clicking on them will make the contents