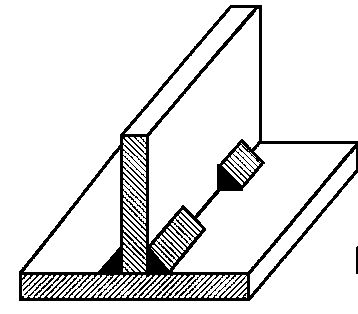
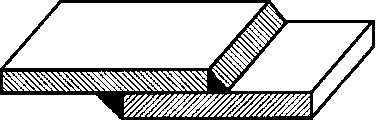
The main types of welded joints are butt, corner, tee and overlap:
- butt (C)- the parts are joined end-to-end along the end surfaces (Fig. 1a);
- corner (U) - the parts are located at an angle and are connected along the edges outside the corner (Fig. 1b);
- tavrovye (T)- the details form the shape of the letter T (Fig. 1c);
- overlap (N)- the parts partially overlap each other (Fig. 1d).
The seams of these joints are designated by a letter with an index corresponding to a certain character of the seam execution (Table 3). Seams of welded joints are made without bevel of edges, with bevel of one edge, with bevel of two edges and in butt joints with flanging of two edges.

a B C D)
Figure 1 - The main types of welded joints:
a) butt; b) angular; c) T-shaped; d) overlap
3 Symbols and symbols of welds
For each welding method, standards have been developed, which indicate the structural elements of the seams, their conventional images and designations.
By the nature of the execution, the seams can be point, intermittent, continuous, i.e. solid. An interrupted seam is made either in a chain or staggered pattern.
Continuous visible seams of welded joints are depicted by a solid main line (Fig. 2a); and the invisible ones are dashed (Fig. 2b). In this case, the side from which welding is performed is taken for the front side of the one-sided seam of the welded joint. For the front side of a double-sided seam of a welded joint with asymmetrically prepared edges, take the one with which the main seam is welded. Any side can be taken as the front side of a double-sided seam with symmetrically prepared edges.
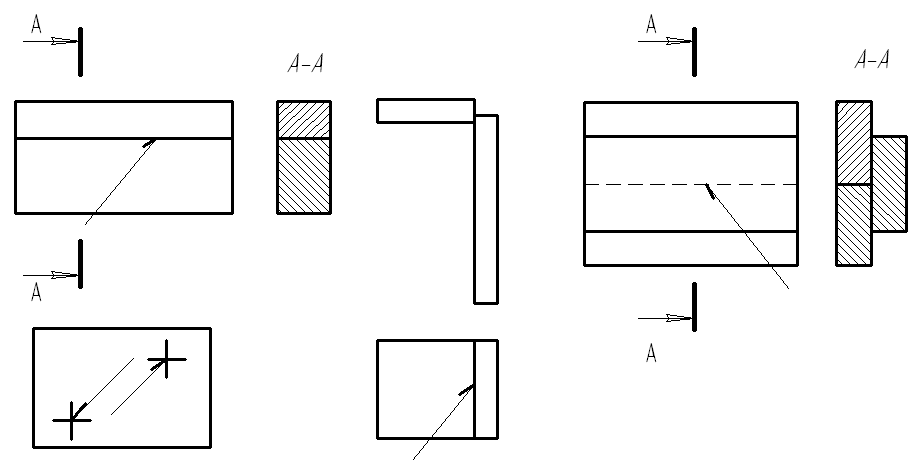
Figure 2 - Conditional images of seams:
a) visible; b) invisible
Visible single welded spots, regardless of the welding method, are conventionally represented by intersecting thin solid lines 5 ... 10 mm long (Fig. 2a). Invisible single points are not shown in drawings.
If there are several identical seams in the drawing, the symbols are applied to one image, and leader lines with shelves are drawn from the rest (Fig. 3a, b).
Identical seams are assigned one number, which is applied on the leader line with the shelf on which the seam designation is located, and the number of seams is indicated (Fig.3a).
For the rest of the seams, only the seam number is applied, respectively, above the shelf or under the shelf of the leader line, depending on the visibility of the weld (Fig. 3b).

Figure 3 - Conditional images in the presence of identical seams in the drawing:
a) one image; b) for identical images; c) simplified or all the seams in the drawing are the same.
If all the seams in the drawing are the same and are depicted on one side (front or back), they are not assigned a serial number, and the seams without designations are marked with leader lines, without shelves (Fig.3c).
A leader line for designating a weld is applied from the side of welding and preferably on that part image where the weld is drawn in full size.
In the drawing of a symmetrical product, it is allowed to mark the seams on only one part of the image.
The seam symbol is applied:
On the shelf of the leader line drawn from the image of the seam on the front side (Figure 3a);
Under the shelf of the leader line drawn from the image of the seam on the reverse side (Fig. 3b). In this case, it is preferable to draw the leader line from the image of the visible seam.
A leader line drawn from the image of a seam or a single weld point always ends with a one-sided arrow (Fig. 3). If the weld is invisible, then a one-sided arrow is drawn on top of the leader line, if the seam is invisible - from below (Fig. 3a, b).
The same requirements for all seams or a group of seams are given once in the technical requirements or the seam table (Fig. 4). In this case, only the serial number of the weld is indicated on the image.
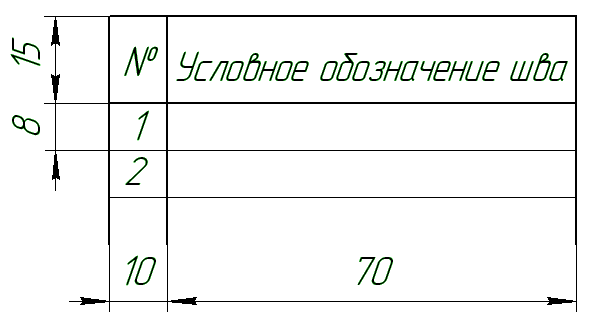
Figure 4 - Table of seams
The symbol for standard welded joints in accordance with GOST 2.312-72 is applied according to the scheme in accordance with Figure 5.

Figure 5 - Scheme of standard designation welds.
The symbol for the seams of welded joints through the "hyphen" signs includes:
1. Auxiliary signs of a seam along a closed line and an assembly seam (see Table 2).
2. Designation of the standard for types and structural elements of welded joints (for example, GOST 5264-80; see Table 1).
3. Alphanumeric designation of the weld according to the standard for types and structural elements of welded joints (for example, C2, see Table 3).
4. Conventional designation of the welding method according to the standard for types and structural elements of welded joints (for example, A, but it is possible not to indicate it).
Table 2 - Auxiliary signs to indicate welding seams
|
Sign meaning |
Application of a sign in the designation of a seam in a drawing |
|
|
The seam is intermittent or punctured with a chain arrangement. Line angle 60 The seam is intermittent or punctured with a staggered arrangement Closed line seam. Diameter of the sign - 3 ... 5mm Open line seam. The sign is used if the location of the seam is clear from the drawing. Perform the seam when installing the product, i.e. when installed according to the installation drawing at the place of its use Remove seam reinforcement Process weld beads and irregularities with a smooth transition to the base metal |
|

5. Sign of the leg of the weld (isosceles right triangle) and the size of the leg (thickness) of the seam, according to the standard, for the types and structural elements of welded joints (for example, 5, Table 3). The thickness of the seam should be in the range from 4 mm to 1.2 of the thickness of the elements to be joined or equal. The sign is executed with solid thin lines. The height of the sign must be the same as the height of the digits included in the seam designation.
6. For an interrupted seam - the size of the length of the section to be welded, the sign / or Z and the step size (for example, 5/40; 6 Z 70).
For a single spot weld, the size of the calculated spot diameter (for example, 6).
For a contact spot electric weld or an electric riveted seam - the size of the calculated diameter of a dot or electric rivets; sign / or Z and step size (for example, 5/60; 4 Z 80).
For a contact roller electric welding seam - the size of the estimated seam width (for example, Kr-5).
For an intermittent seam of contact roller electric welding - the size of the calculated seam width, the multiplication sign "", the length of the welded section, the sign / and the step size (for example, 5 10/60).
Any method of welding, be it gas, electric arc, cold, contact, etc., allows you to obtain welded joints of a certain type.
Note that the actual concept of a welded joint means a section of a metal product that has been connected by any welding method. The constituent elements of any welded joint - the seam itself obtained as a result of welding, the zone of the metal product that adjoins it and has undergone a structural change during welding, it is also called the heat-affected zone, as well as sections of the product are already near this zone.
Today, there are several types of welded joints, among them the butt welded joint.
Varieties of welded joints.
To begin with, let us indicate that it is necessary to distinguish between the concepts of a welded seam and a welded joint. As we noted above, the seam is only part of the connection. It is the area of the metal that has crystallized after welding.
Why is it important to separate these concepts? The fact is that a seam is a connecting part of metal parts, it has a certain geometric shape, its own properties of strength and continuity, etc. Whereas the properties of the welded joint are determined based on the properties of the seam and the adjacent zone.
Welded joints are classified depending on the shape of the mating of metal parts. So, the following types are usually used:
- butt welded joint;
- tavrovoe;
- angular;
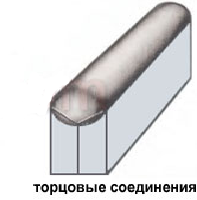
- end;
- overlapping.
Note that seams are also different. Welds are divided into butt and fillet in cross-sectional shape (transverse), and continuous and intermittent in longitudinal shape. Note that butt joints are usually observed in butt joints. But through fillet welds, the remaining types of connections are obtained.
Features and varieties of butt joints.
Basic distinctive feature butt welded joint is the arrangement of metal parts in space. In butt welding, parts of the metal product are on the same plane or surface. The welding itself is carried out at the ends, which are located adjacent to each other.
Butt joints can also be different types, which are determined by the shape of the edges to be welded. So, they are:
- straight lines, i.e. weldable edges do not have bevels;
- V-shaped - edges with corresponding bevels;
- X-shaped - the bevel of the edges is made in the form of the letter X;
- curved - the edges have bevels that resemble the Latin letter U in the joint.

The use of different types of beveled edges defines two more types of butt joints. Based on the location of the seam, there are:
- one-sided connections (the seam is made only on one side of the parts to be welded);
- double-sided (respectively, two seams are made: top and bottom).
Note that it is the butt joints that are used for the installation of critical, important structures. This is due to the fact that such joints have the highest mechanical properties, unlike others. On the other hand, the use of this type of welded joint is associated with the need to additionally prepare the edges of the metal product.
In addition to excellent mechanical properties, the butt connection has earned popularity due to the fact that it is quite economical and has high performance. This type of connection results in less metal consumption and less work time.
The use of different types of butt joints.
Each type of butt joint is characterized by certain properties and features that determine their application.
So, usually a one-sided butt joint, without preliminary beveling of the edges, is used for welding not thick sheets of metal (up to 4 millimeters).
The connection without bevel edges can also be double-sided. This type is used when working with parts whose thickness does not exceed 8 millimeters. Note that with a butt joint without beveling the edges, regardless of the location of the seams, a small gap is necessarily left between the edges of the product, which is about one or two millimeters.
Welders advise to resort to the bevels of the edges in cases where the parts to be welded have a thickness of 4-25 millimeters. In this case, a one-way connection can be used. And the bevels of the edges can be V-shaped or, less often, U-shaped. Note that whatever shape of the edges is chosen, it is necessary to blunt them somewhat.
If the metal product has a thickness of more than 12 millimeters and a decision is made to make a double-sided connection, then it is better to choose an X-shape for the edges. This type of edges can reduce the amount of metal required to fill the groove by almost half. Which, of course, will affect the economy and productivity of work.
Note that each type of butt joint, the shape of the edges, the location of the seams are selected based on the characteristics of the metal, the design itself and the desired result.
The work piece to be welded is placed on the welding table. The bare end of the electrode is clamped in the electrode holder. Excite welding arc touching the end of the electrode to the work piece. There are two ways to strike an arc:
Lower the electrode down until it touches the metal to be welded and quickly take it back to a distance equal to the length of the arc;
Run the end of the electrode over the surface of the product (like lighting a match).
The difficulty in striking the arc lies in the fact that if the end of the electrode is not quickly removed from the surface of the product, it can be welded or, as they say, "freeze", and if the end of the electrode is too abruptly removed, the arc can break off and go out.
Once the arc has been struck, the welder maintains a constant arc length by slowly lowering the electrode as it melts. Welding should be carried out with a short arc: its length should not exceed the diameter of the electrode.
When surfacing, the welder evenly moves the electrode along the seam, tilting it to the surface of the product at an angle of 70-80 °. The longitudinal movement speed must be sufficient to melt the base metal. When the electrode is moved quickly, the base metal does not melt, and when the electrode is moved slowly, the welding performance decreases, and the weld metal overheats.
Transverse vibrational movements of the electrode are imparted to obtain a weld of a certain width. These movements can be zigzag, crescent, figure eight, etc. If the longitudinal movement of the electrode is performed without transverse vibrations, then the width of the roller is 0.8 ... 1.5 d eh, but should be 2 ... 4.
When the arc breaks, it is ignited in front of the break, on the metal not yet welded, and then returned to the weld metal, ensuring the continuity of the bead. After the end of the surfacing of the entire bead, it is impossible to abruptly tear the electrode away from the part, since in this case a depression forms at the end of the bead - a crater, in which cracks may appear. It is necessary to carefully weld the crater by two-, three-fold shortening of the arc. The welding technique largely depends on the position of the seams in space. It is easiest to weld seams in the lower position, therefore, when welding, you should always install the product (part) in such a way that most of the seams are welded in the lower position.
When welding butt seams in the down position, the main difficulty lies in obtaining full penetration. There are two ways to ensure full penetration without the danger of metal glorification:
Root weld (i.e. welding the reverse side of the seam);
Welding lined.
The pads are remaining, which are welded to the base material during the welding process, and removable, which are removed after welding. The remaining pads are usually made of steel and the removable pads are made of copper.
Control questions : 1 Methods for striking the arc. 2 How long should the arc be? 3 What kind of movement is imparted to the electrode? 4 Where does the arc strike when it breaks? 5 How should the seam be finished? 6 How to ensure full penetration of butt welds?
3.7 Defects in welds
Seam shape defects are detected during external examination and measurements of seams using templates and measuring instruments. Such defects include: a) inconsistency of the actual dimensions of the seams specified by the drawing or standards; b) nodules: c) undercuts; d) non-welded craters, etc. Defects in the shape of the seams are eliminated by additional welding of sections of weakening of the seam (necks, incomplete seams) and machining of the thickenings, providing smooth transitions to adjacent sections of the seam and to the base metal.
Cracks are the most dangerous defects , which can occur both in the seam itself and in the near-seam zone. Eliminate cracks by welding with preliminary cutting of the defective spot to the entire depth of the crack.
Pores and shells if they are in a seam in large quantities, they reduce its strength and violate its density. If the number of pores exceeds the permissible norm, then the defective section of the seam is removed by mechanical treatment (drilling, cutting) and welded again.
Non-metallic inclusions affect the strength of the weld in the same way as the pores. Eliminate non-metallic inclusions as well as pores.
Lack of penetration there are two types: a) lack of fusion of the base metal with weld; b) not filling the entire section of the groove with molten metal (lack of penetration of the root of the weld). Defective areas of the seams are removed by mechanical processing (drilling, milling, etc.) and welded again.
Control questions : 1 What are the defects of welded seams? 2 How are they eliminated?